IDaaS Trial Identity Management Administrator View
This Steplist document describes how you can operate the Ubisecure IDaaS Trial Identity Management environment in Administrator view. Administrative users can invite and add new users, assign roles for them and manage their accounts. Users can access a self-service portal to manage their identity attributes and passwords.
Administrative user tasks
The possible tasks an administrative user can manage include the following:
- Access the Identity Management System.
- Invite a new user
- Register via email invitation
- Approve a new user
- Add a new user
- Modify user attributes
- Assign additional roles
- Remove a role
- Approve role requests
- Delete a user
- Reset a forgotten password
1. Access the Identity Management System.
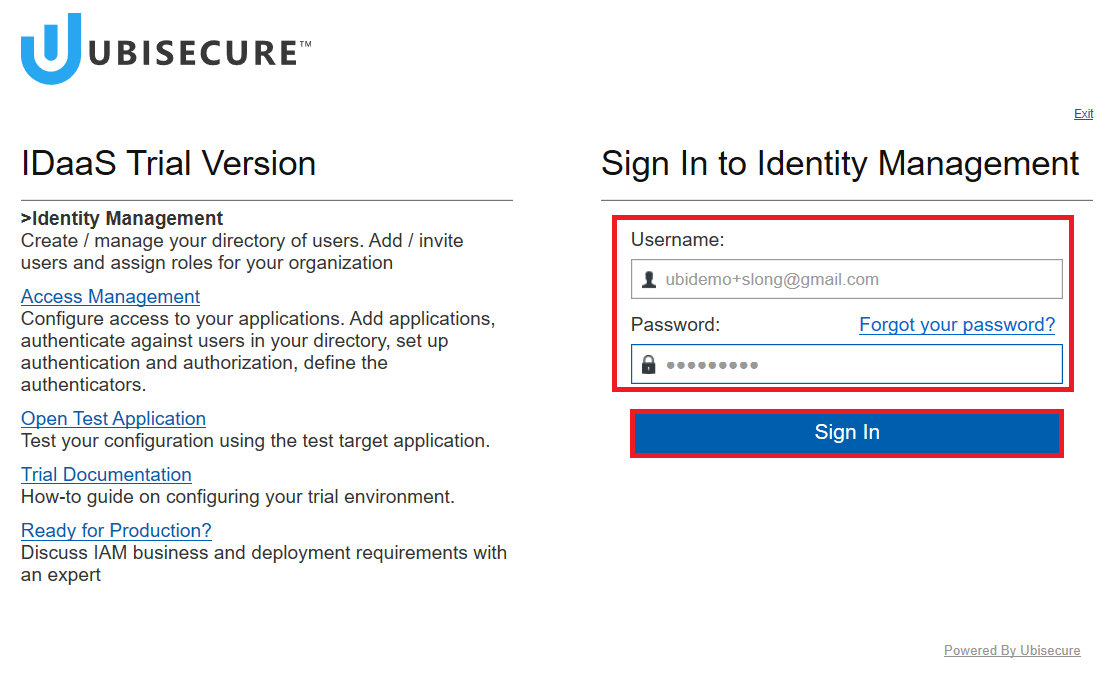
Step 1. Browse to the Identity Management administrative user login page
https://trial.idaas.ubisecure.com/eidm2/wf/admin
Step 2. Sign in to the Identity Management
Type your email address and password and click the Sign In button.
2. Invite a new user
Next, we will see how to add a new user by email invitation. Very often this is a preferred way to add users. One benefit is that the user can assign the password during the registration process. Note, in this environment, new user registration has to be approved by the main user of the organisation. A user can sign in after the approval.
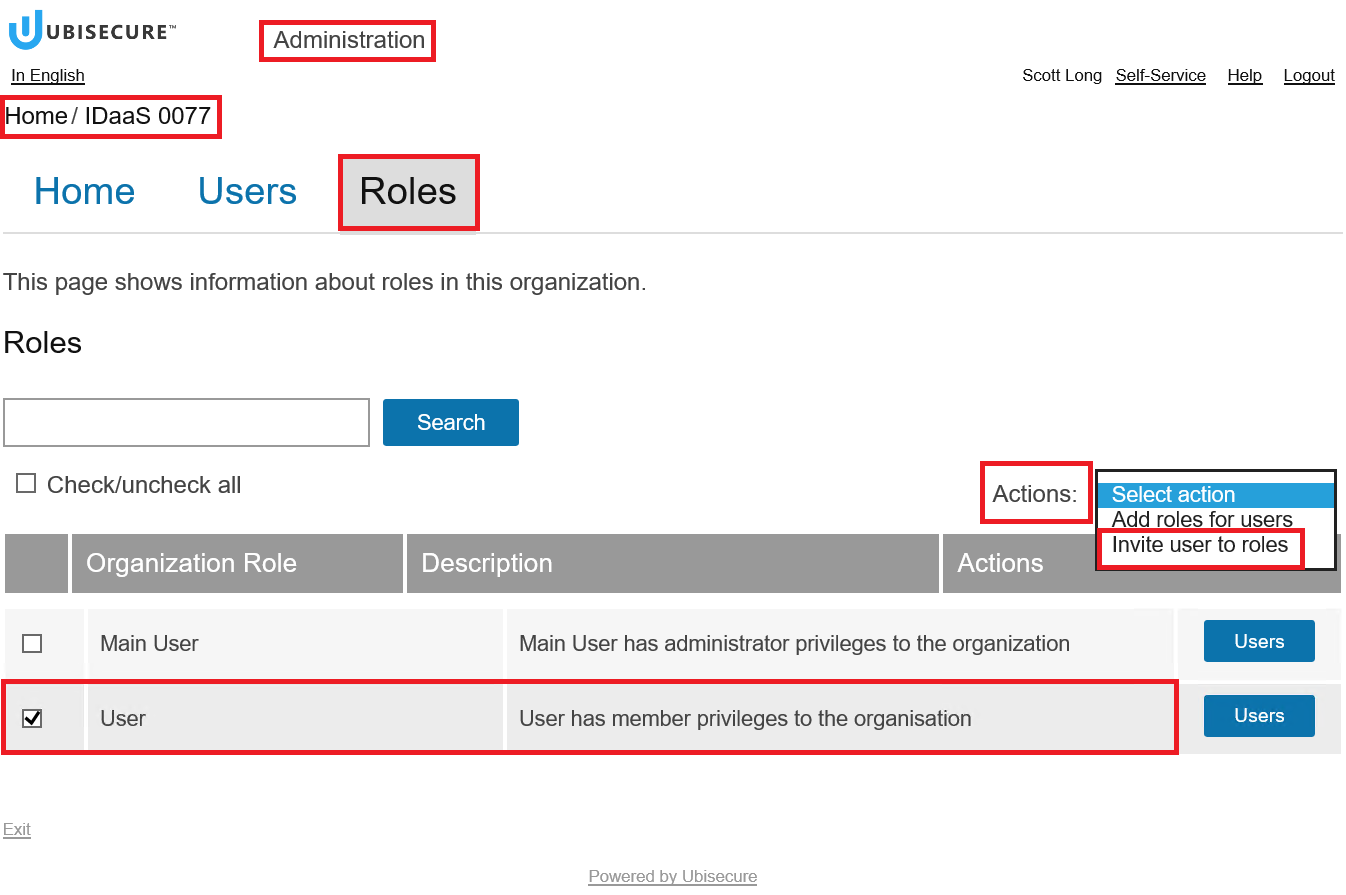
Step 1. Choose a role for the new user
Make sure that you are in the Administration view of your home organisation. Click the Roles tab - tick the role for the new user - in the Actions list choose the option "Invite user to roles".
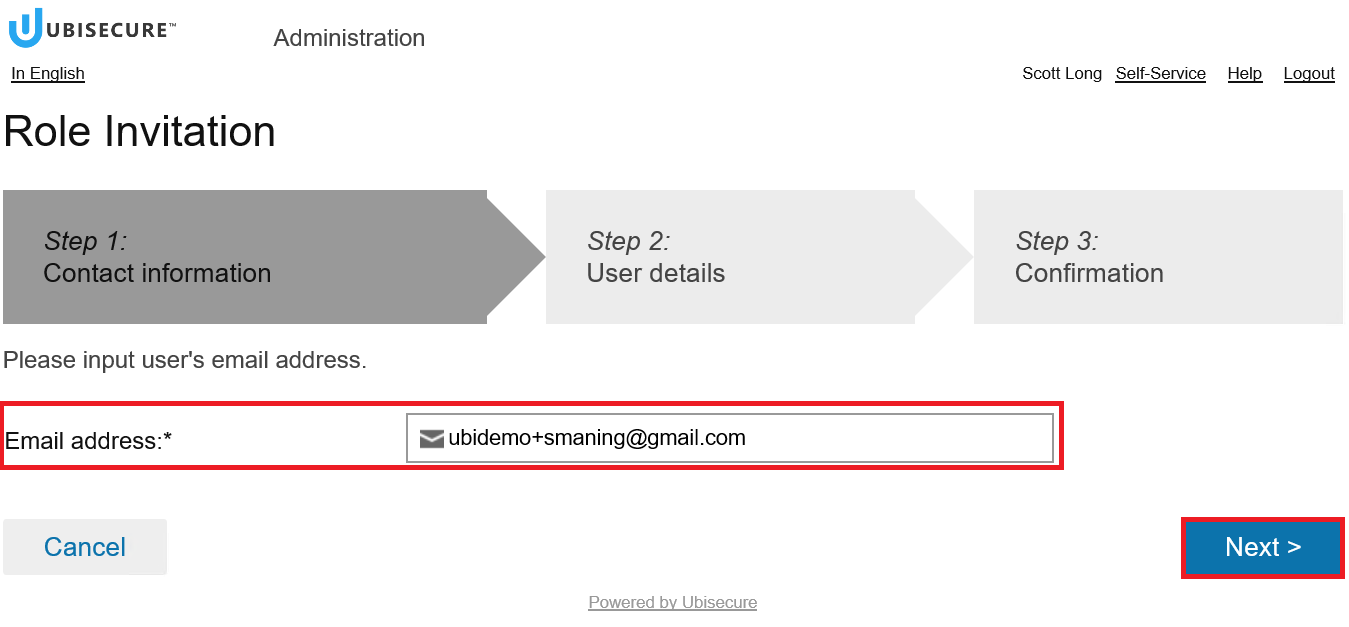
Step 2. Define the contact information of the new user
Write the email address of the new user inside the field and click the Next button.
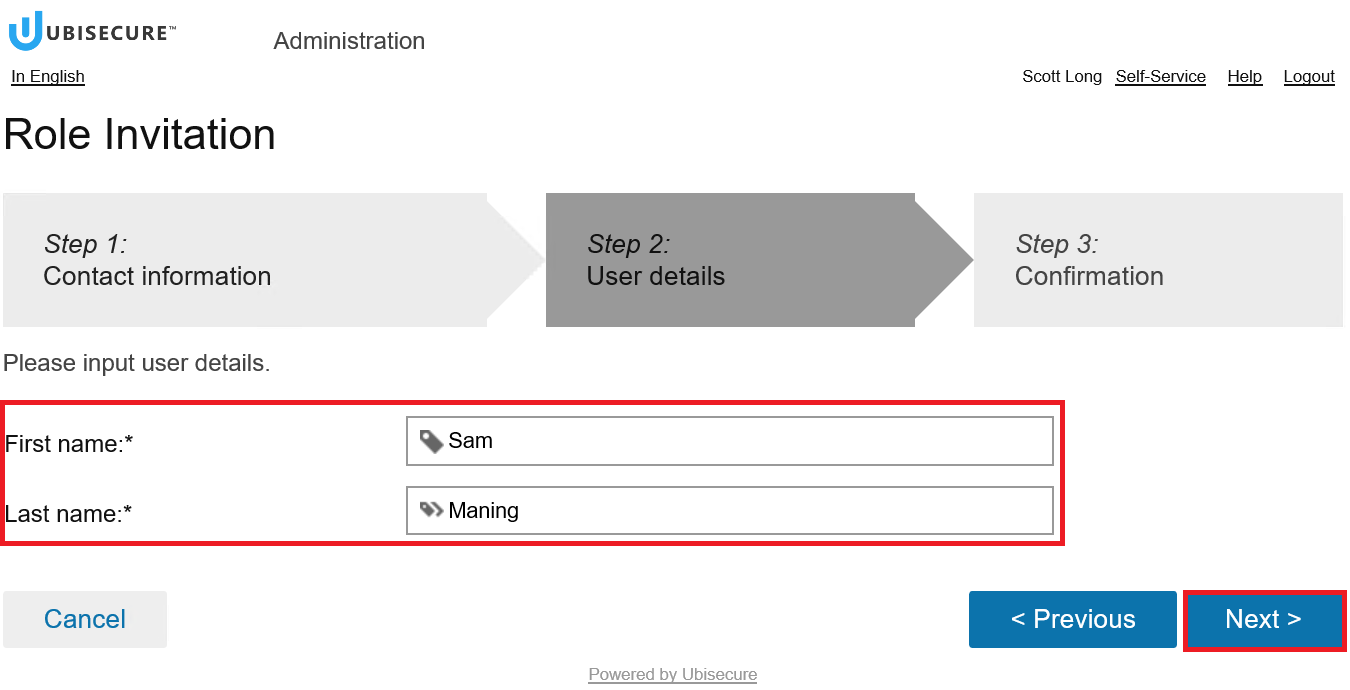
Step 3. Define the name of the new user
Write the first name and last name of the new user inside the fields and click the Next button.
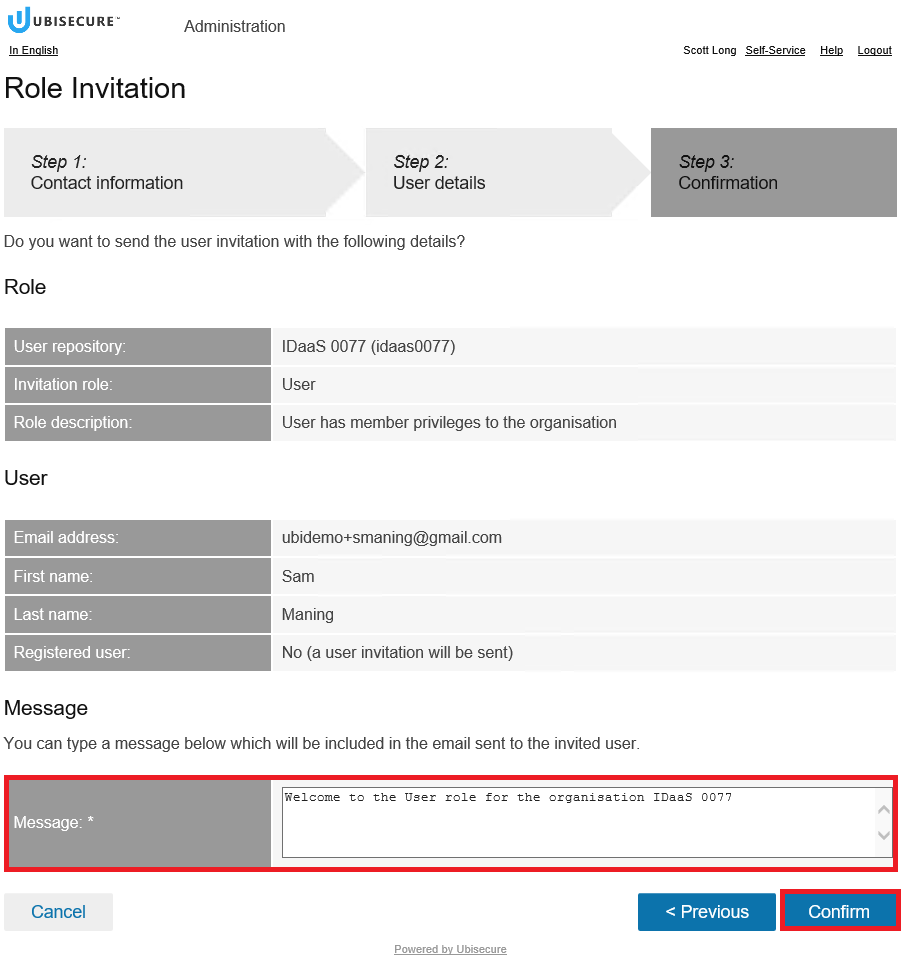
Step 4. Verify the user information and write a welcome text
Verify that the role and user information are correct. The system will generate an invitation email automatically, but you can add a welcome message to it. Click the Confirm button to finalise the procedure.
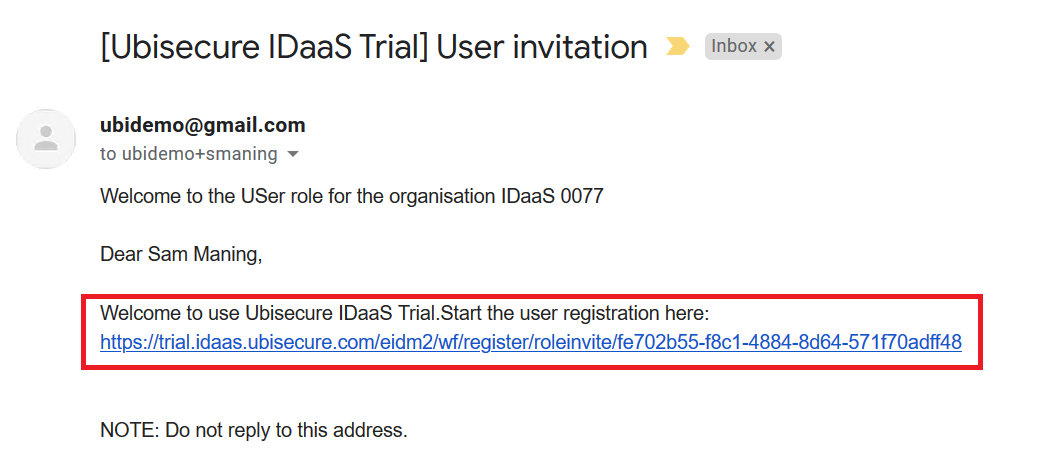
The new user will receive an invitation email and is added to the list of users after his registration.
2a. Registration via email invitation
The main user can send email invitations to other users (See the instructions above). After receiving an invitation message a user can click a link included and register an account. This allows the user to access the Identity Management System self-service portal and possible target services integrated to Ubisecure Access Management.
Step 1.Open the received invitation email
Open your email Application and read the invitation letter sent by the main user. Click the link in the email to register.
Step 2. Fill in the registration form
Verify the pre-filled information and fill in the missing parts. Tick the "accept the terms of use" box and click the Next button.

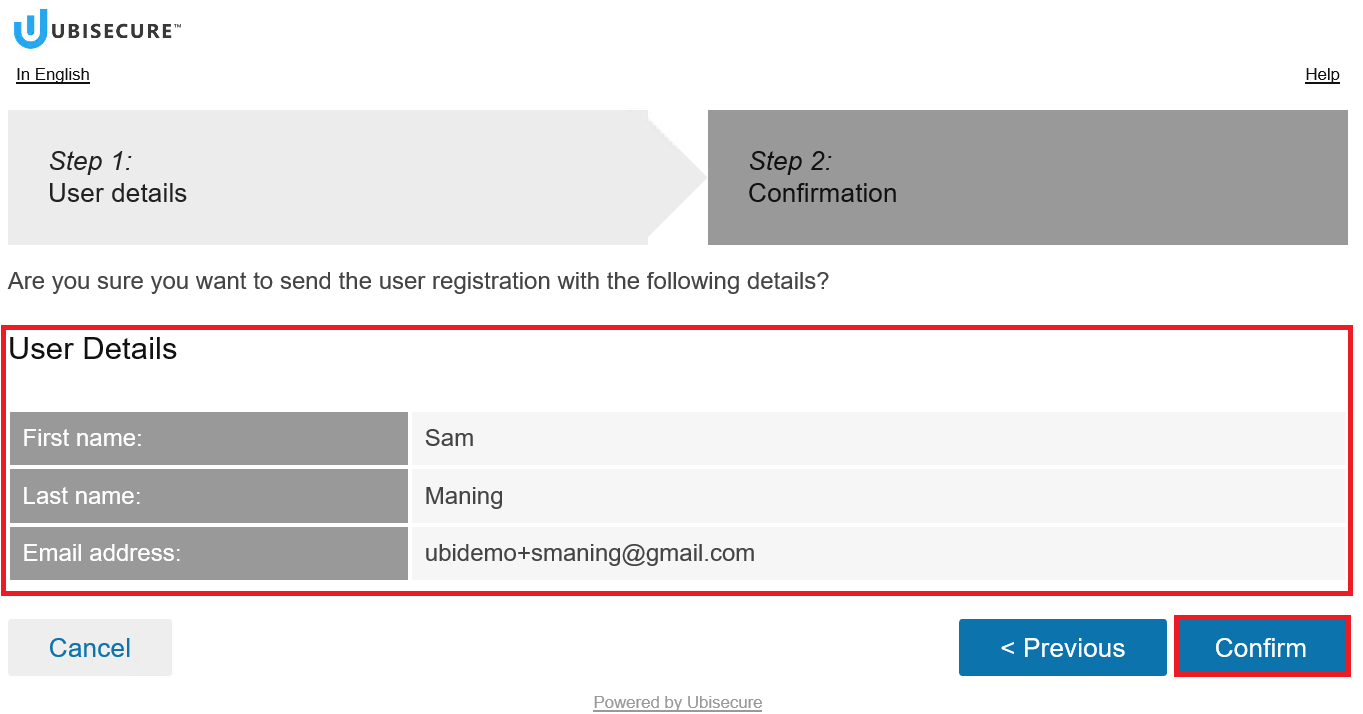
Step 3. Verify the user details
Verify that everything is correct and click the Confirm button.
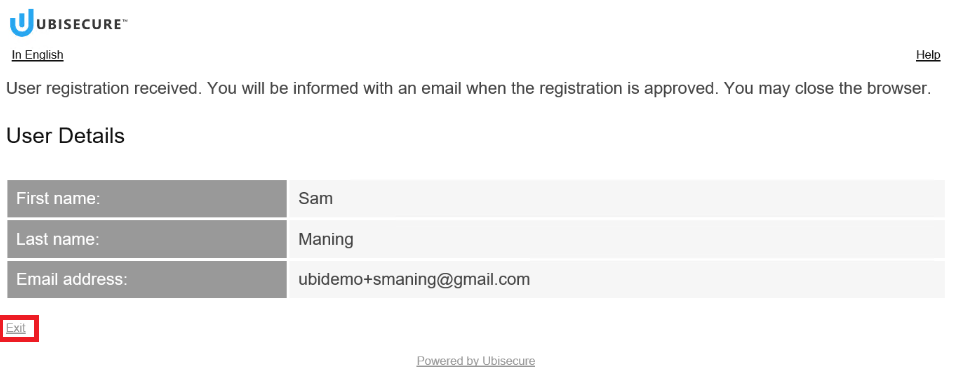
Step 4. Finalise the procedure
You can view the user details one more time and click the Exit link to return to the Identity Management Sign In page.
NOTE! Ubisecure IDaaS Trial requires an administrator approval before a new user can access the system.
2b. Administrator approval for a new user
After the registration, a user has to be approved by the main user of the organisation.
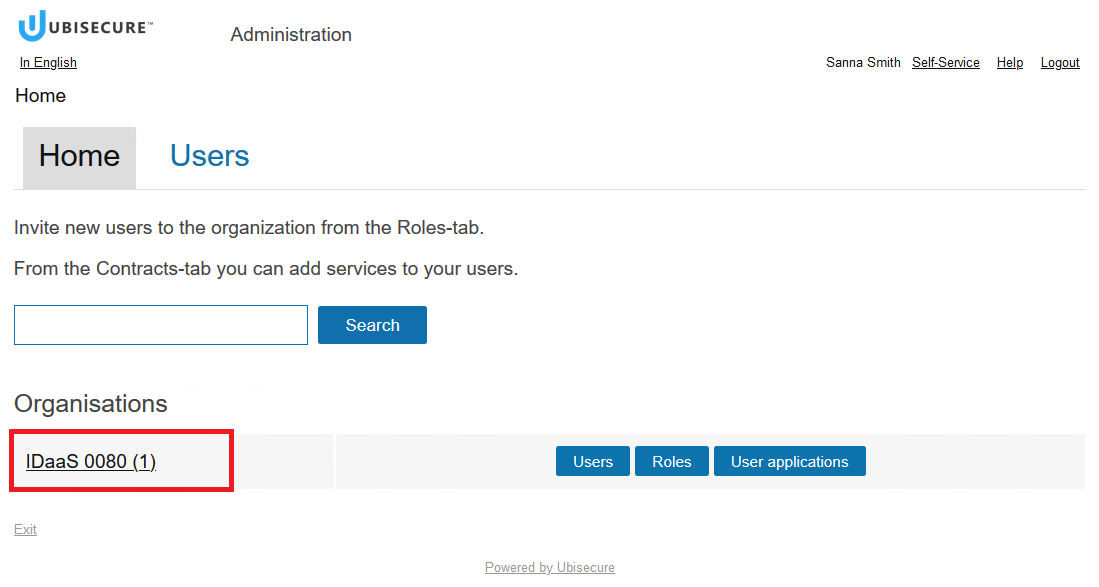
Step 1. Open the home organisation.
The main user opens the home organisation. Note, The number in the brackets indicates the number of registrations waiting for approval.
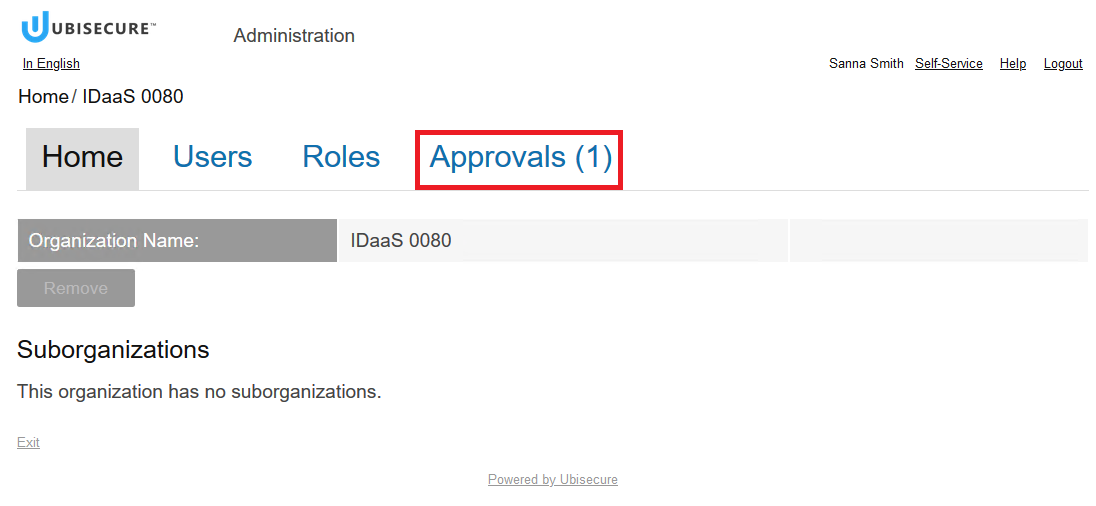
Step 2. Open the Approvals tab
Click the approvals tab to open the page for approvals.
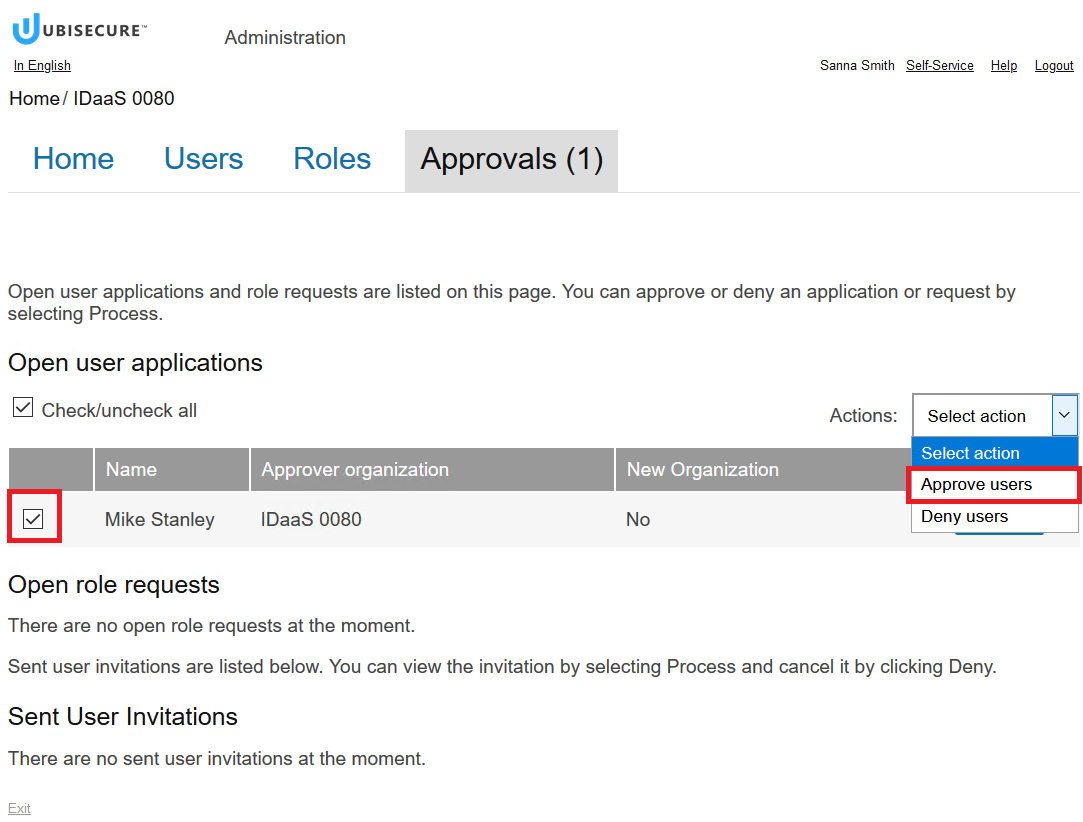
Step 3. Approve the new user
Check the tick box to select the user and use the Actions list to run the approve command.
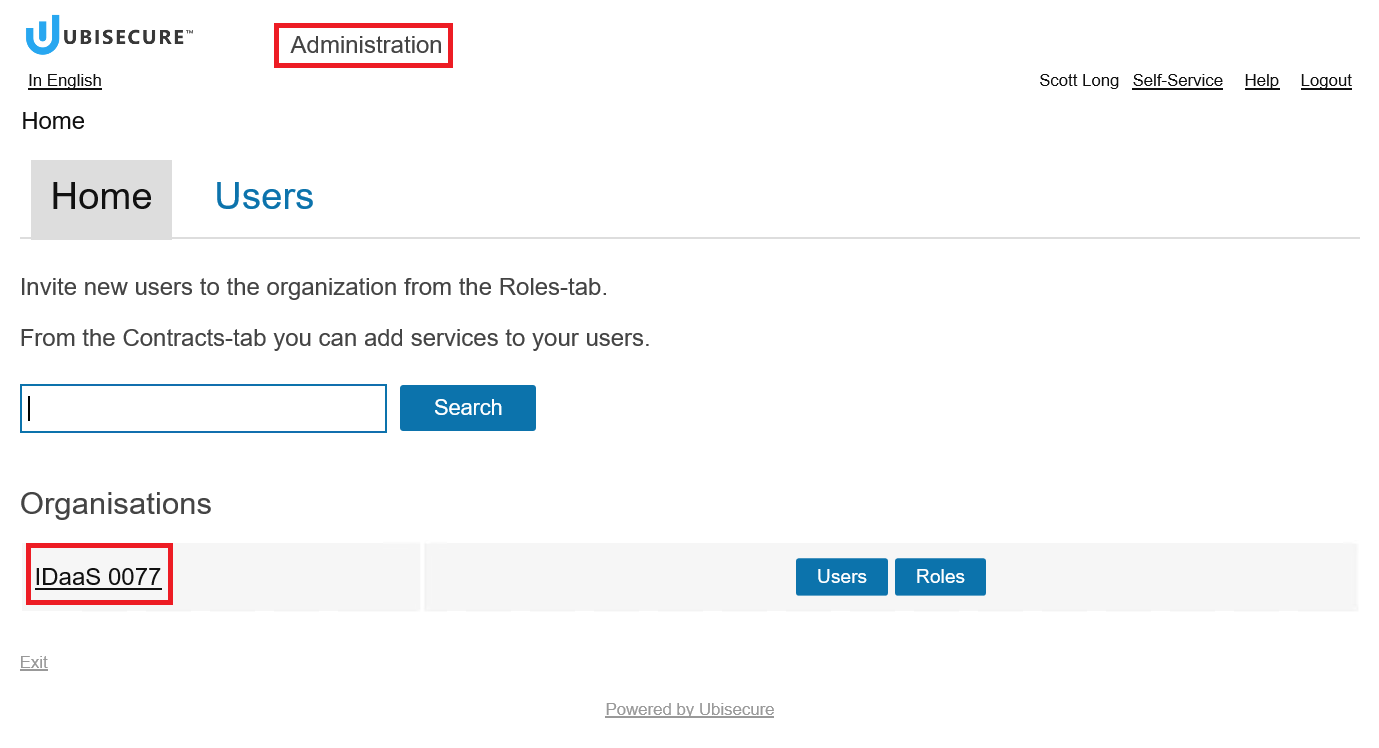
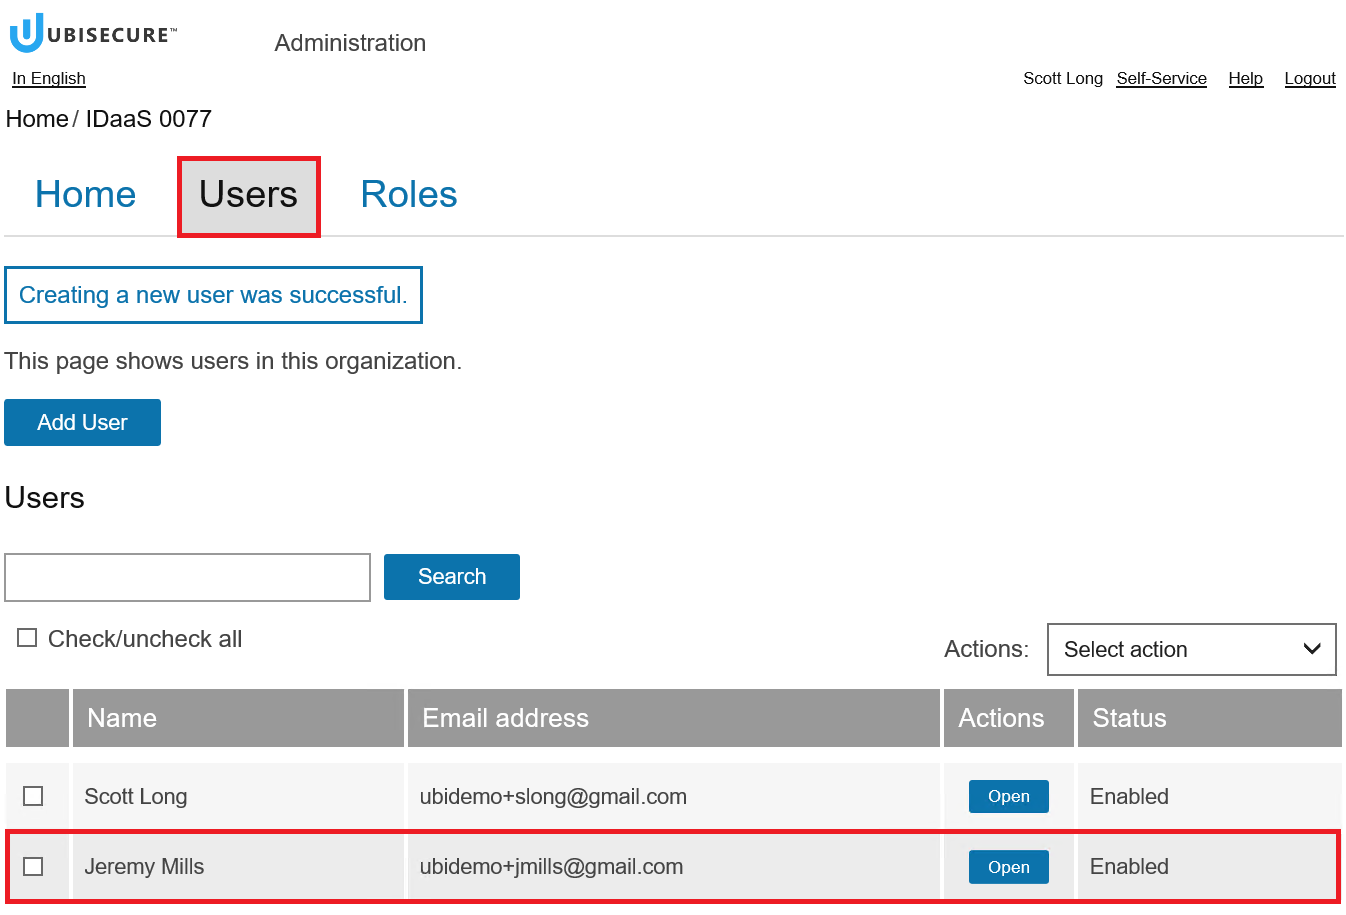
3. Add a new user
An administrative user can add new users either manually or sending an invitation email. Next, we will see how to add a new user manually.
Step 1. Click your home organisation.
Make sure that you are in the Administration view and click your home organisation.
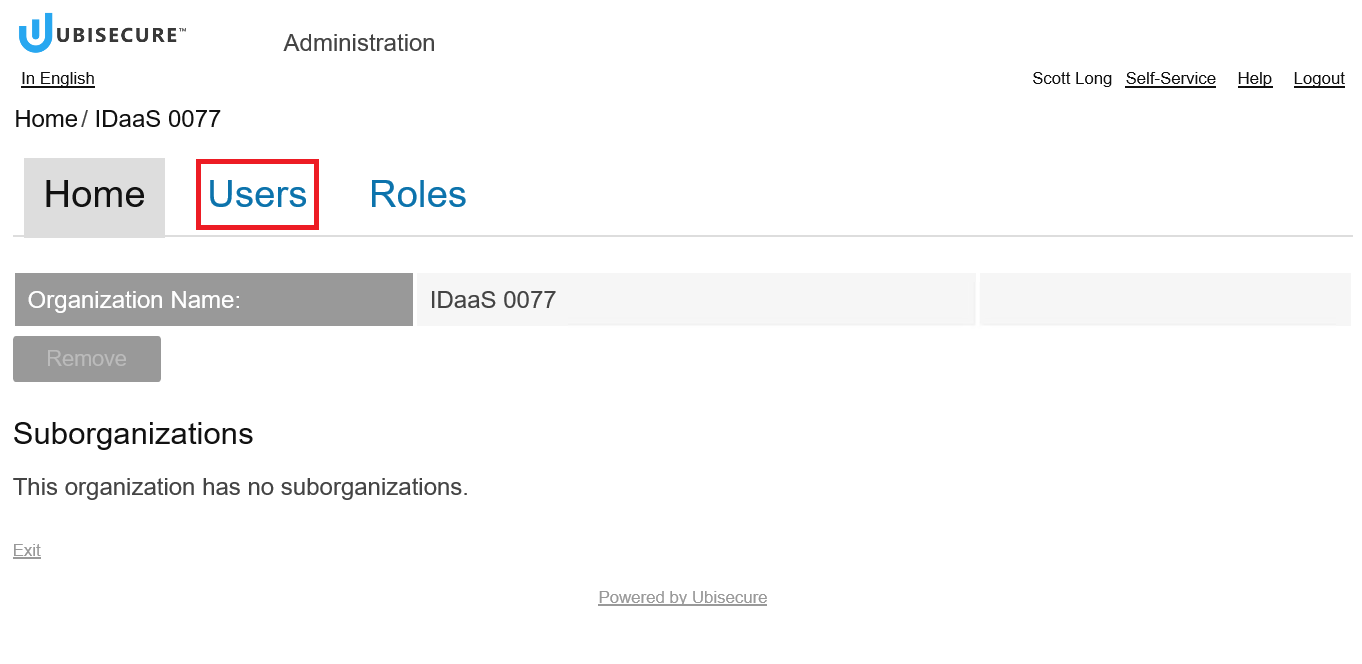
Step 2. View the current users of the organisation.
Click the Users tab to view the list of users.
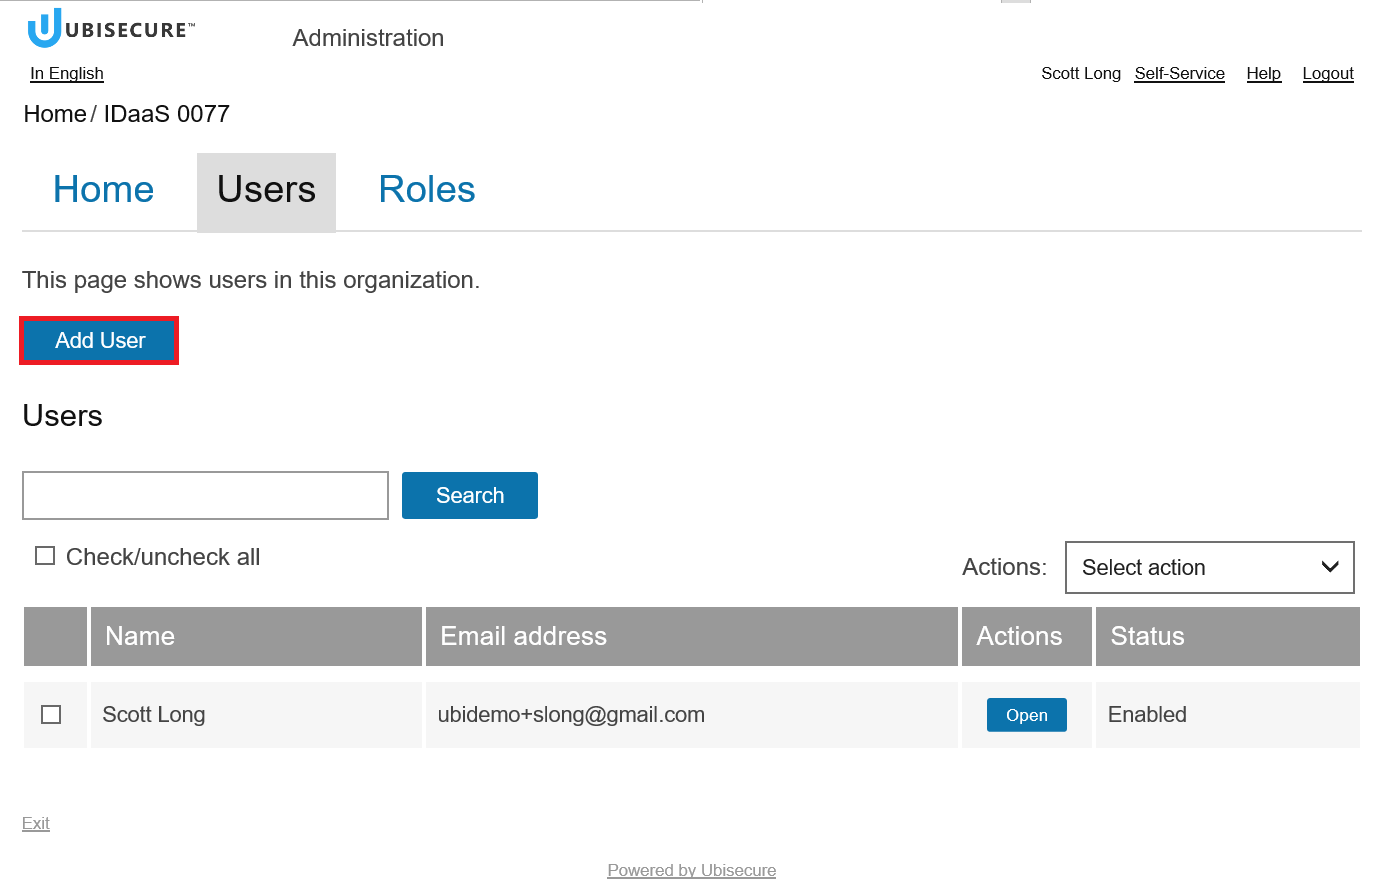
Step 3. Add a new user
Click the Add User button to open the new user creation window.
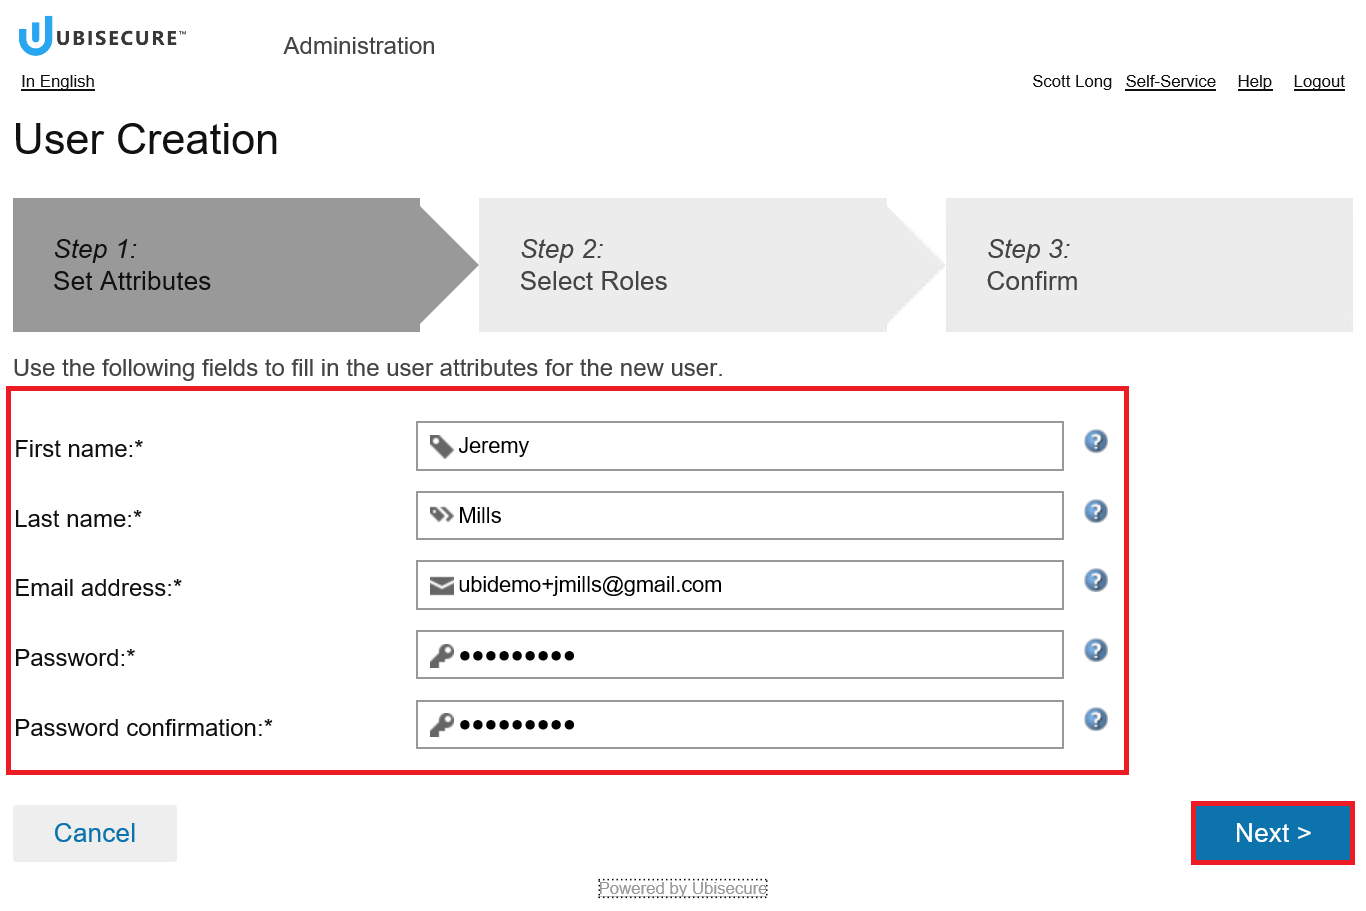
Step 4. Define the new user identity attributes
Define the new user attributes and click the Next button.
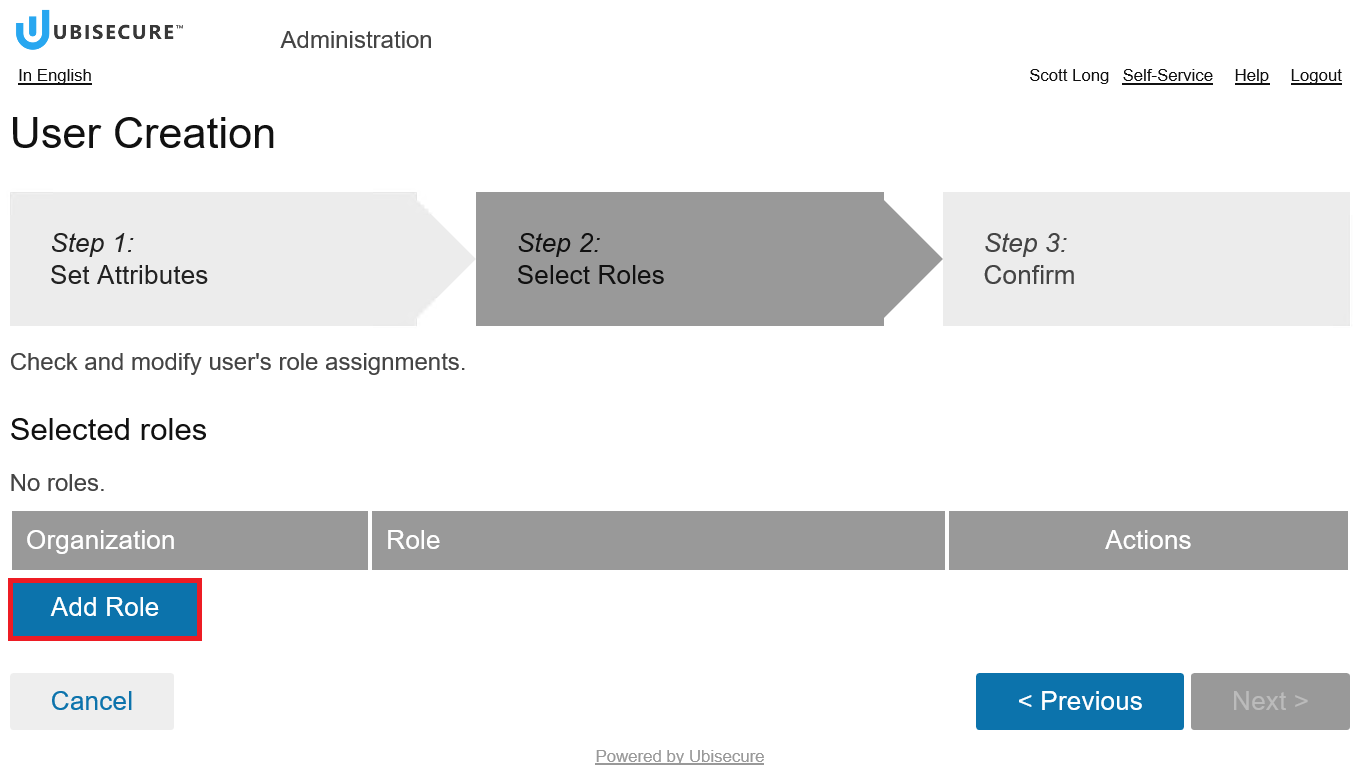
Step 5. Open the role assignment window
Click the Add Role button to open the role assignment window.
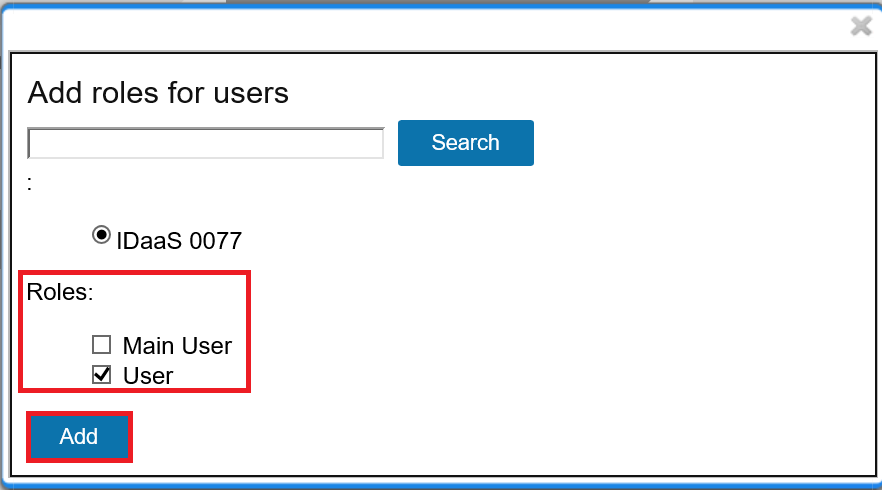
Step 6. Assign a role for the new user
Tick the required roles and click the Add button.
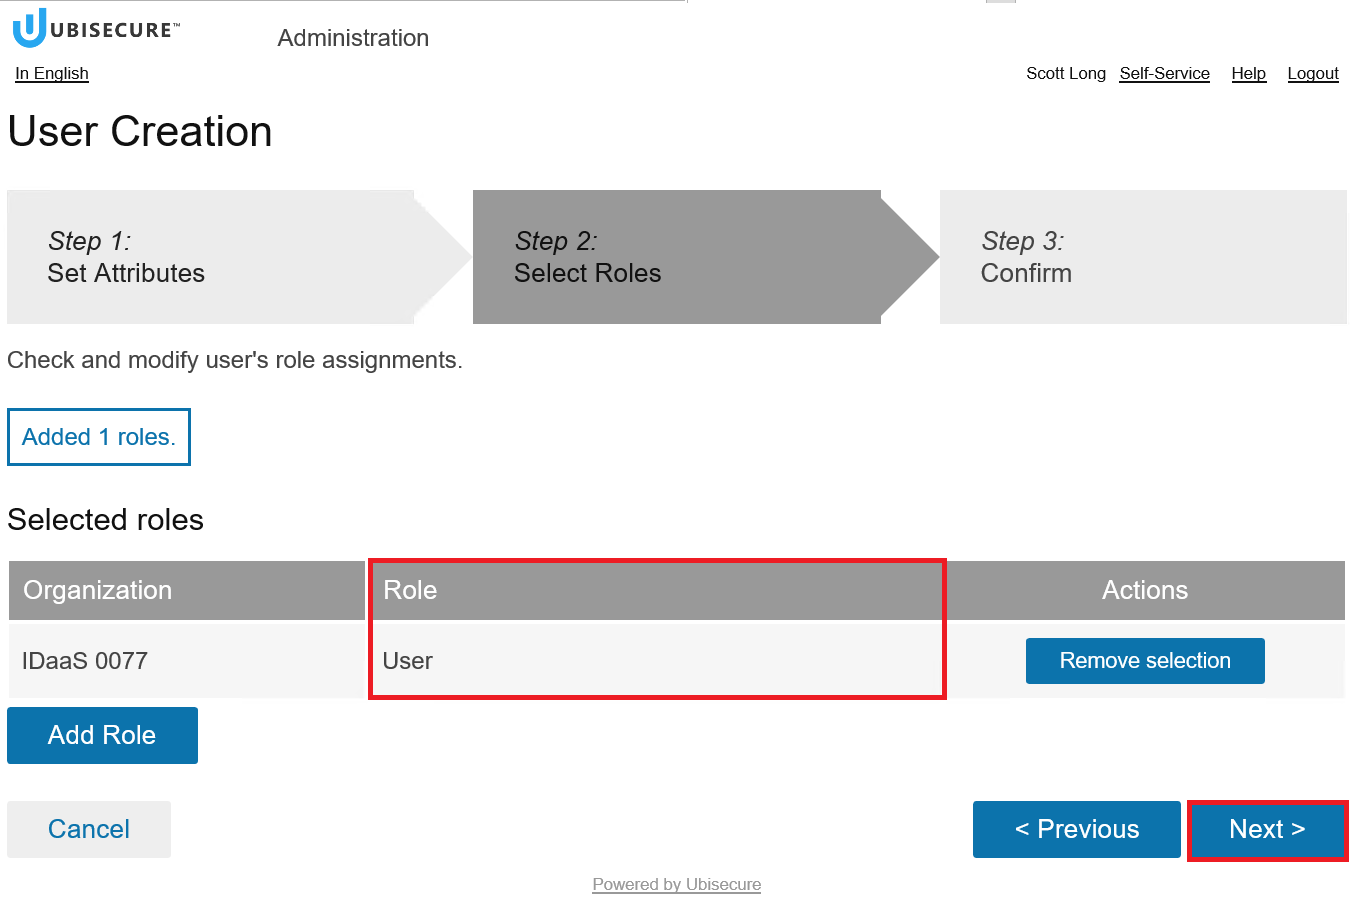
Step 7. Verify the role assignments
Verify that the user has the correct role(s) and click the Next button.
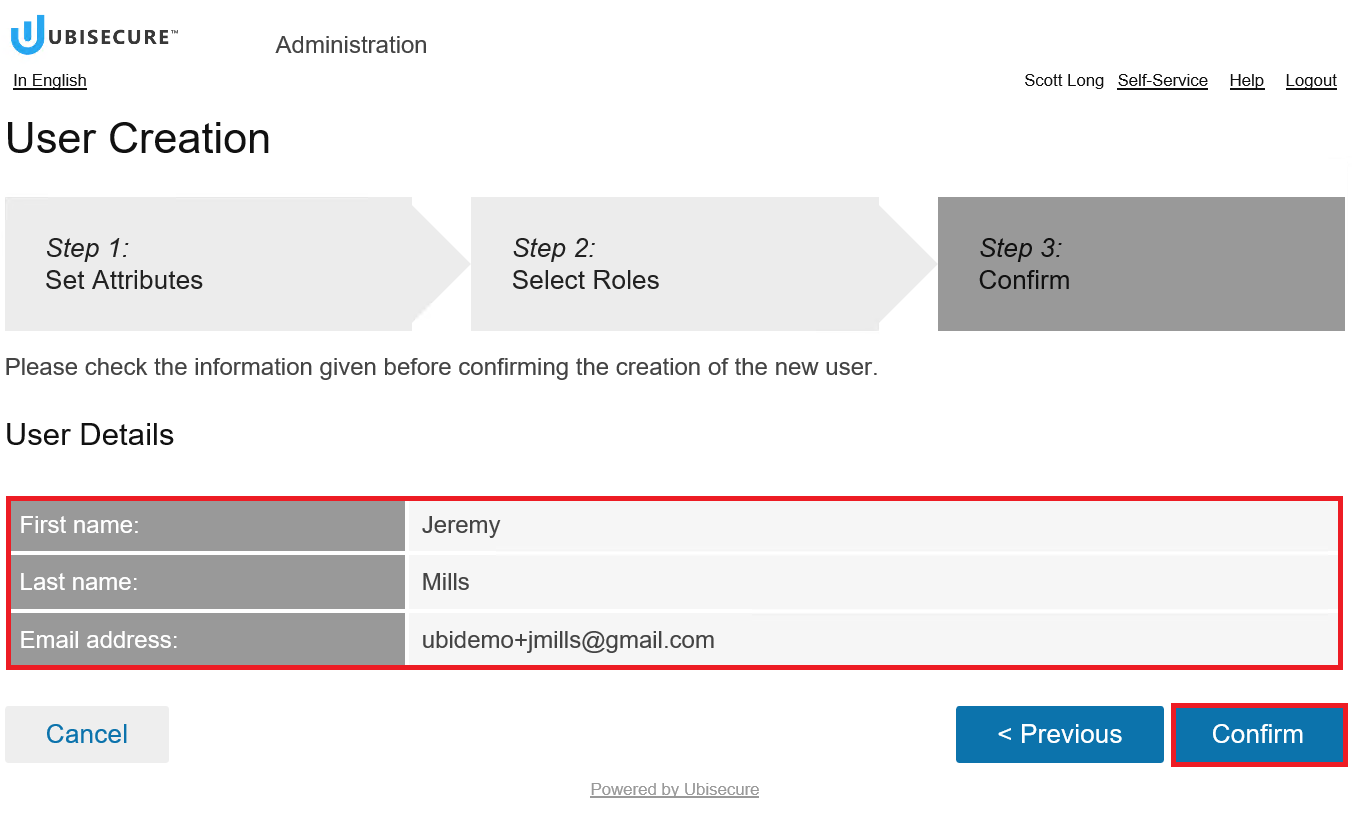
Step 8. Finalise the operation
Verify that the new user has the correct attributes: First name, Last name and Email address. Click the Confirm button.
Step 9. View the user
See the new user under the Users tab.
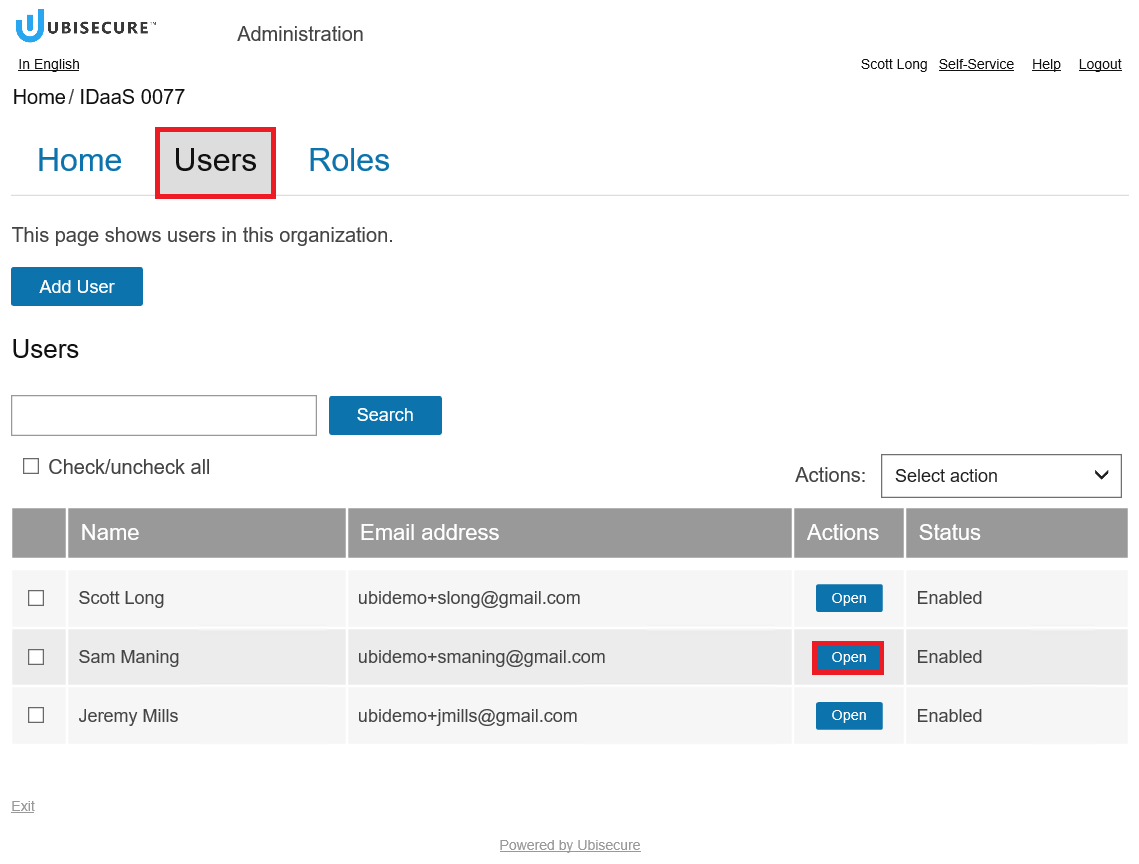
4. Modify user attributes
The main user can modify the attributes of all the users if some information has changed or is wrong.
NOTE, main user can also reset the password of another user if necessary. Notice also, that all users are allowed to reset their own passwords.
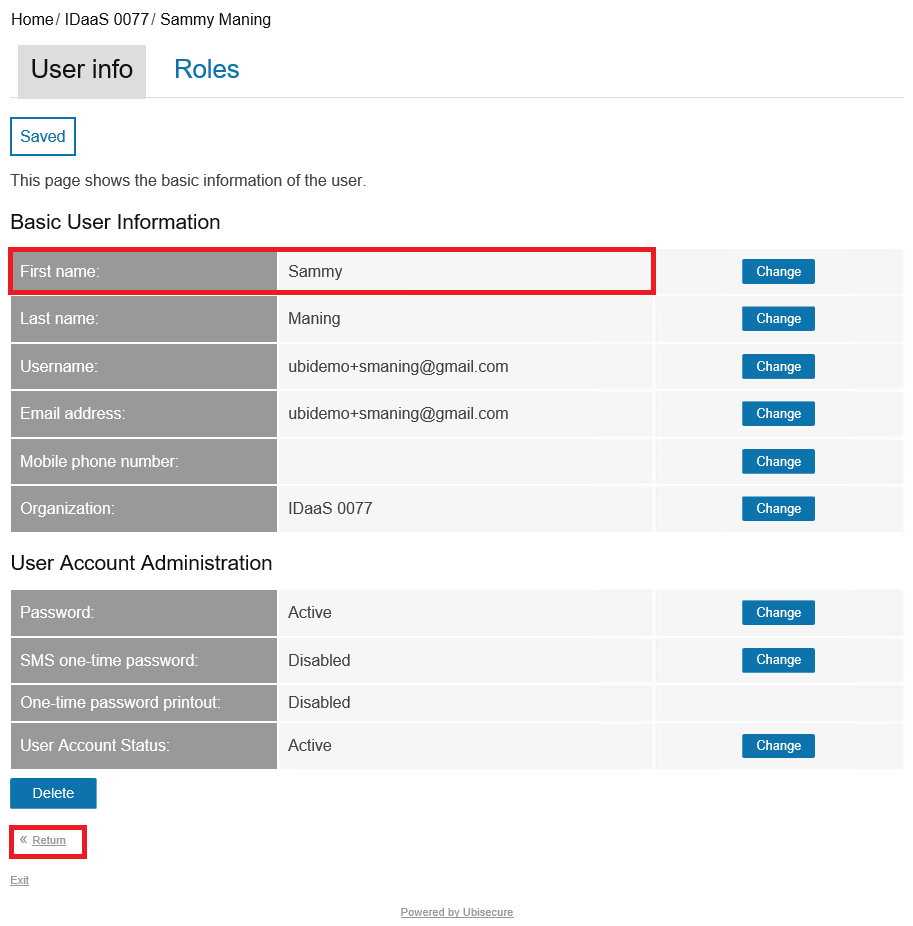
Step 1. Choose the user to be modified
Click the Users tab to view a list of users in your organisation. Select the user and click the Open button next to it.
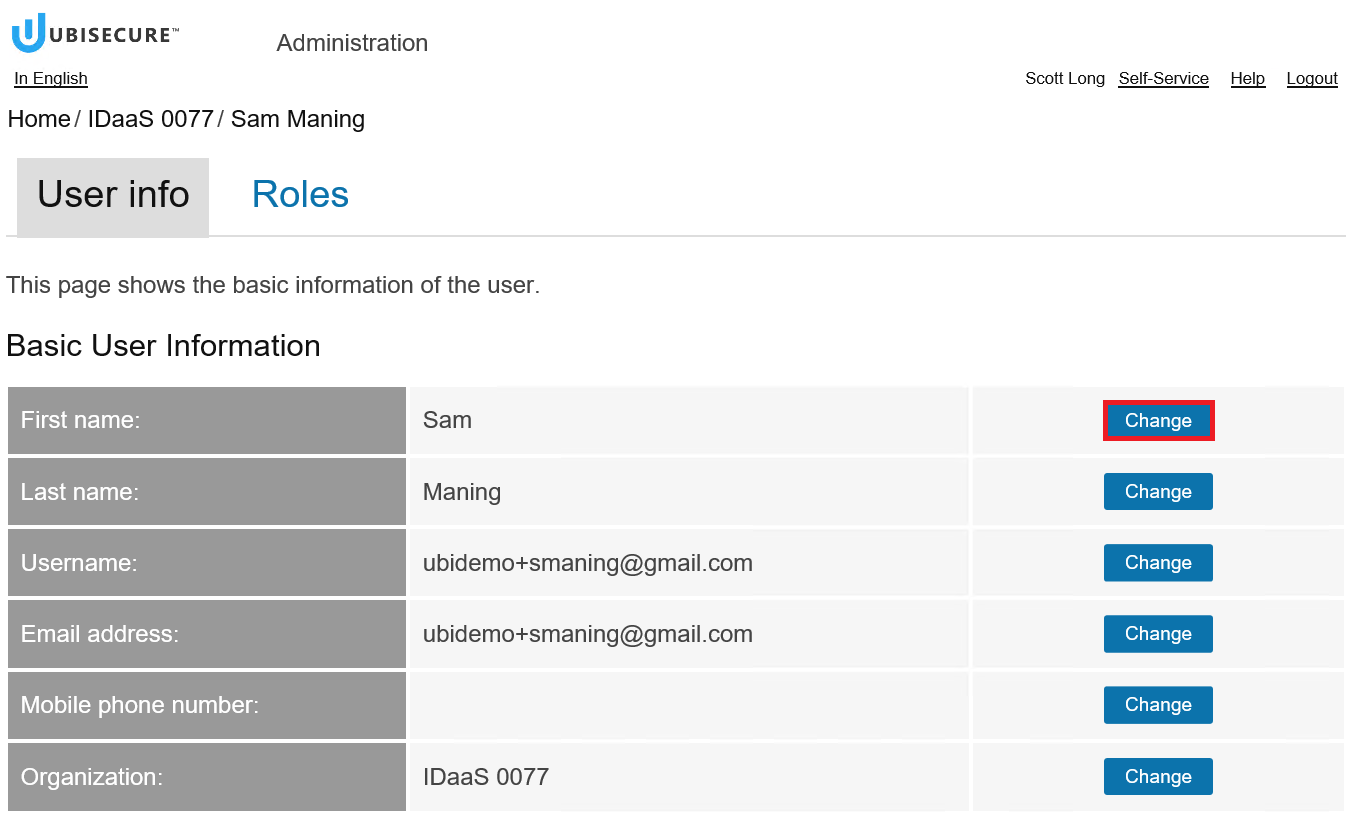
Step 2. Choose the attribute to be modified
Choose the attribute that needs to be modified and click the Change button next to it.
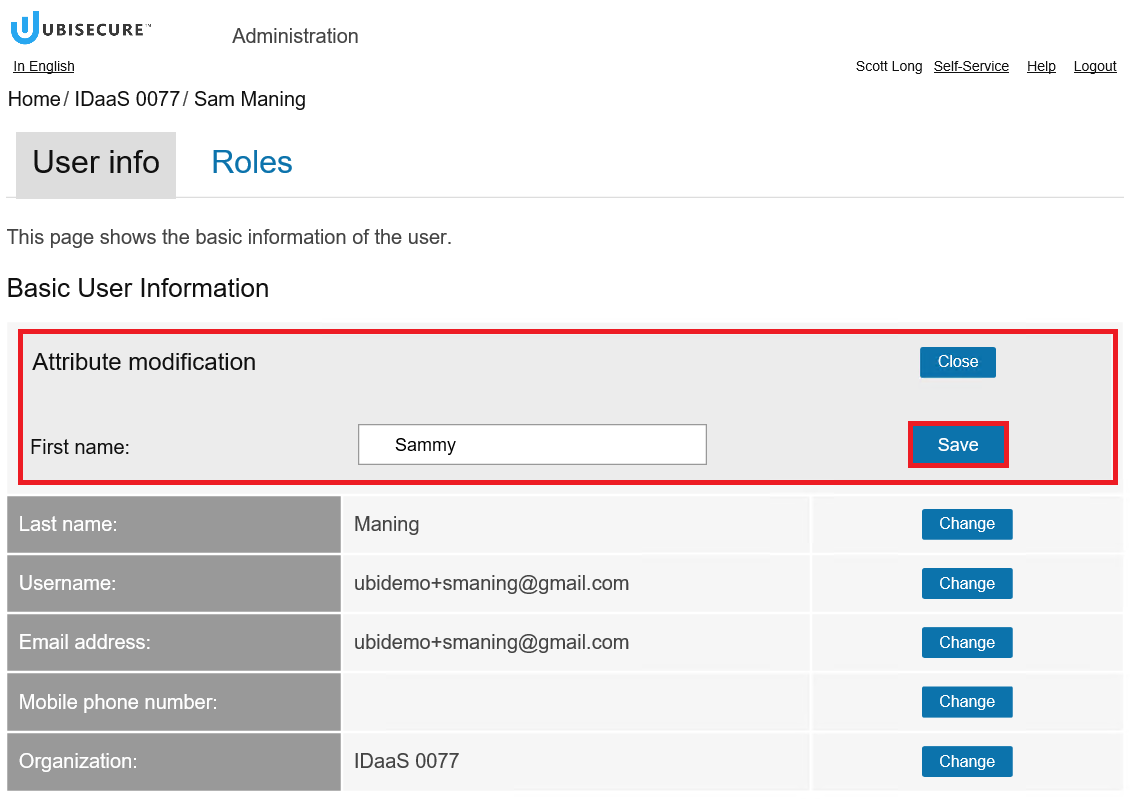
Step 3. Modify the selected attribute
Modify the attribute you have chosen and click the Save button.
Step 4. Verify the changes
Verify the change and click the Return link.
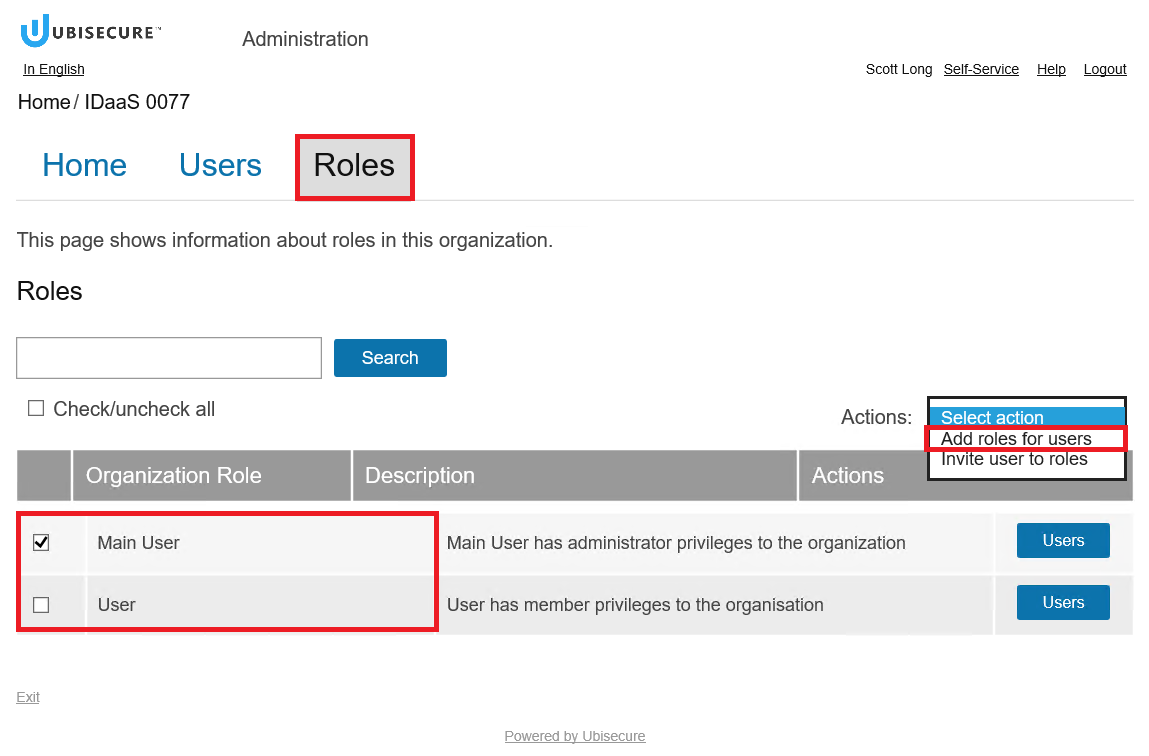
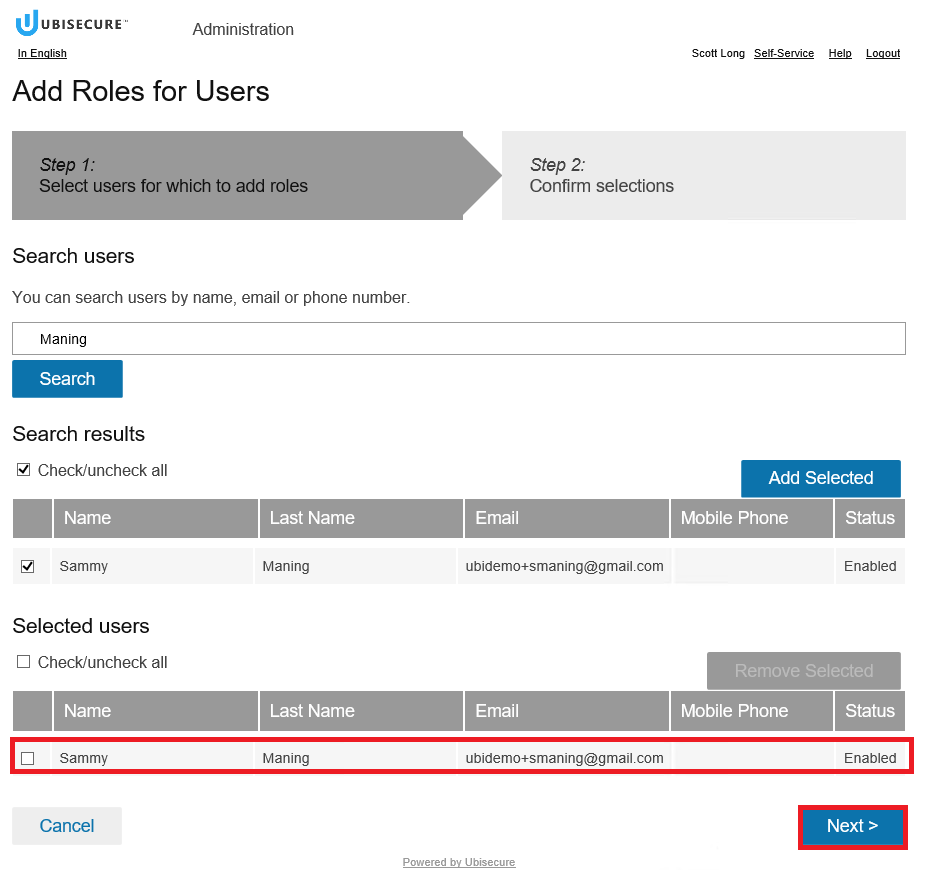
5. Assign additional roles
The main user can add new roles for the users. One user can have several roles at the same time.
Step 1. Choose the role to be assigned
Click the Roles tab and tick the role to be assigned. In the Actions list choose the option "Add roles for users".
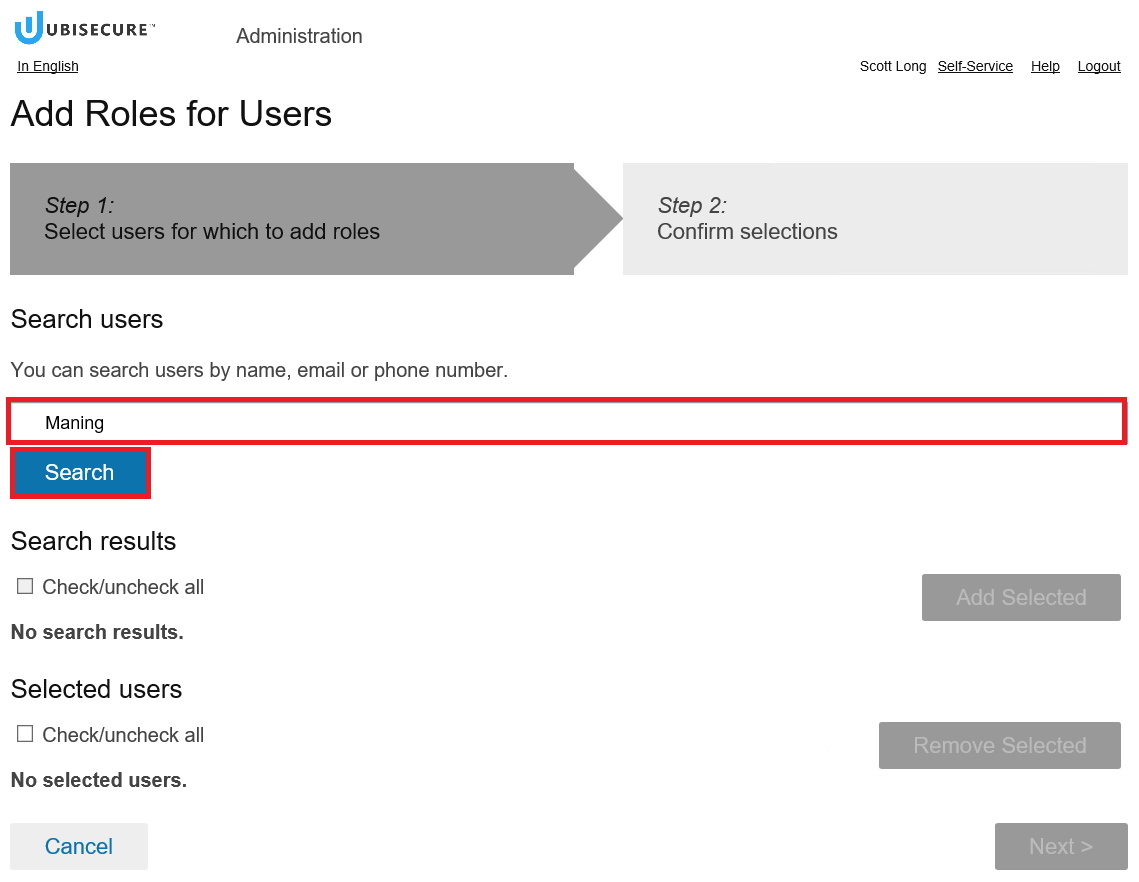
Step 2. Search the users who will get the new role
Write the name, email or phone number of the user who will get the new role and click the Search button.
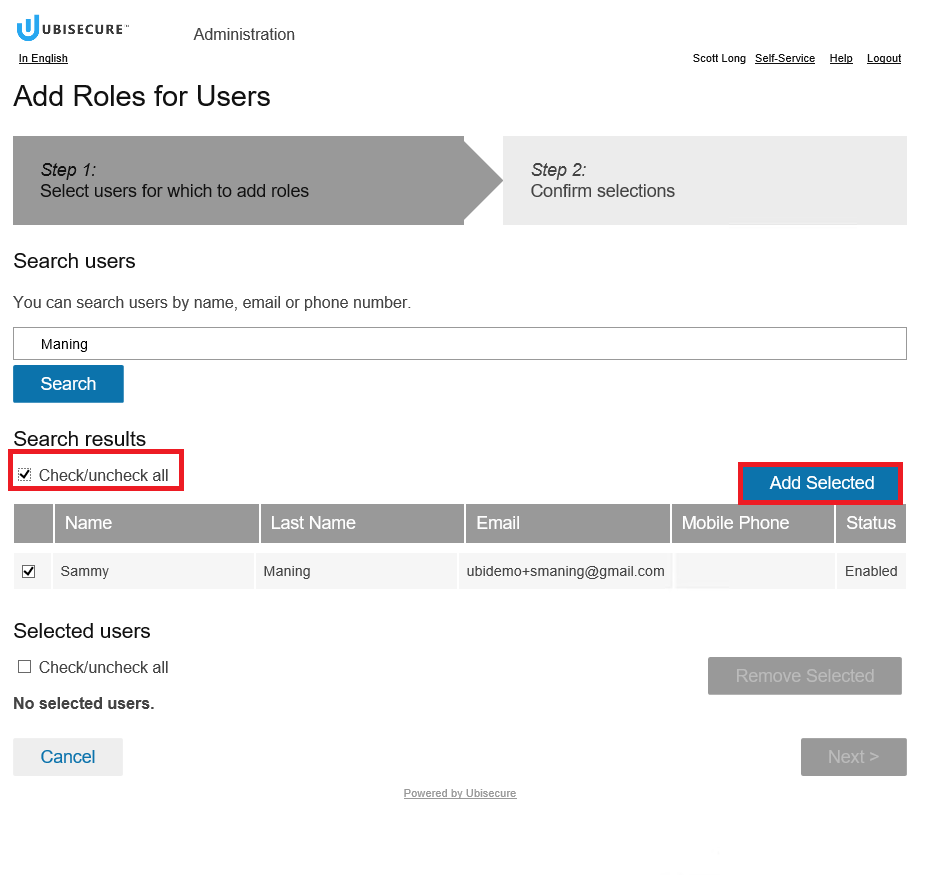
Step 3. Choose the user from the search results
Tick the checkbox for the user under the Search results and click the Add Selected button.
Step 4. Verify the selected user
Verify that the correct user(s) has been selected under the "Selected users" and click the Next button.
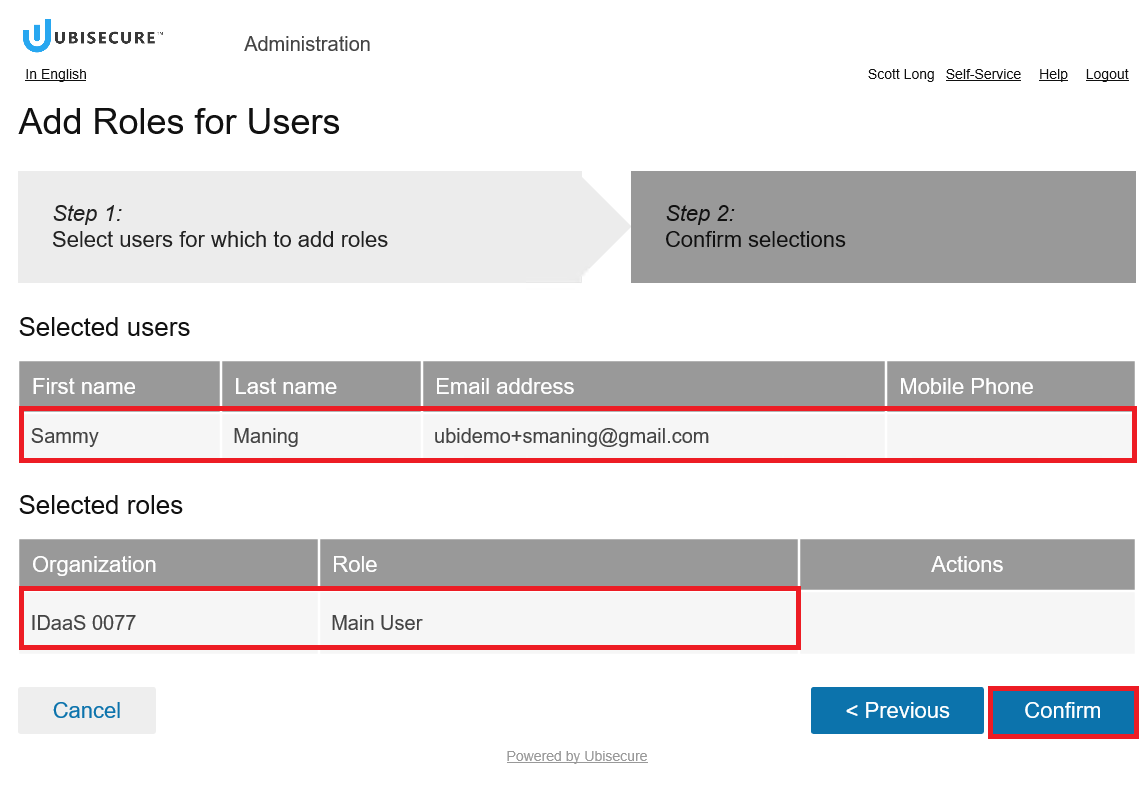
Step 5. Finalise the procedure
Verify all the information and click the Confirm button.
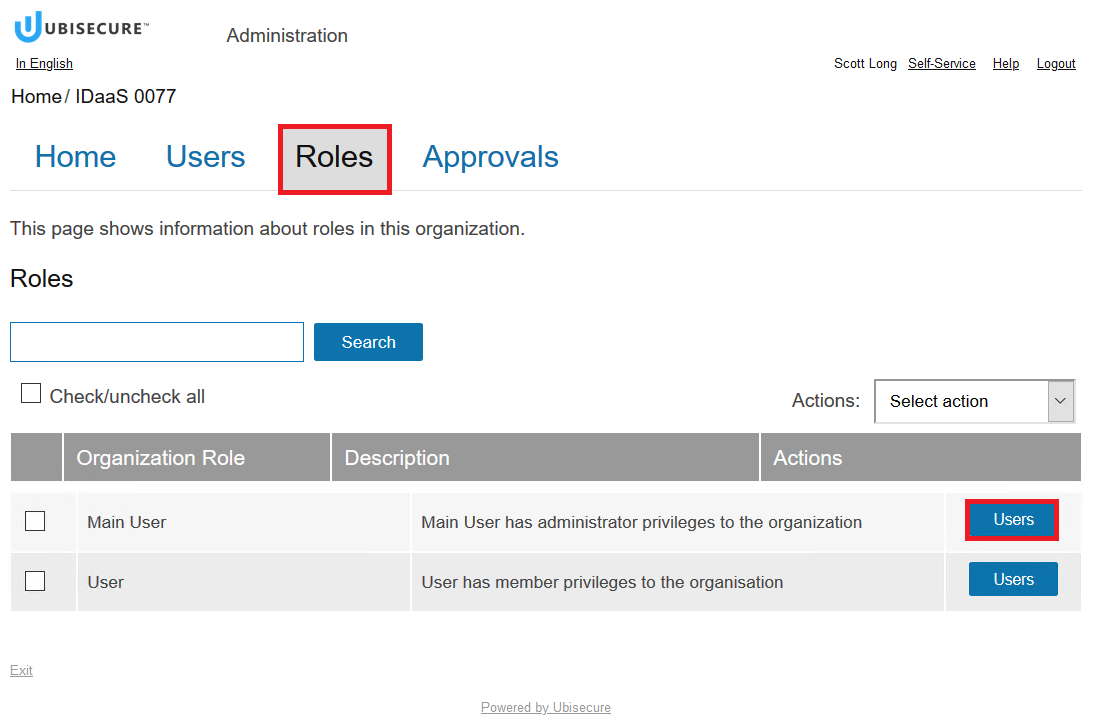
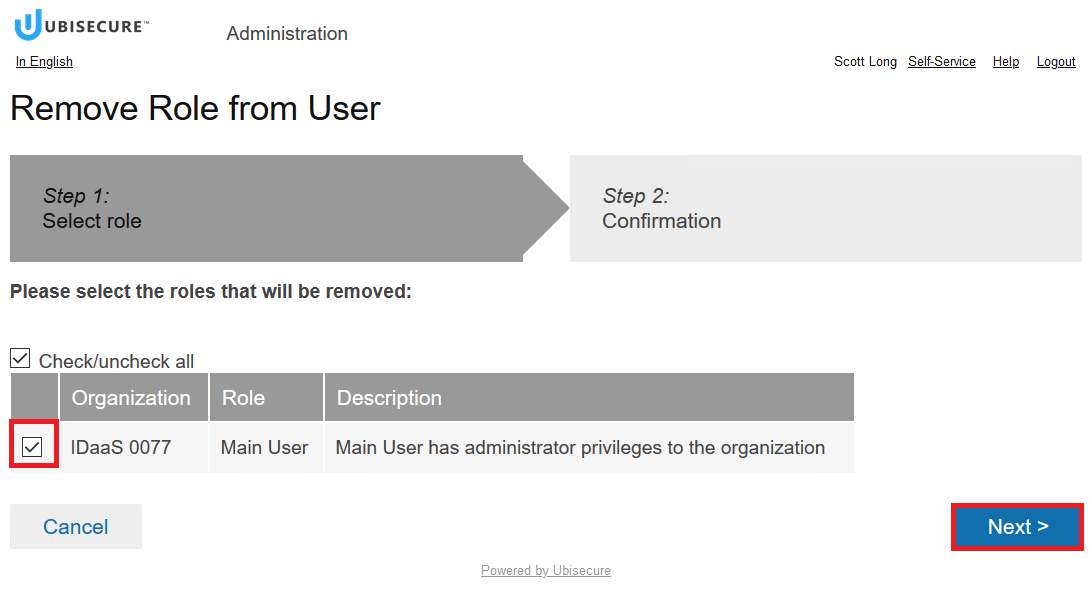
5a. remove a role
By removing user roles the main user can revoke access to applications.
Step 1. View the users with selected role(s)
Click the Roles tab, choose the role(s) and click the Users button.
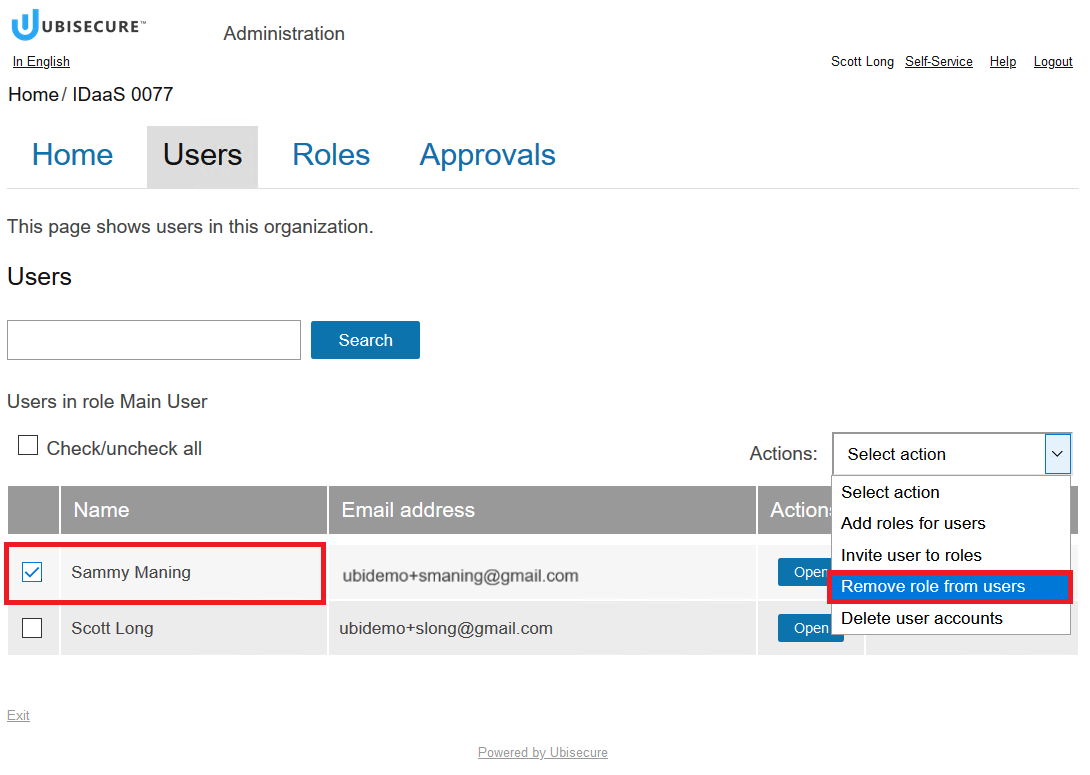
Step 2. Choose the user
Choose the user(s) from the list and choose the option "Remove role from users" from the Actions list.
Step 3. Select the role to be removed
Check the tick box for the role that will be removed and click the Next button.
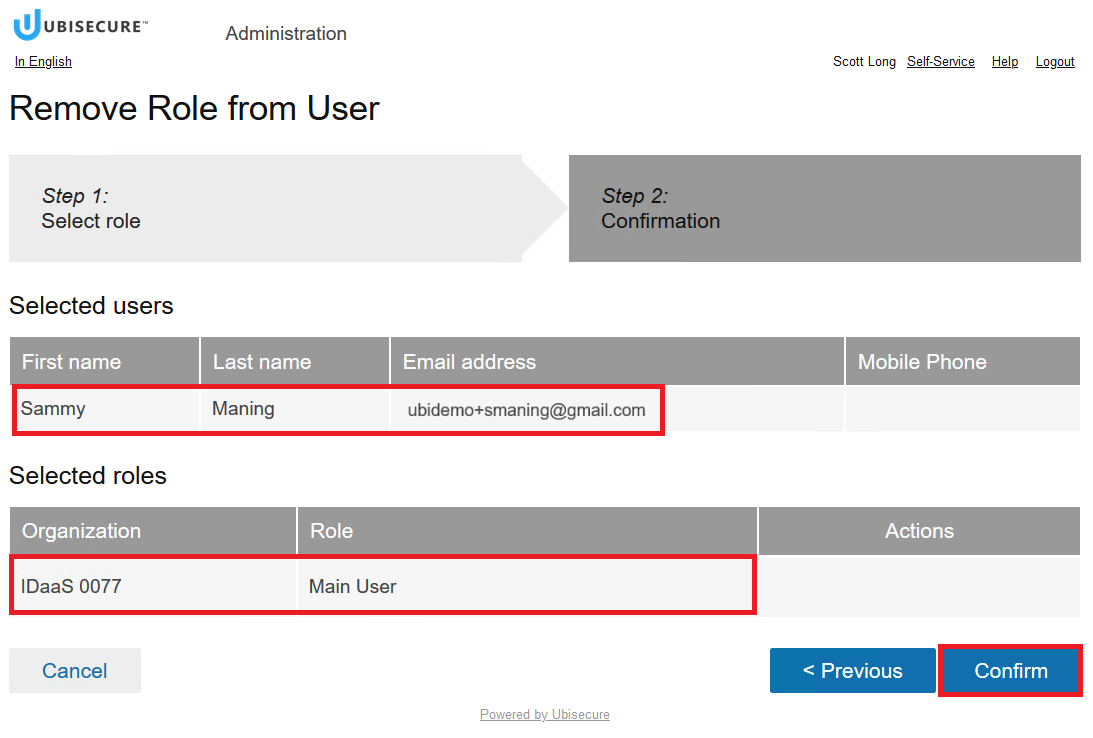
Step 4. Confirm the operation
verify that you have chosen the right user and a role and click the Confirm button.
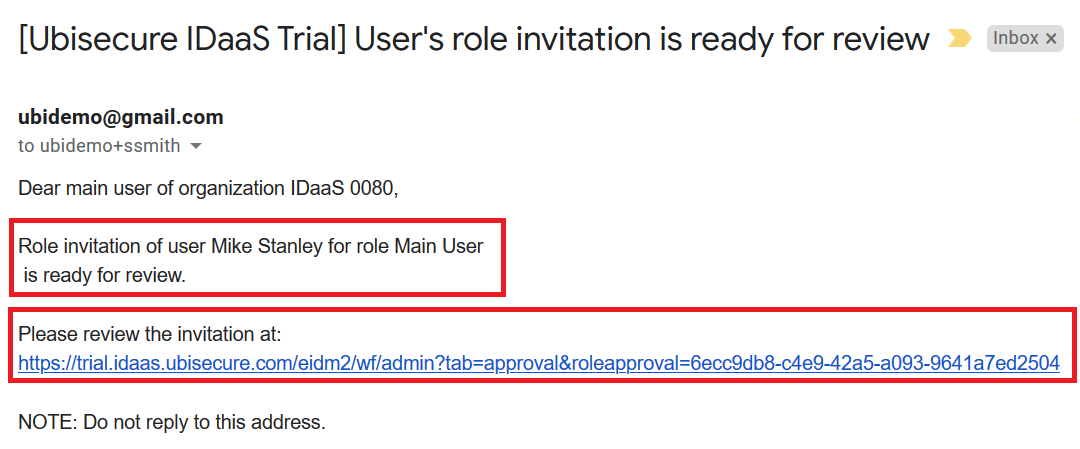
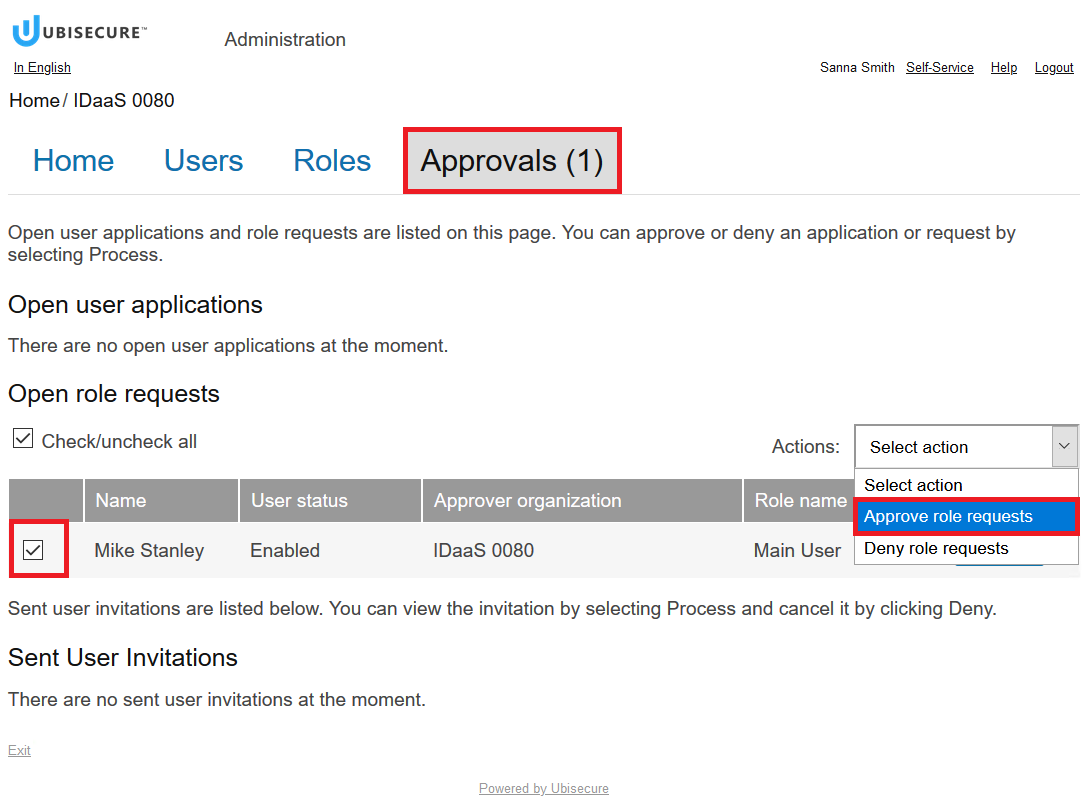
5b. Approve role requests
Users can request additional roles (see the Self-Service view documentation). The main user of the organisation can approve or deny these requests.
Step 1. Review the role invitation email
Main User will get notification emails for the new role requests. See from who the request is from and for which role. Click the link in the email (and sign in to the Identity Manageent if you are not already logged in) to begin the process.
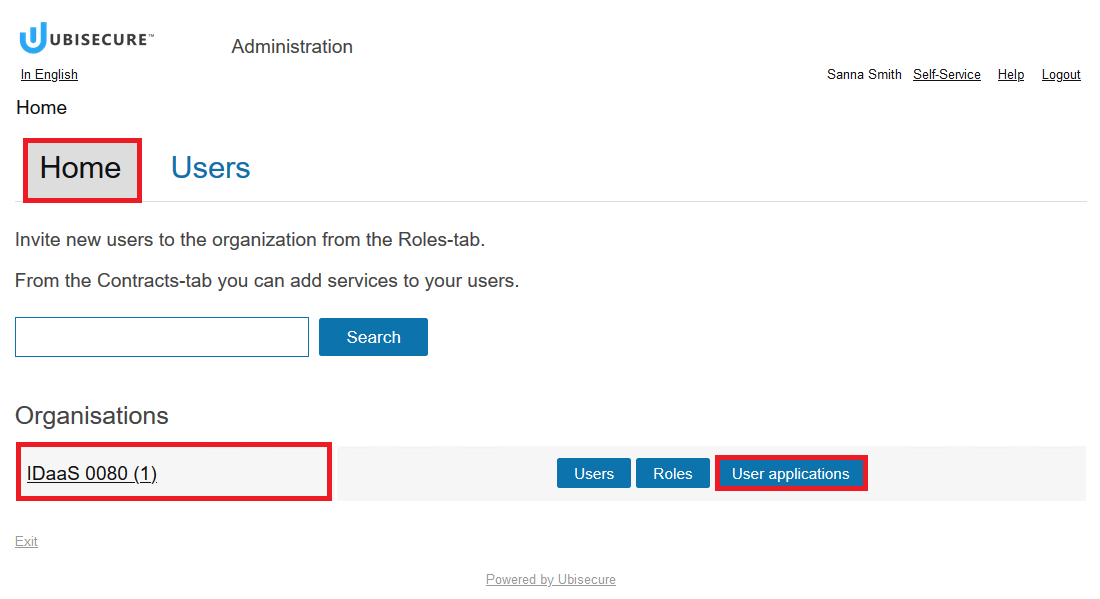
Step 2. Open the list of open role requests
In the Administration view under the Home tab click the User applications button. Note, the number inside the brackets next to the organisation name indicates the number of open applications waiting for approval.
Step 3. Approve the application
Under the Approvals tab, check the tick box for the user who's application you like to approve/deny and choose the command from the Actions list.
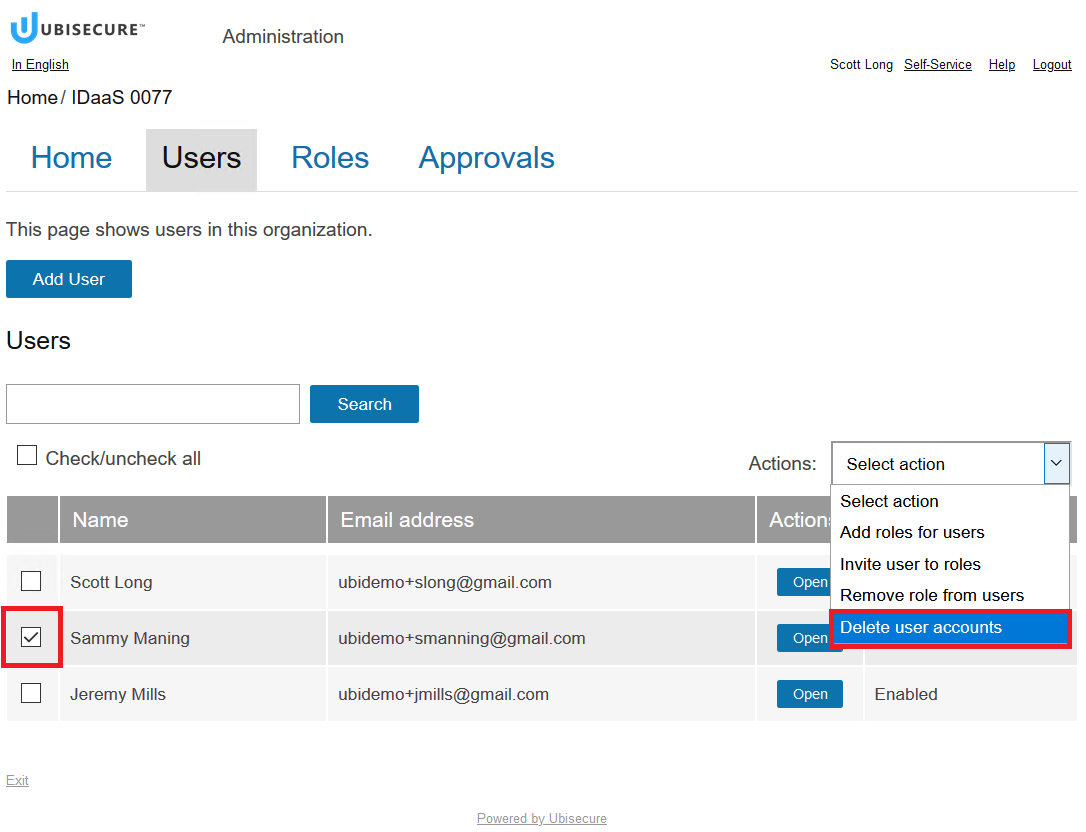
6. Delete a user
The main user can remove users from the Identity Management system.
Step 1. View the list of users and delete the selected user account
Click the Users tab to view the list of users in the organisation. Check the tick box for the user to be removed and choose the option "Delete user accounts" from the Actions list.
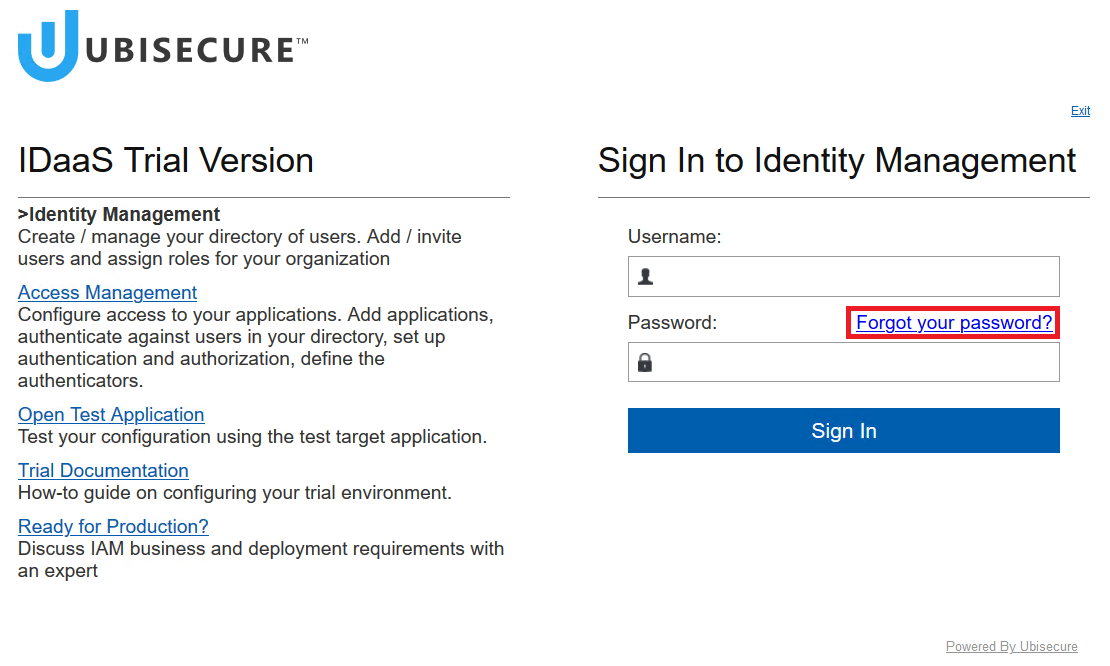
7. Reset a forgotten password
In case you have forgotten your password, you can reset it in the Sign In window.
Step 1. Open the Email Password Reset window
Click the link "Forgot your Password?" in the Identity Management Sign In window.
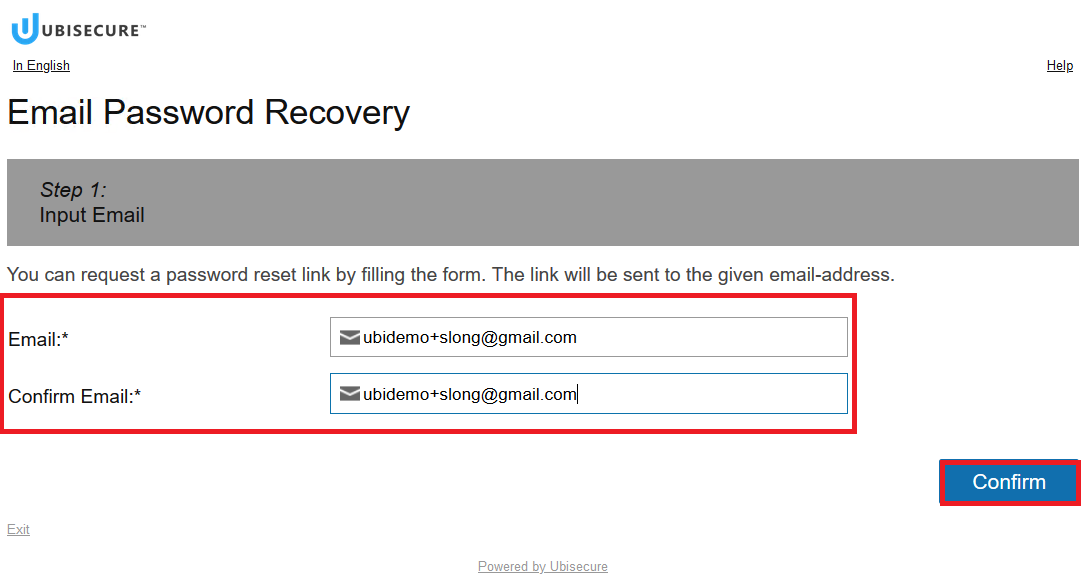
Step 2. Type your email
Type in your email address twice and click the Confirm button.
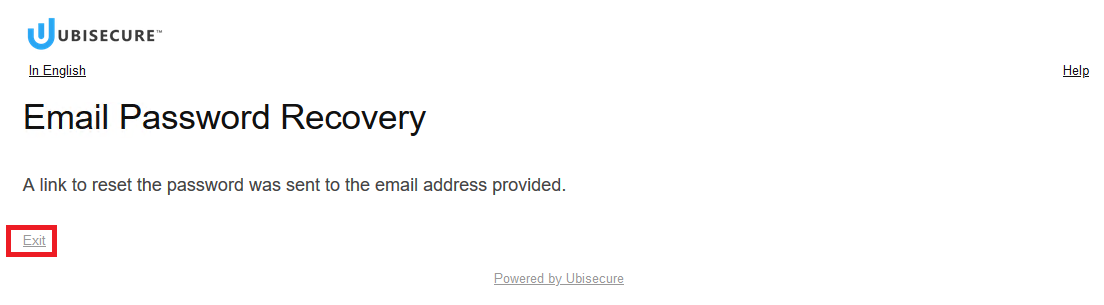
Step 2. Exit the notification window
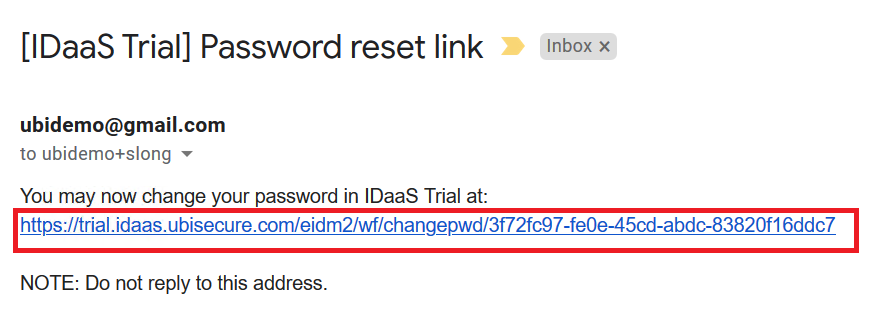
Step 3. Open the password reset window
Click the password reset link sent to your email box to open the password reset window.
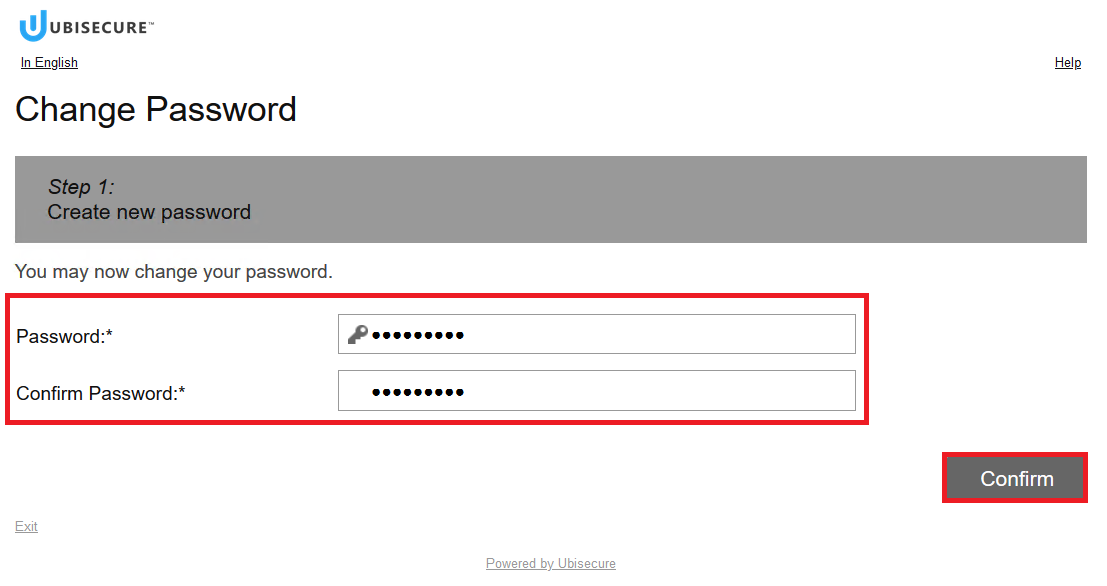
Step 4. Define a new password
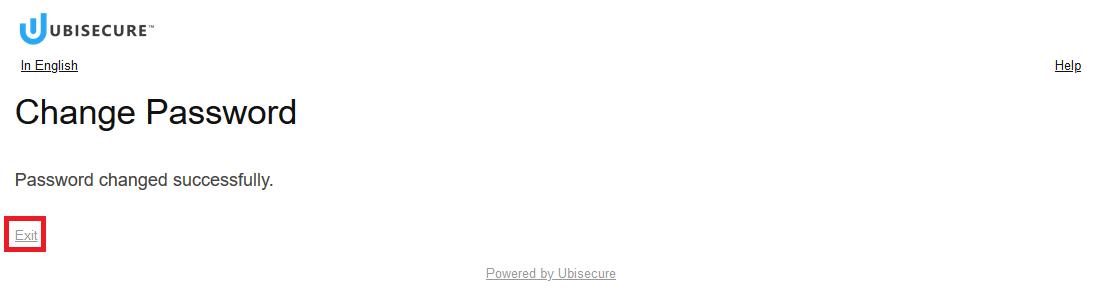
Type in the new password twice and click the Confirm button.
Step 5. Exit the notification window