Lab 1.5: Configuring CustomerID data model
The purpose of this module is to:
- Get you started with configuring CustomerID
- Give you an overview of organisations, roles
- CustomerID installed
Overview

The first steps when setting up delegated role and user management:
- Define what types of services and organisations this system will manage
- Define what roles these services and organisations need to operate
- Migrate customer organisations from e.g. existing CRM system
- Create organisation users using role invitation by email. The user confirms their own email address by clicking the link and sets their own password
Configure organisation types
- You can use organisation types to model:
- A customer organisation with various roles
- An online service (SmartPlan Application) with various roles
- Outcome: Organisation type to be used when creating companies
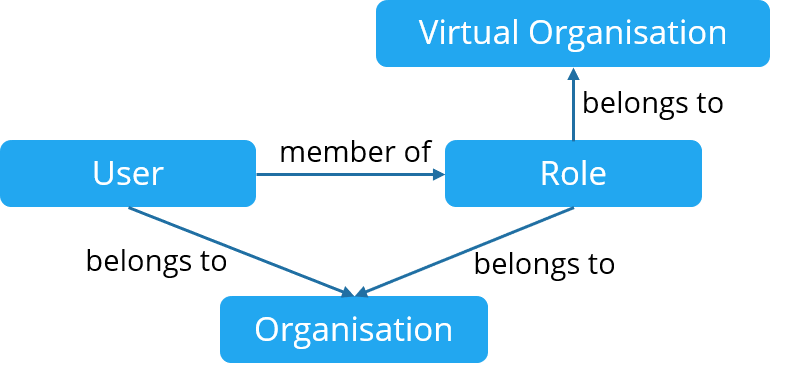
There are two types of organisations: physical and virtual.
- Organisations are used for storing user accounts
- Virtual organisations are used to model organisations and services.
- In virtual organisations, the users are not physically located in any of the projects but they are part of them through roles.
The system will read the correct values from eidm2_generated.properties file. During system setup, the file eidm2_generated.properties is read first and the eidm2.properties is read and overwrites any settings in eidm2_generated.properties.
Wondering what "eidm" stands for?
eidm is obsolete name for CustomerID. It meant "extranet Identity Management"
Part 1: Configuring Organisation Types
Step 1: Configuring Customer Organisations
company to hold customer organisation userscompany organisation has two roles, Contact Person and Representative, represented by the technical names mainuser and user respectively.Edit C:\Program Files\Ubisecure\customerid\application\custom\eidm2.properties
eidm2.propertiesorganization.type.name.1 = company organization.type.company.1 = mainuser organization.type.company.2 = user
Copy C:\Program Files\Ubisecure\customerid\tools\examples\custom\messages_en.properties to C:\Program Files\Ubisecure\customerid\application\custom\ and then add the following lines to the file.
messages_en.propertiesorg.label.company = Customer Organization org.label.company.plural = Customer Organizations
Copy C:\Program Files\Ubisecure\customerid\tools\examples\custom\roles.properties to C:\Program Files\Ubisecure\customerid\application\custom\ and then add the following lines to the file.
roles.propertiesen.friendlyName.mainuser = Contact Person en.description.mainuser = The main user of the company. en.friendlyName.user = Representative en.description.user = Employee of the company.
Step 2: Configuring Service Organisations
Create a new organisation type to hold SmartPlan Application roles
This service has three roles: Owner, Member and Visitor
Edit C:\Program Files\Ubisecure\customerid\application\custom\eidm2.properties
eidm2.propertiesorganization.type.name.2 = site organization.type.site.1 = owner organization.type.site.2 = member organization.type.site.3 = visitor
Edit C:\Program Files\Ubisecure\customerid\application\custom\messages_en.properties
messages_en.propertiesorg.label.site = Service org.label.site.plural = Services
Edit C:\Program Files\Ubisecure\customerid\application\custom\roles.properties to define what each role name is
roles.propertiesen.friendlyName.visitor = Visitor en.description.visitor = Visitor can view public information. en.friendlyName.member = Member en.description.member = Member can read private information. en.friendlyName.owner = Owner en.description.owner = Owner can write information and manage user rights.
Activate all changes by restarting Wildfly
Restart of Wildfly is required when changes are made to CustomerID system configuration and localization text files
Part 2: Configuring Organisation and user attributes
Step 1: Create Custom Organisation Attributes
Custom organisation attributes are added dynamically to the schema as used. If used, localisation must be given.
Define language text key for the new attribute in C:\Program Files\Ubisecure\customerid\application\custom\messages_en.properties
messages_en.propertiesorganization.crmid = CRM ID registerWizard.organization.crmid = CRM ID
Define the order of displaying custom fields on the organisation info page by modifying: C:\Program Files\Ubisecure\customerid\application\custom\eidm2.properties
eidm2.propertiesui.admin.organizationinfo.fields.order = technicalname, friendlyname, crmid
Restart Wildfly
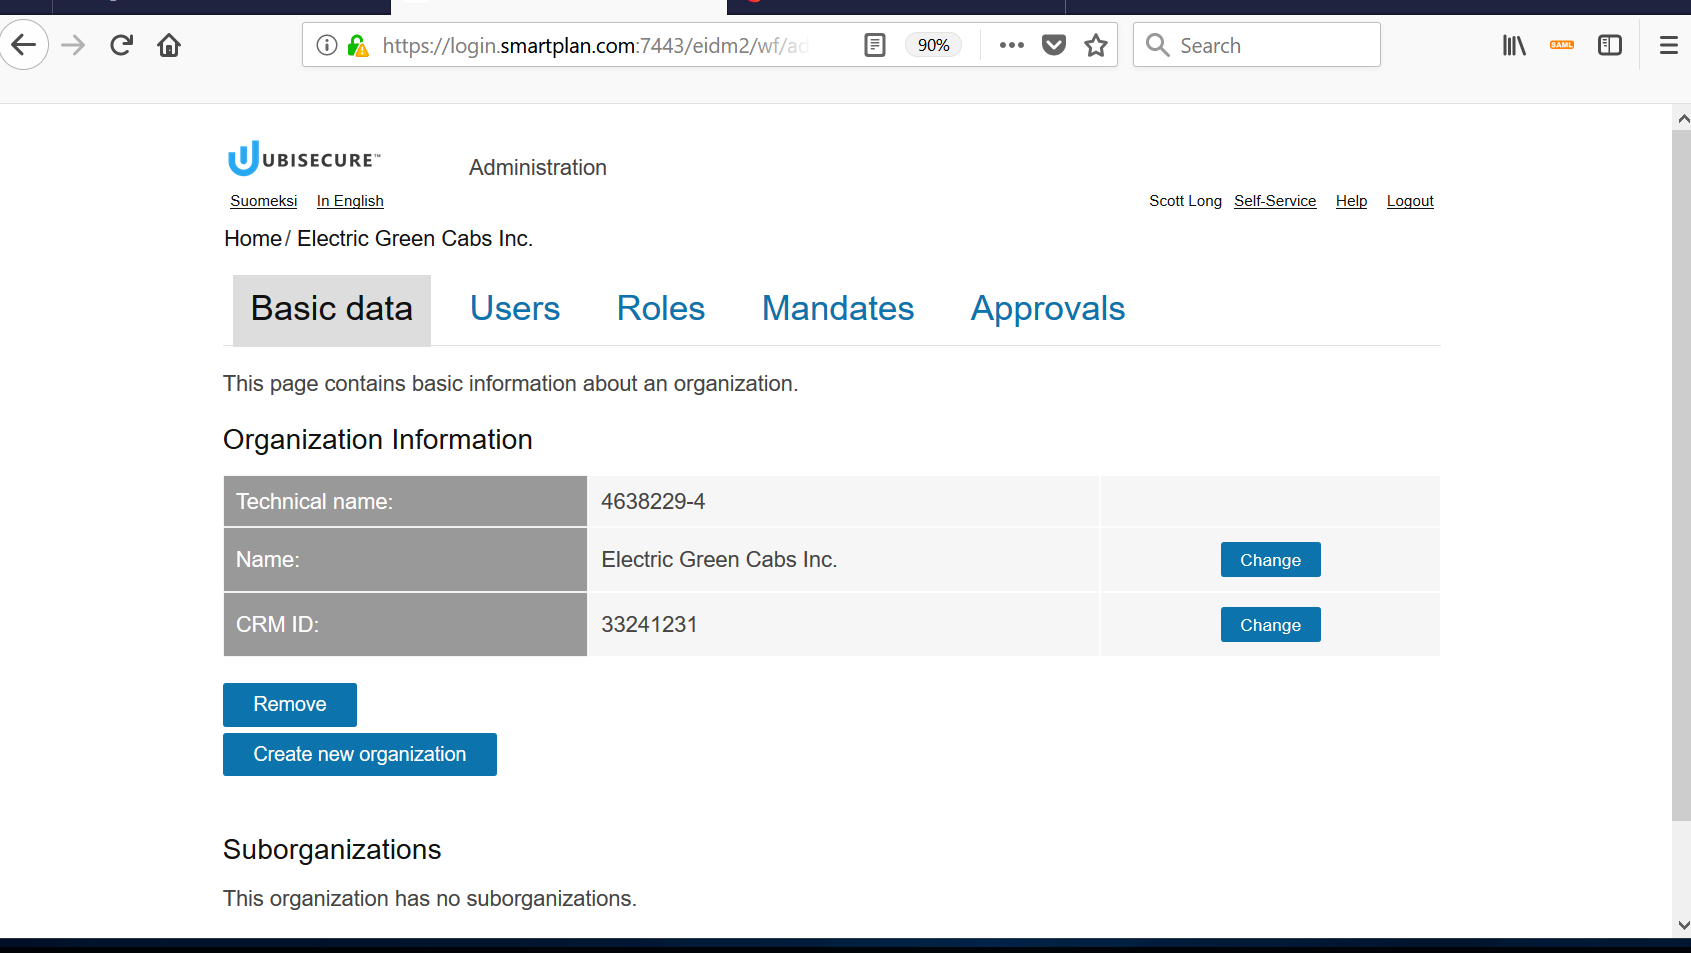
Log to CustomerID Administration interface https://login.smartplan.com:7443/eidm2/wf/admin as Scott Long. Select an organisation and observe the order of attributes:

As you can observe, there are only administrative organisations such as "Users." The next step is to create customer organisations (companies) in the system.
Part 3: Migrate customer organisations
Step 1: Customer Data Integration with Import Tool
- City Group
- Electric Green Cabs
The VAT number (such as 2184053-5) of the customer organisation will be used as the unique identifier.
Go to directory C:\Program Files\Ubisecure\customerid\tools\examples\importtool and create a text file crm.import containing the entries shown on the next table
crm.import# City Group entity: organization id: 2184053-5 organizationType: company crmid: 73476543 friendlyName: City Group Inc. # Electric Green Cabs entity: organization id: 4638229-4 organizationType: company crmid: 33241231 friendlyName: Electric Green Cabs Inc.
Open the command prompt. In C:\Program Files\Ubisecure\customerid\tools directory, run the following command:
import.cmd examples\importtool\crm.import
Successful execution will show a message like this:
ImportTool 5.0.31Create '2184053-5': OKCreate '4638229-4': OK- Now log in, find the newly created organisation "Electric Green Cabs." Observe its attributes and their order as at the end of Part 2 (Technical name, Name, CRM ID).
Part 4: Create users by email based invitation
- By system or organisation administrator using the Customer ID administration user interface
- Add a user
- Send an email invitation
- By REST interface
- Add a user
- Send an email invitation
- User Self-registration
- Using Import tool
More Information
You can find more information about the CustomerID Data Model in this page: