Lab 2.6: Federation Configuration
The purpose of this module is to understand how to configure SAML IdPs as authentication methods. This will enable applications to accept SAML federated identities.
Access to Microsoft Entra ID (formerly Azure AD) test tenant. The credentials will be provided by your instructor.
Overview

User will be accessing the SmartPlan application (SP B), but will log in at City Group Azure AD (IDP A) using credentials issued by IDP A.
Part 1: Configure Azure AD authentication method
Log in to SSO admin console, go to Global Method Settings and click on "New Method". Enter following data and click "Ok".
Obs: every student must have a unique "Name" such as azure.saml.yournameTitle City Group AD Name* azure.saml.yourname Method Type SAML Directory CustomerID Directory 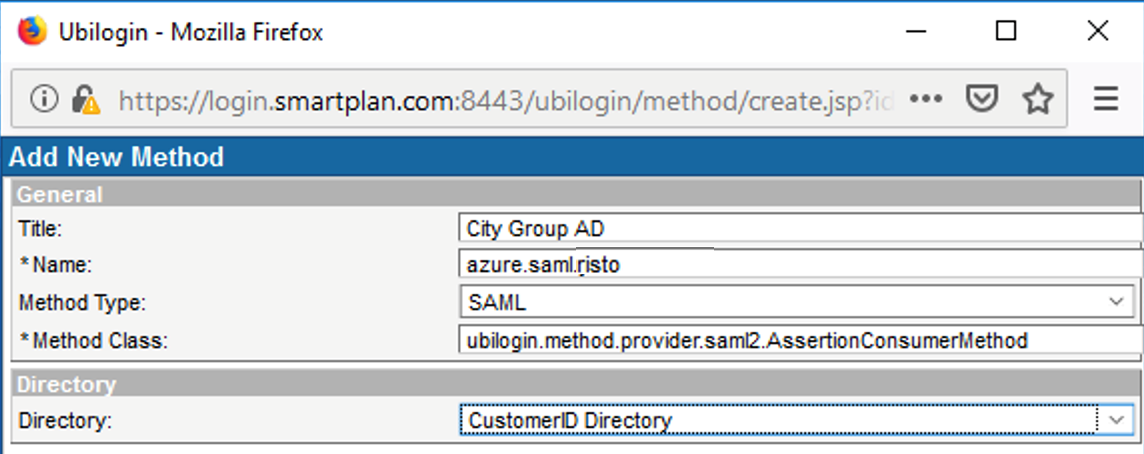
- Add following configuration string in the "Compatibility Flags" box:
HttpPostResponseValidate AuthnRequestSign MetadataCertificate IdpProxyDelegate
Then tick the "Enabled" box, and press "Update"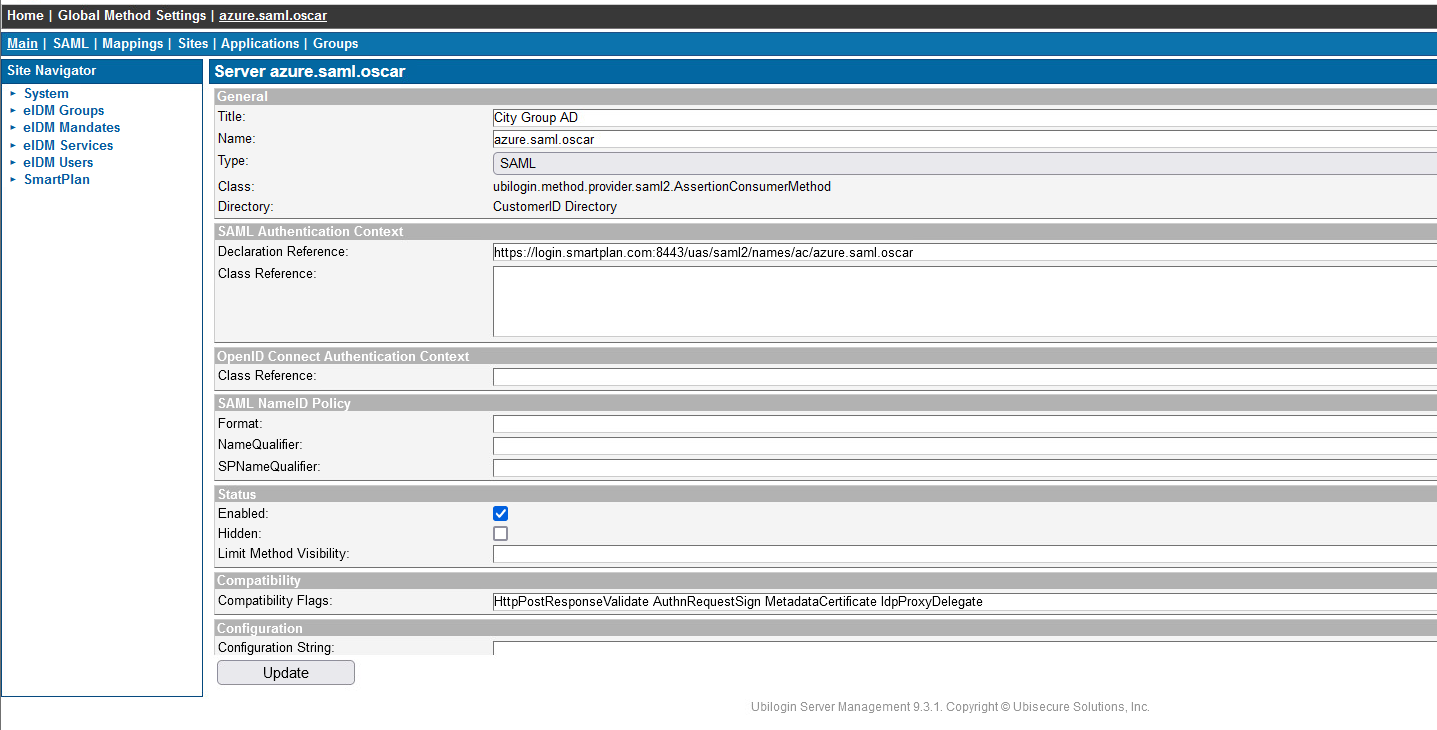
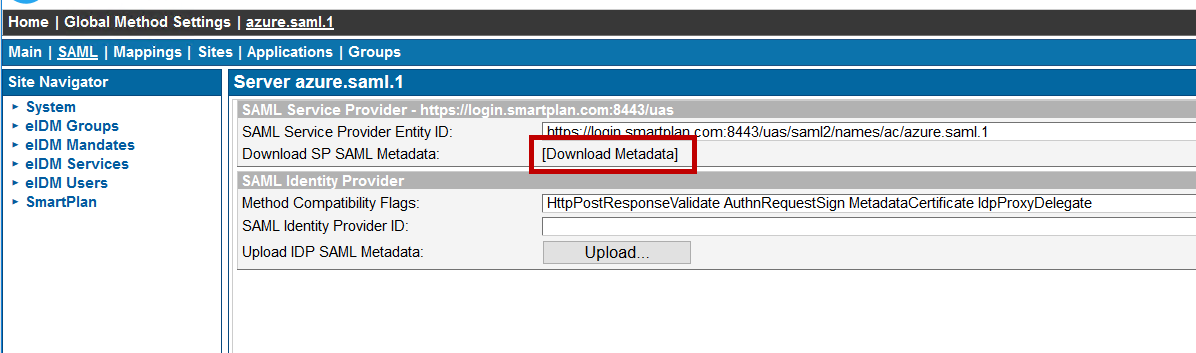
- On "SAML" tab, right-click "Download Metadata" link and save the metadata to file "smartplan-sp.xml" on Desktop. We will upload the IdP metadata later when it will be available.
- Add the method azure.saml.yourname to sites eIDM Users and SmartPlan (use "Site Methods" tab)
- Allow Azure authentication for SmartPlan Application: On SmartPlan site, go to Applications → SmartPlan Application → Allowed Methods, select method azure.saml.yourname and click on "Update".
Note: We allow access only to CustomerID users and therefore we don't add any new group on "Allowed To" tab. To be able to access SmartPlan Application, user's Azure AD identity must be found in CustomerID user directory.
Part 2: Configure Directory User Mapping
To link Azure AD identities to CustomerID user profiles, Directory User Mapping is configured as follows:
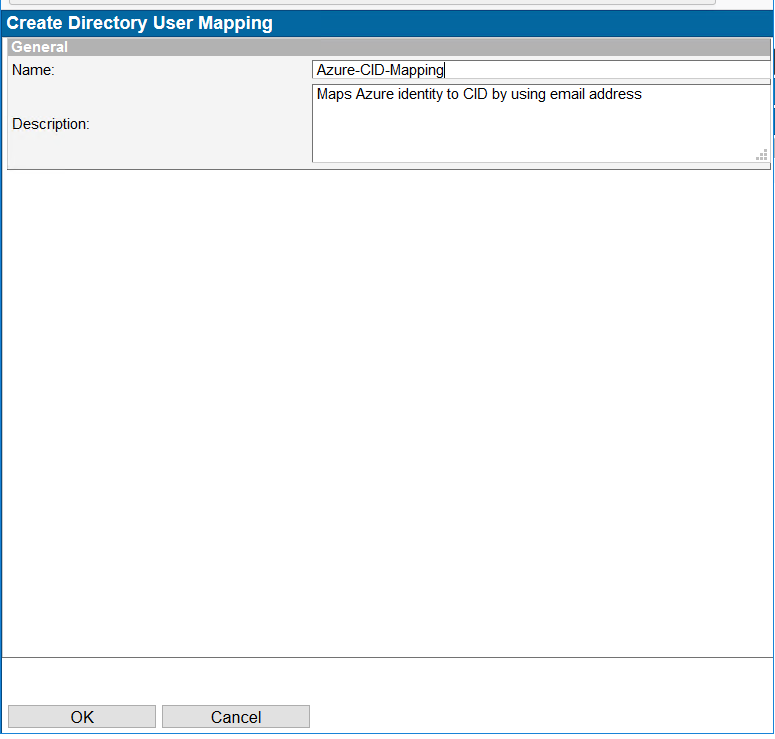
- Go to Home → Directory User Mappings, click on "New Mapping..."
- Enter "Azure-CID-Mapping" to the Name field and write a description, for example "Maps Azure identity to CID by using email address." Click OK button.
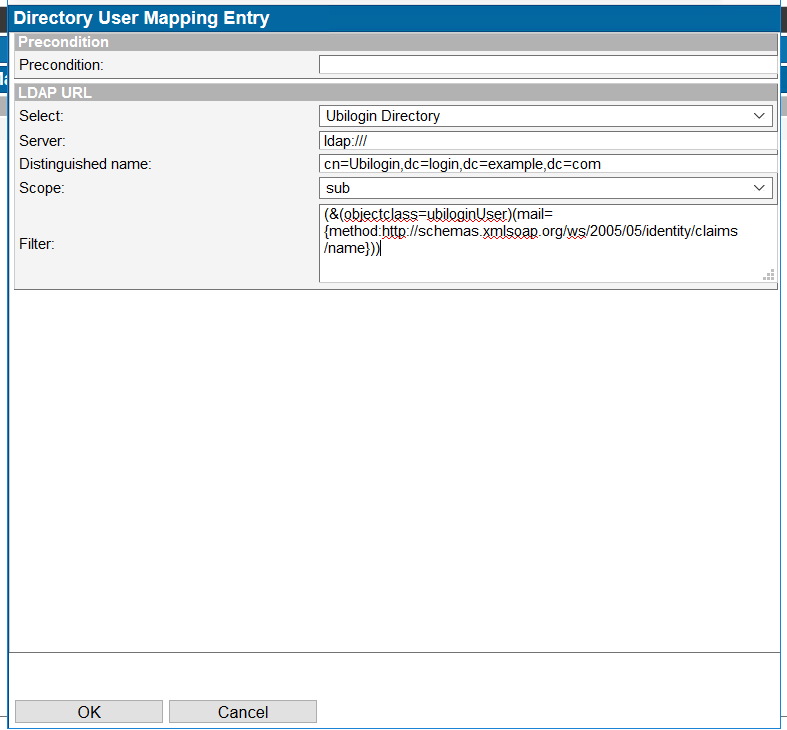
Go to "User Mappings" tab and click on "Add". Give following data:
Precondition <empty> Select Ubilogin Directory Server <filled in automatically> Distinguished Name <filled in automatically> Scope sub Filter (&(objectclass=ubiloginUser)(mail={method:http://schemas.xmlsoap.org/ws/2005/05/identity/claims/name})) This mapping will search for a CustomerID user with an email address matching the "name" claim received from Azure AD.
On Methods tab, select Citigroup AD (azure.saml.yourname) and Update.
Part 3: Register application in Azure AD
In order to access SmartPlan Application by using Azure AD authentication, the application must be added to the Azure AD tenant.
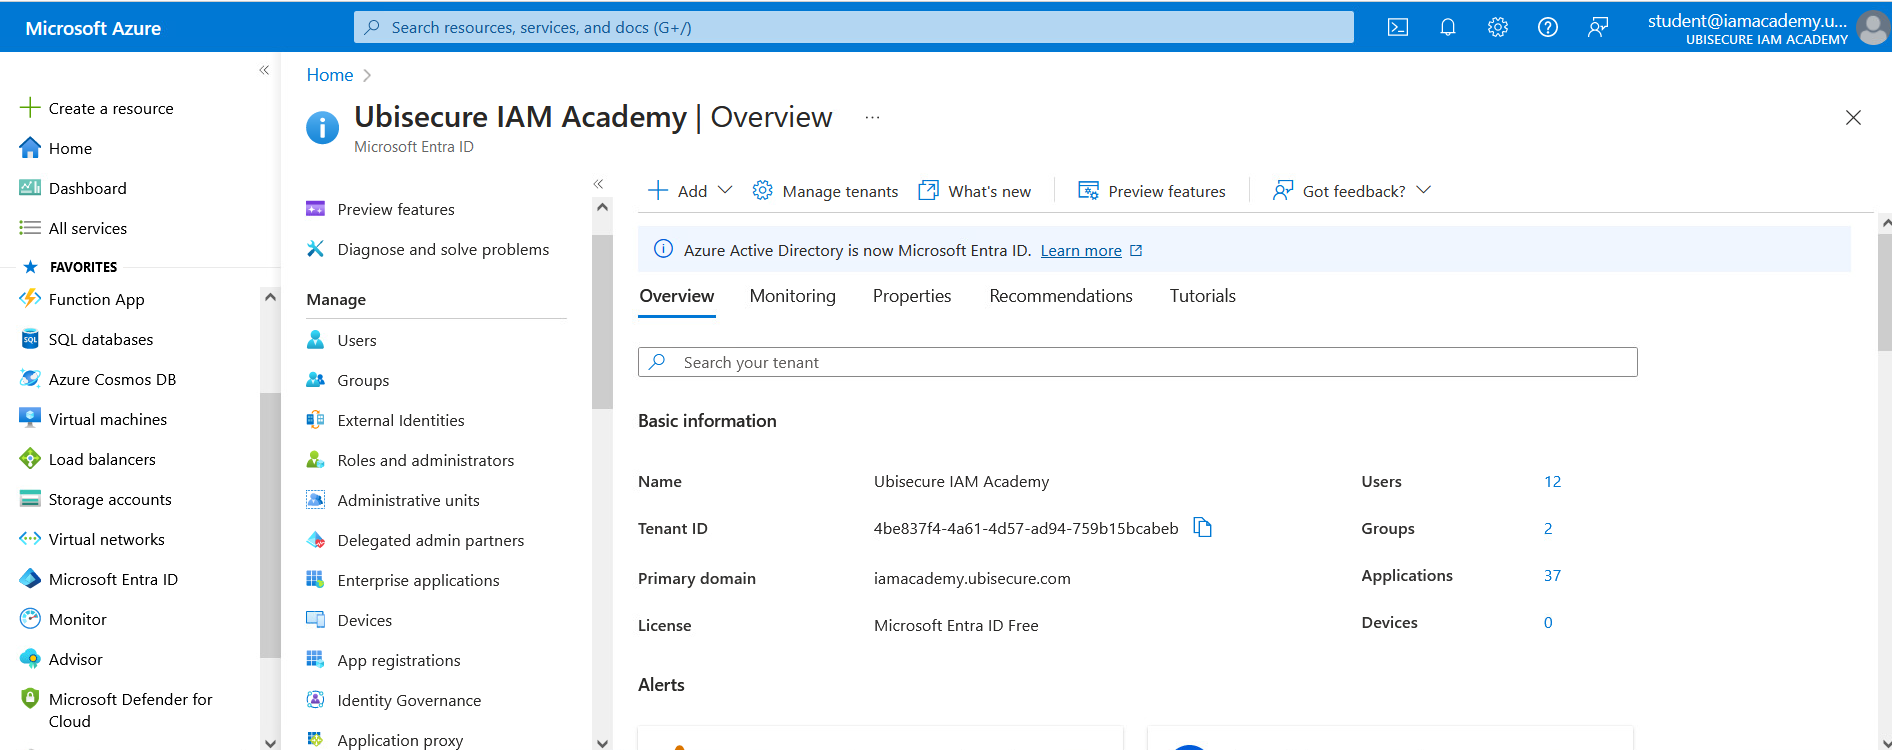
- Go to http://portal.azure.com/ and login with credentials given by your instructor.
- Go to "Microsoft Entra ID" → Enterprise Applications
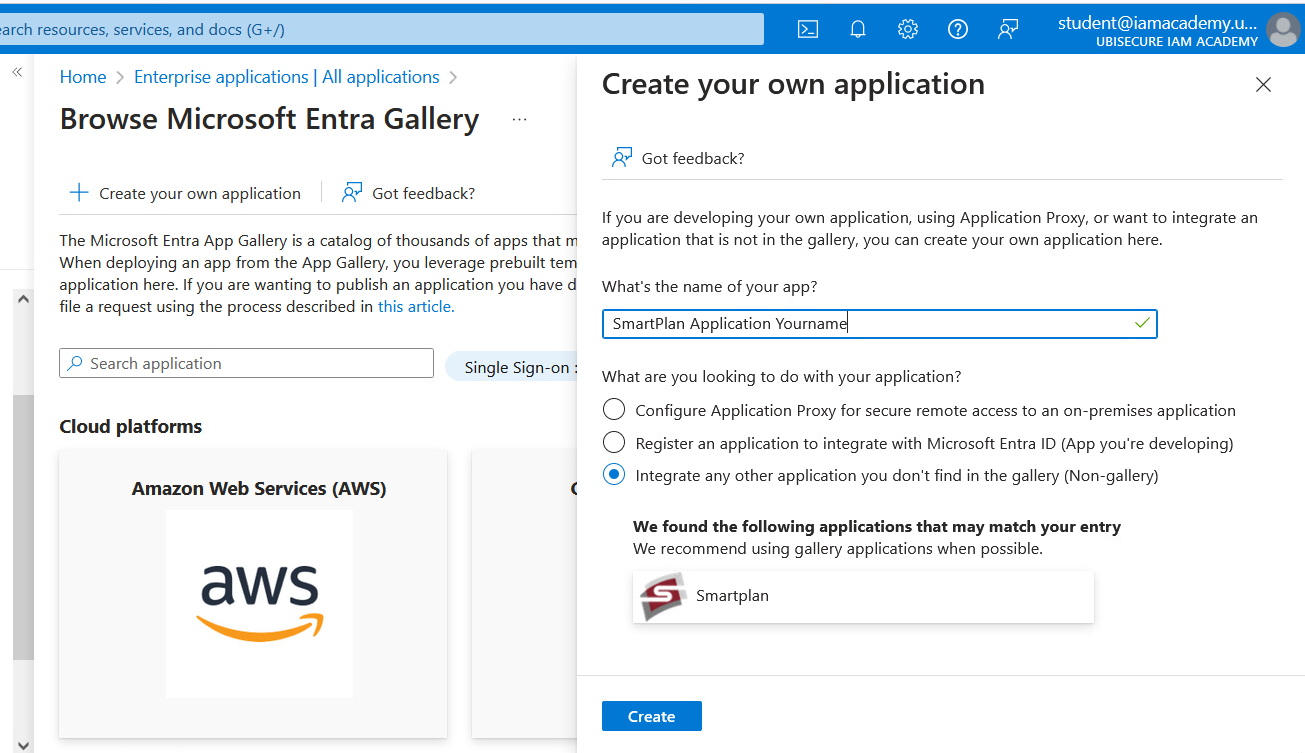
- Click "New Application" and then select "Create your own application".


- Give a unique application name, for example "SmartPlan Application" followed by your name, and select "Create".
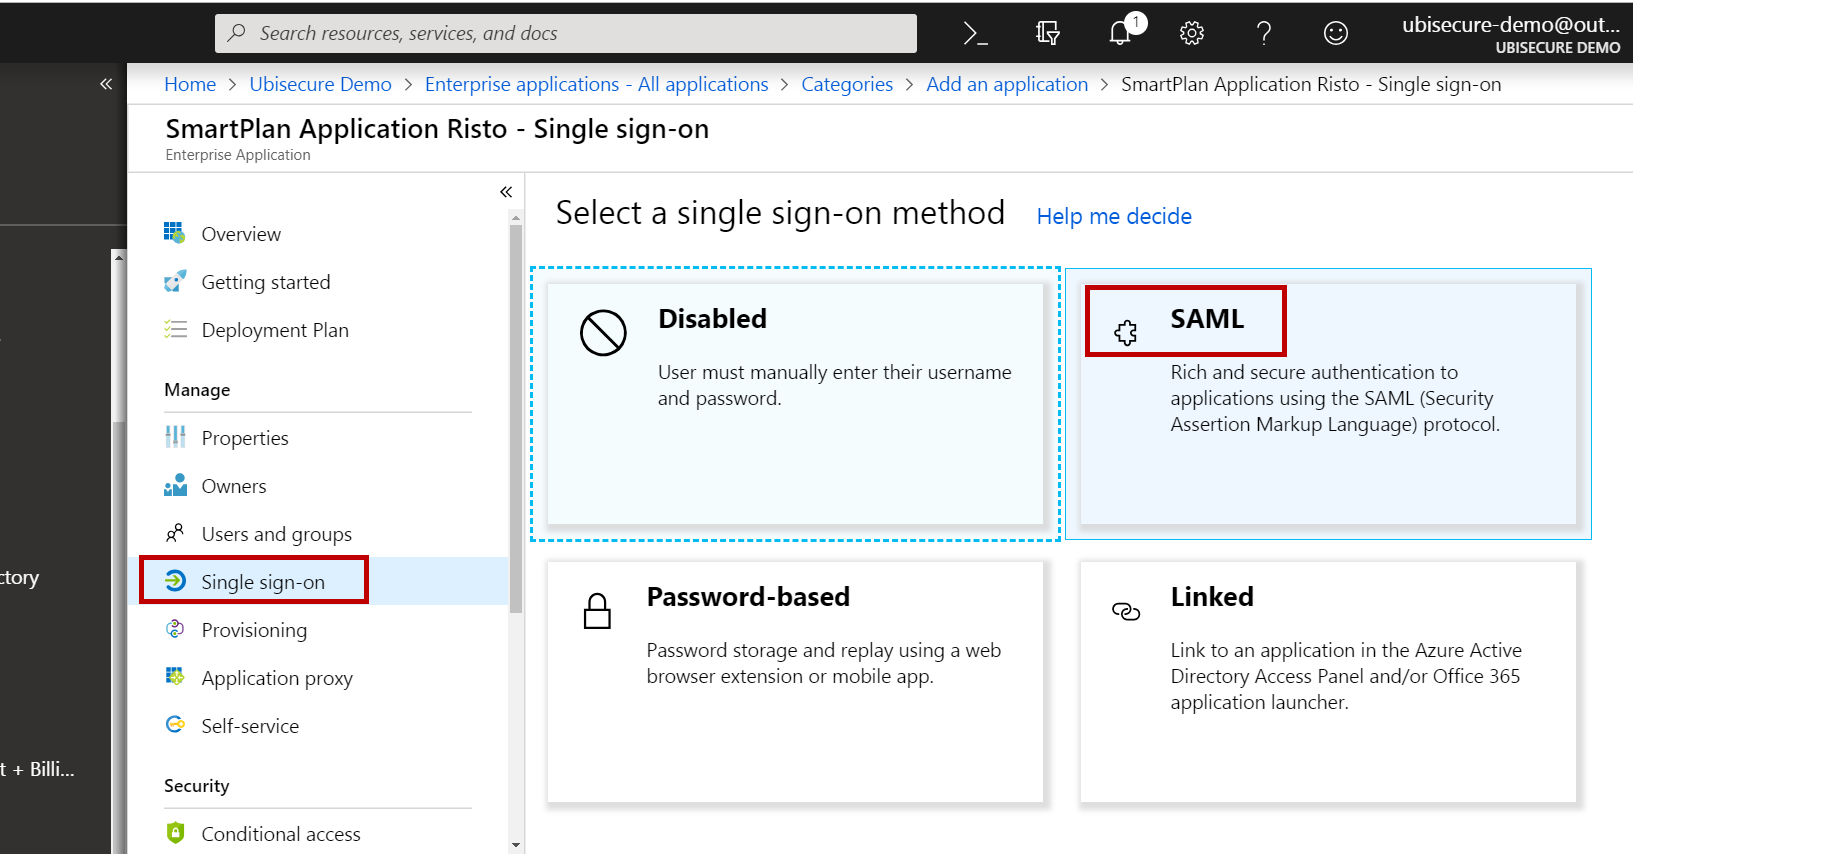
- Select "Single sign-on" and "SAML".
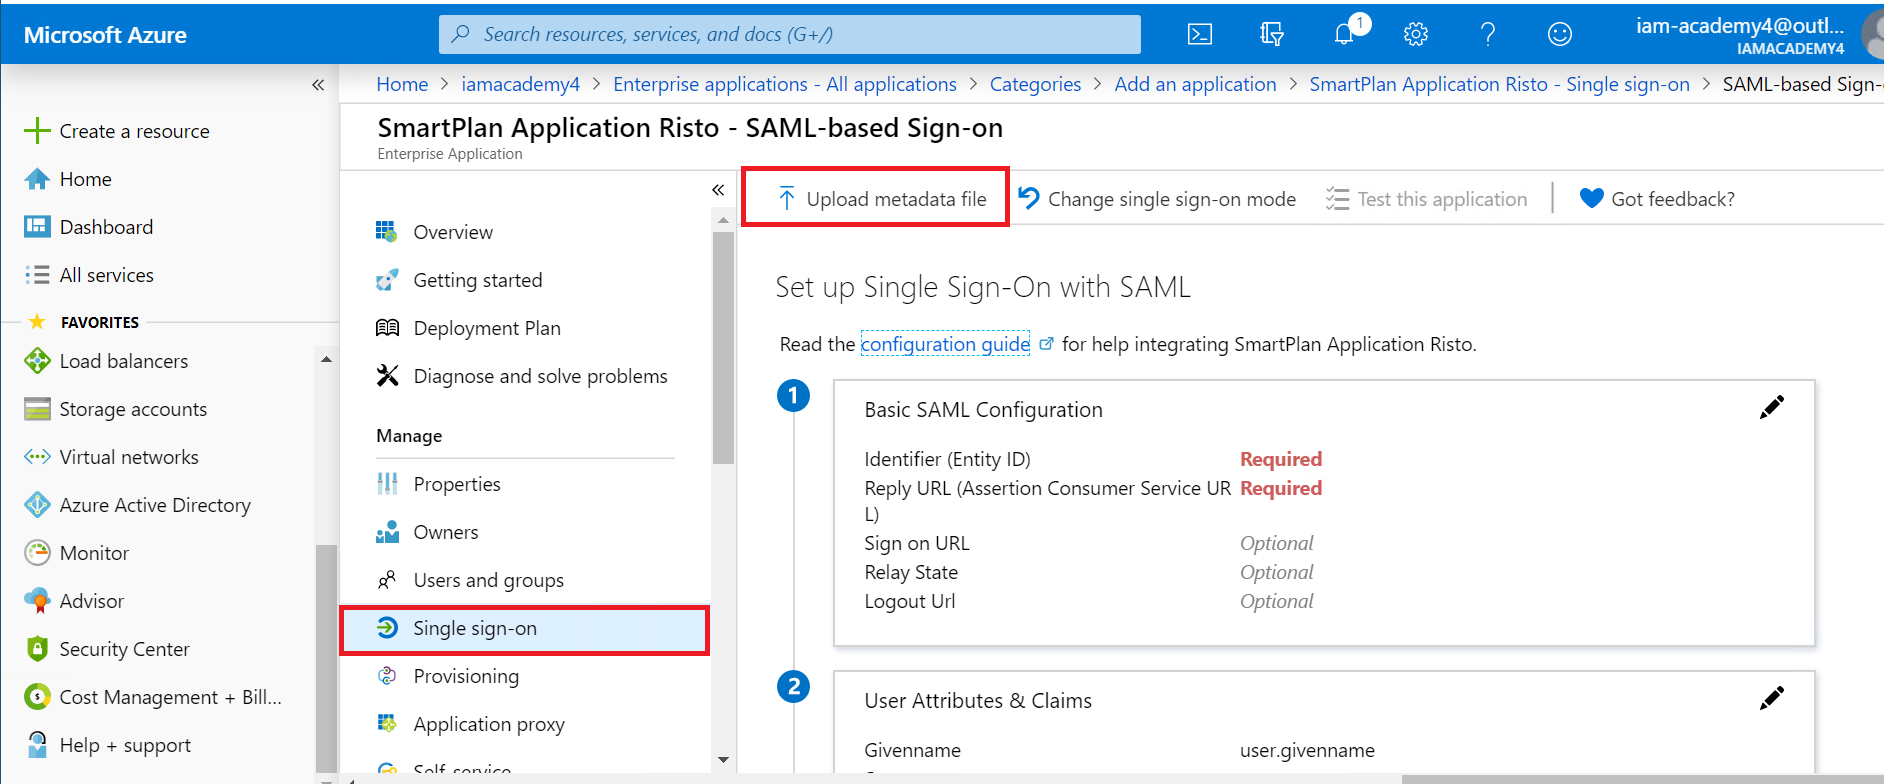
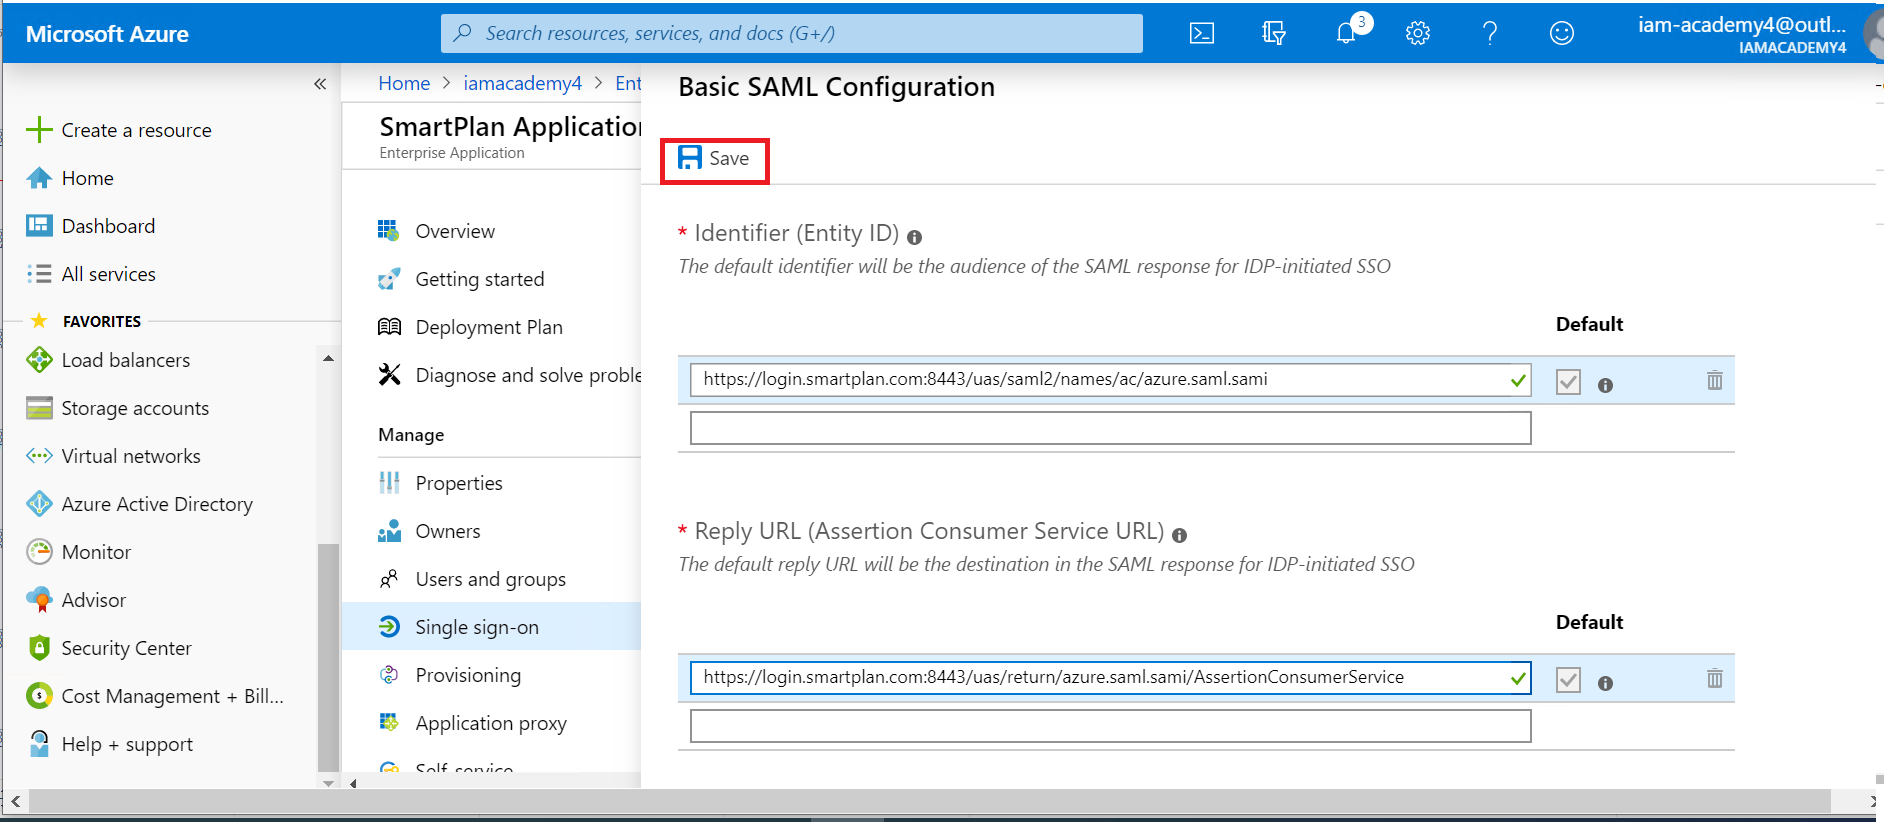
- Select "Upload metadata file" and select the file you saved on Part 1, step 3 on this lab ("smartplan-sp.xml" on Desktop). The Entity ID and Assertion Consumer Service URL will be displayed.
- Save the changes.
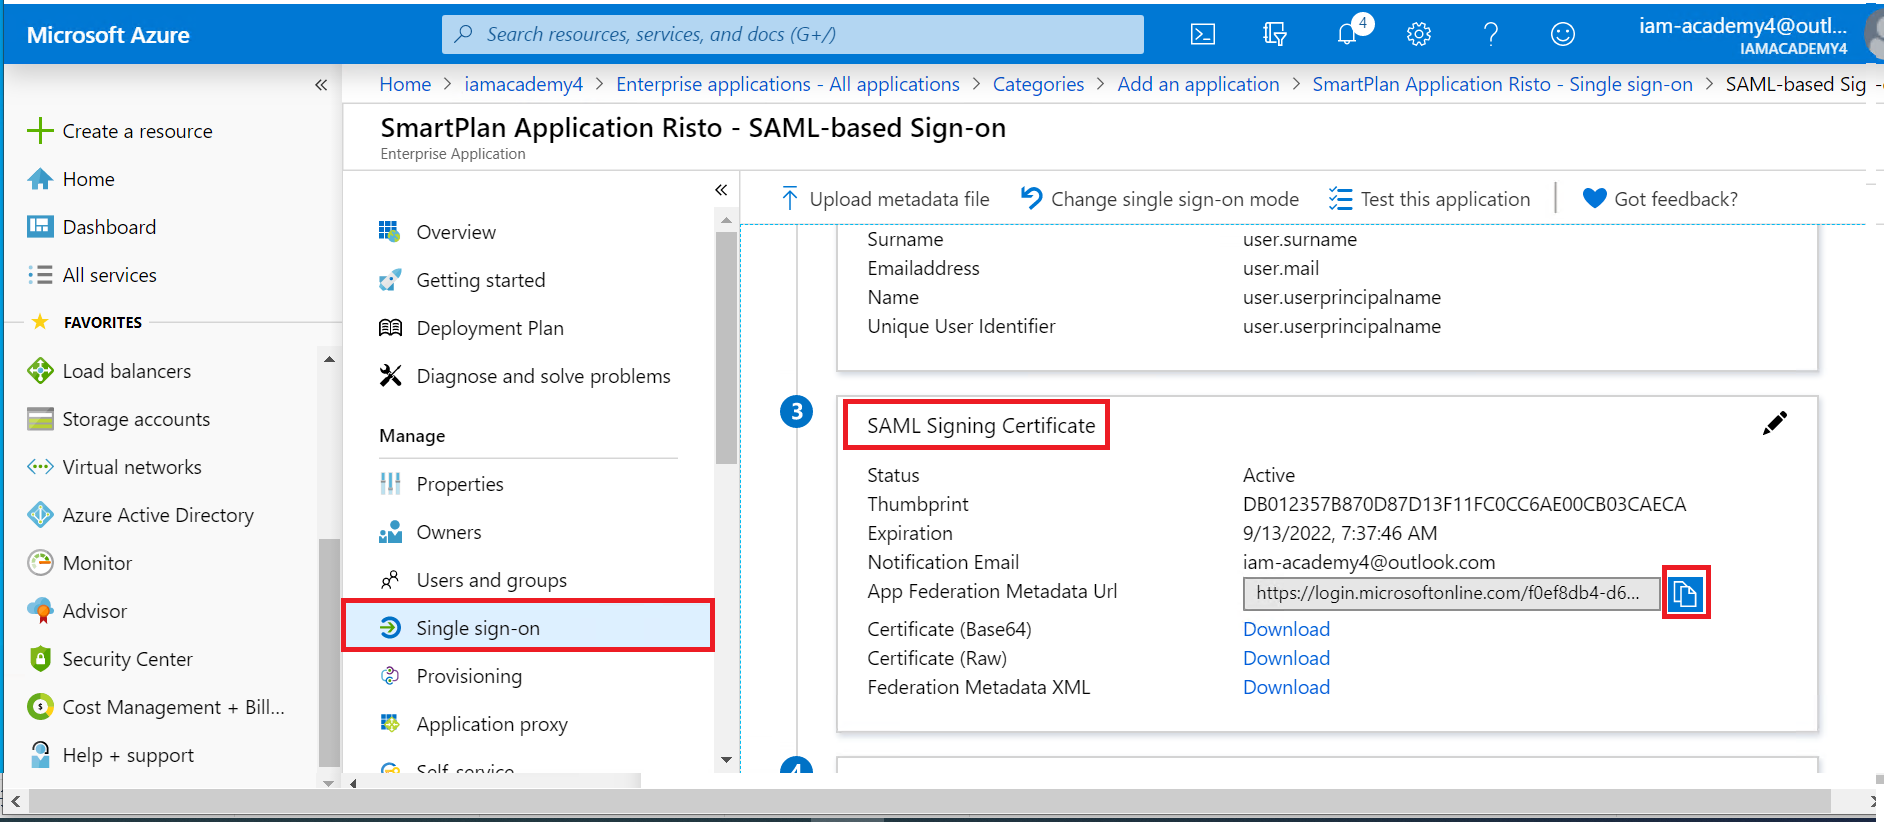
- Copy the App Federation metadata Url to clipboard.
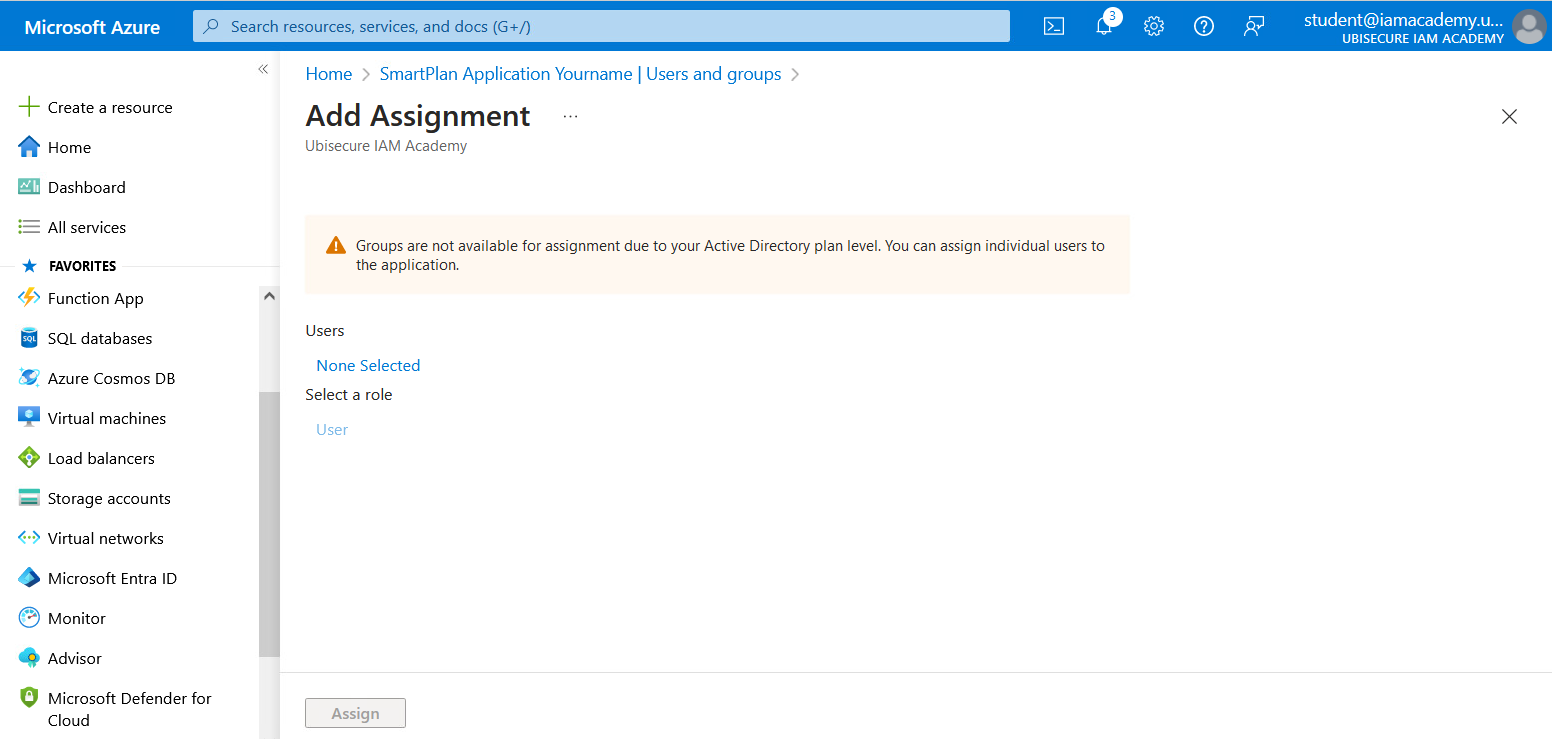
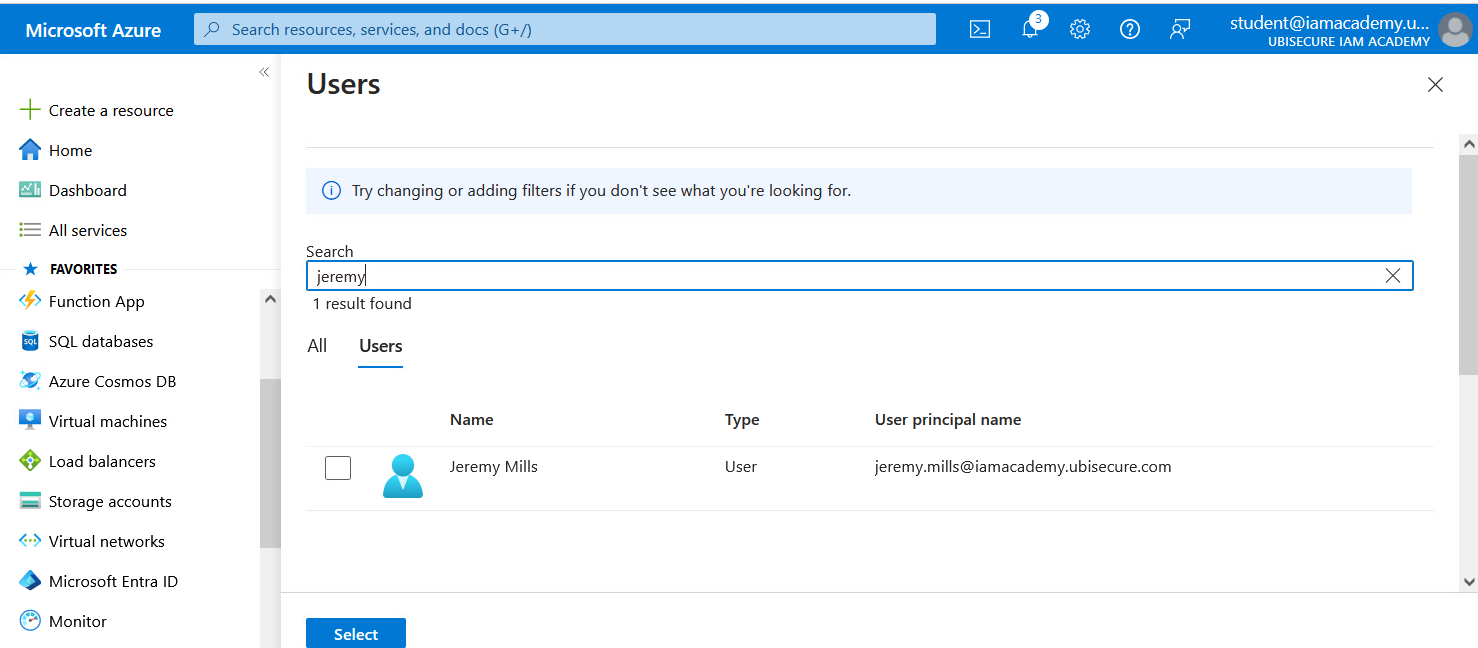
- Go to "Users and Groups" and click on "Add user/group".
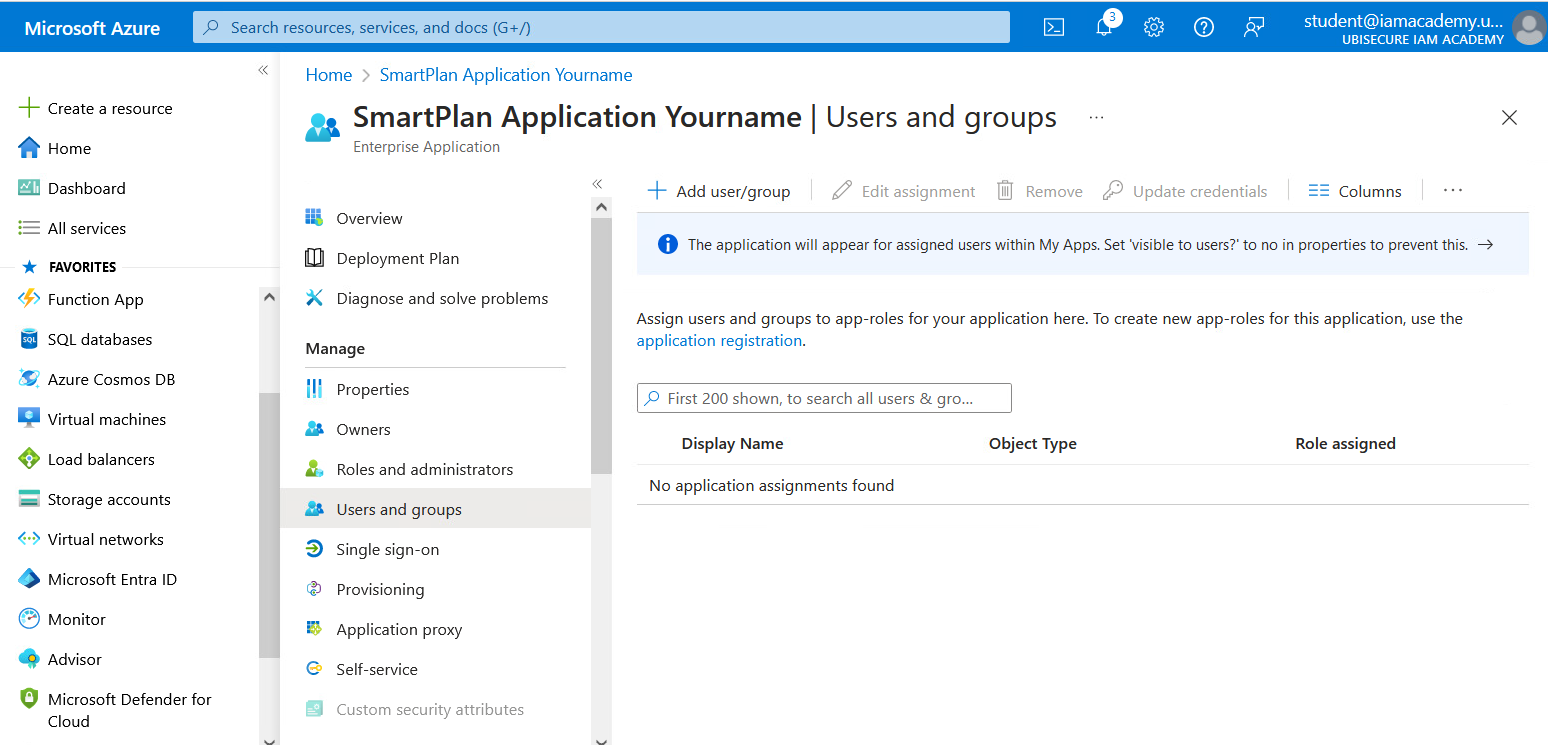
- First click on "None selected." When you see "Users", search for Jeremy, select "Jeremy Mills" and click "Select". Then click "Assign". Azure AD (Entra ID) configuration is now complete.

Part 4: Complete Azure AD authentication method configuration
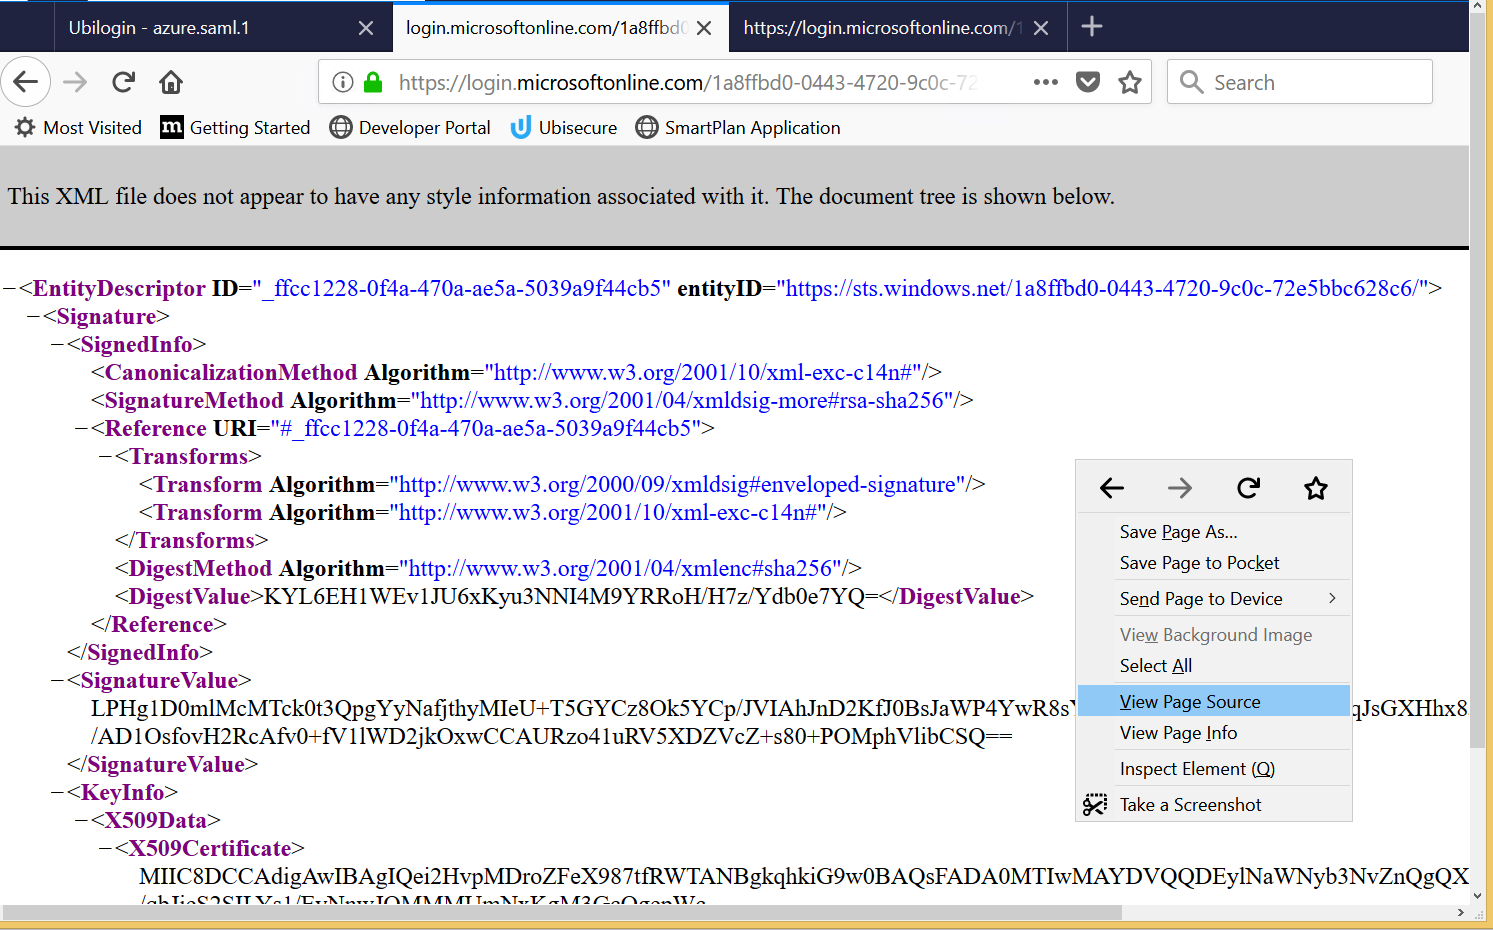
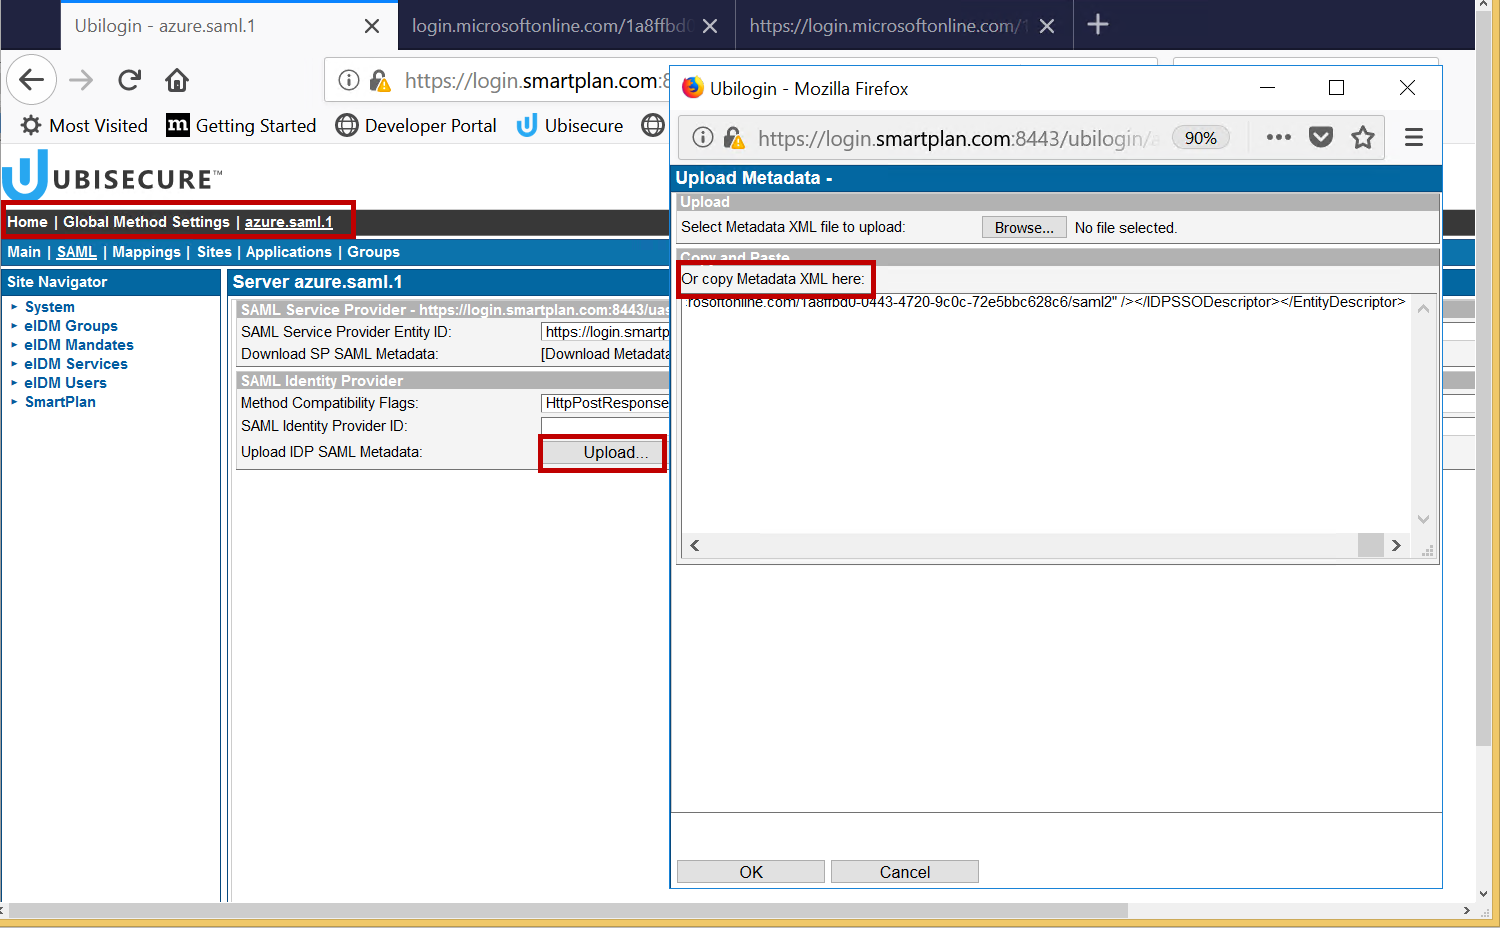
- To complete the federation configuration, upload the Azure metadata to the Azure authentication method in SSO. First open the Azure metadata URL (copied to clipboard in task 8 of step 3 above). Right-click and select "View Page Source". On the page source tab, copy the metadata to clipboard (ctrl-A ctrl-C).
- Go to SSO admin console: Home → Global Method Settings → Citigroup AD. Then select SAML tab. Click "Upload" and paste the Azure metadata from the clipboard. Click the OK button. Save the changes by clicking the Update button. You can see the SAML Identity Provider ID on the SAML tab.
- After configuring Directory User Mappings, UbiloginServer must be restarted, do it now.
Part 5: Log in to SmartPlan application
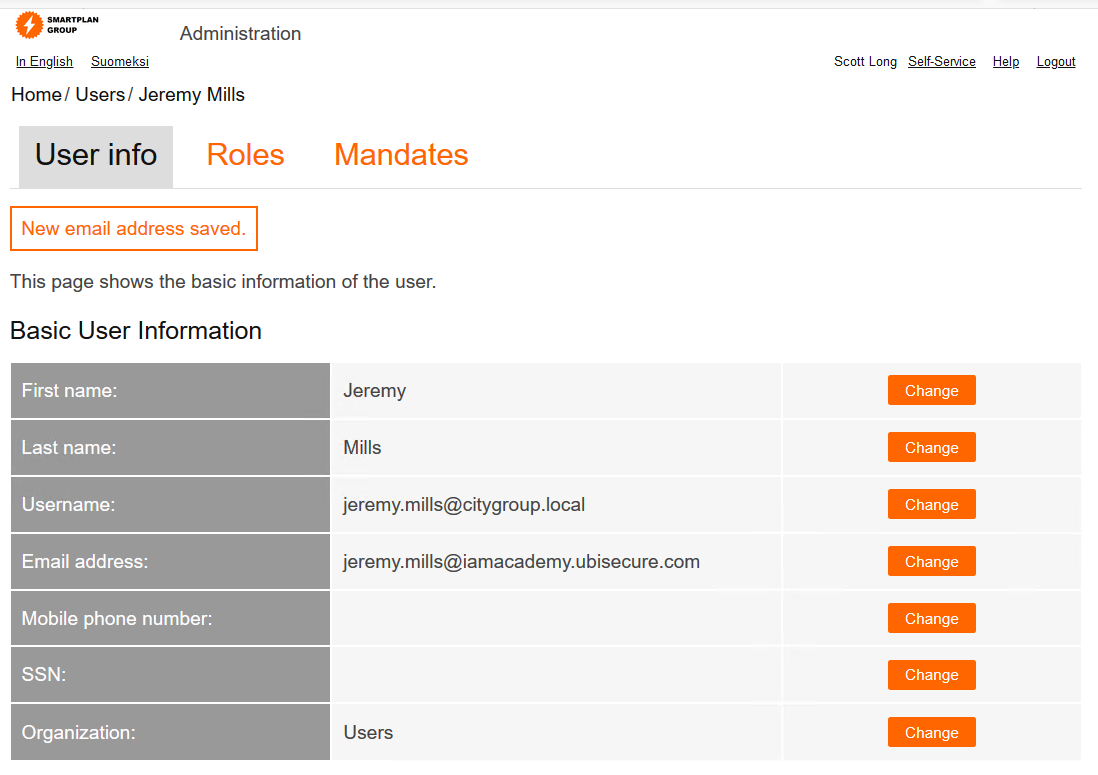
- For testing the federation from City Group Azure AD, we must have a test user in Azure AD and a user profile with matching email address in CustomerID. To achieve this, log in as Scott Long (the superuser) and modify the email address of Jeremy Mills in CustomerID to match the test user in Azure AD: jeremy.mills@iamacademy.ubisecure.com This is how will look once you saved the new email address:
- Logout from CustomerID and go to SmartPlan application
- Select "City Group AD" authentication method
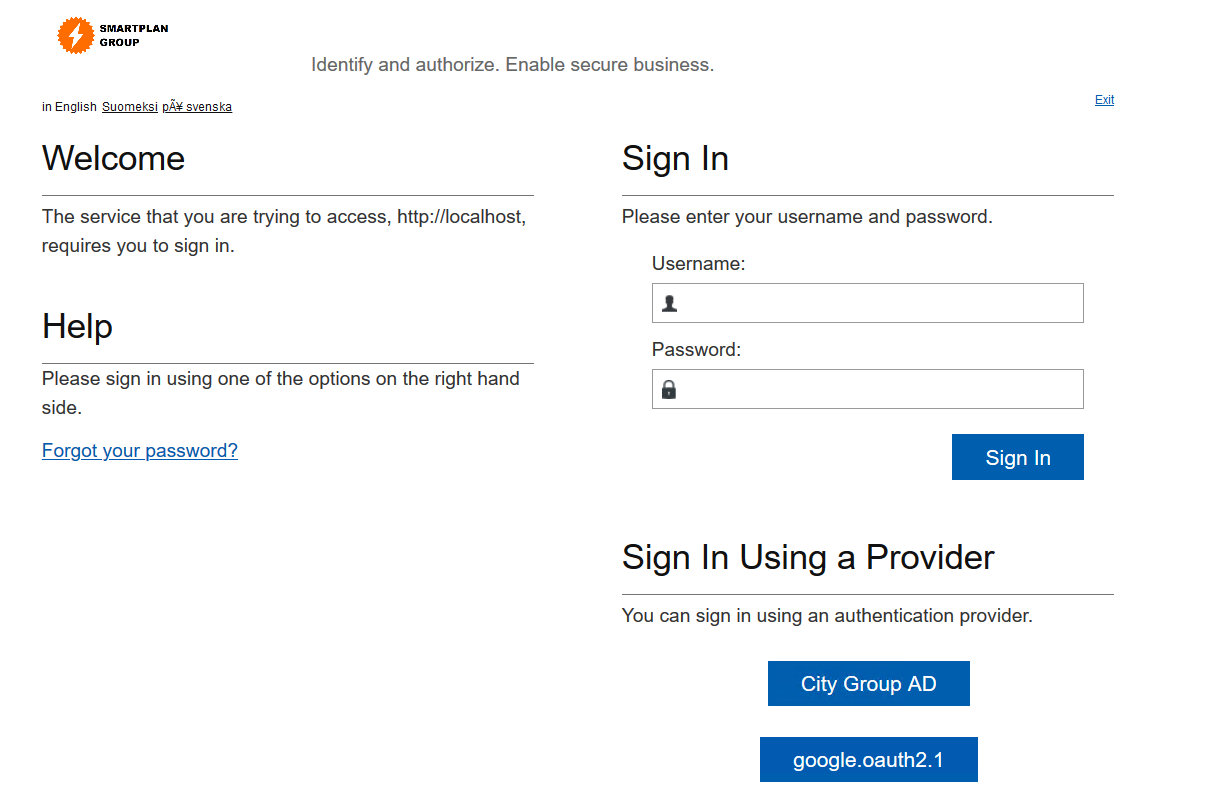
Log in as Jeremy Mills:
User ID jeremy.mills@iamacademy.ubisecure.com Password Will be given by the instructor - Note that in SmartPlan application you see Jeremy's attributes from CustomerID, not from Azure AD.
- You have now completed the exercise.
Extra task 1
In addition to CustomerID user attributes, you may need user attributes from the federation source in your applications. In this exercise we will pass user's job title from Azure AD to SmartPlan Application.
- First we need to configure Azure AD to include the job title in the SAML assertion. Open your application in Azure Portal: go to Azure Active Directory → Enterprise Applications → "SmartPlan Application Yourname"
- Select "Single sign-on" on the navigation pane
- On section "3. User Attributes" check "View and edit all other user attributes"
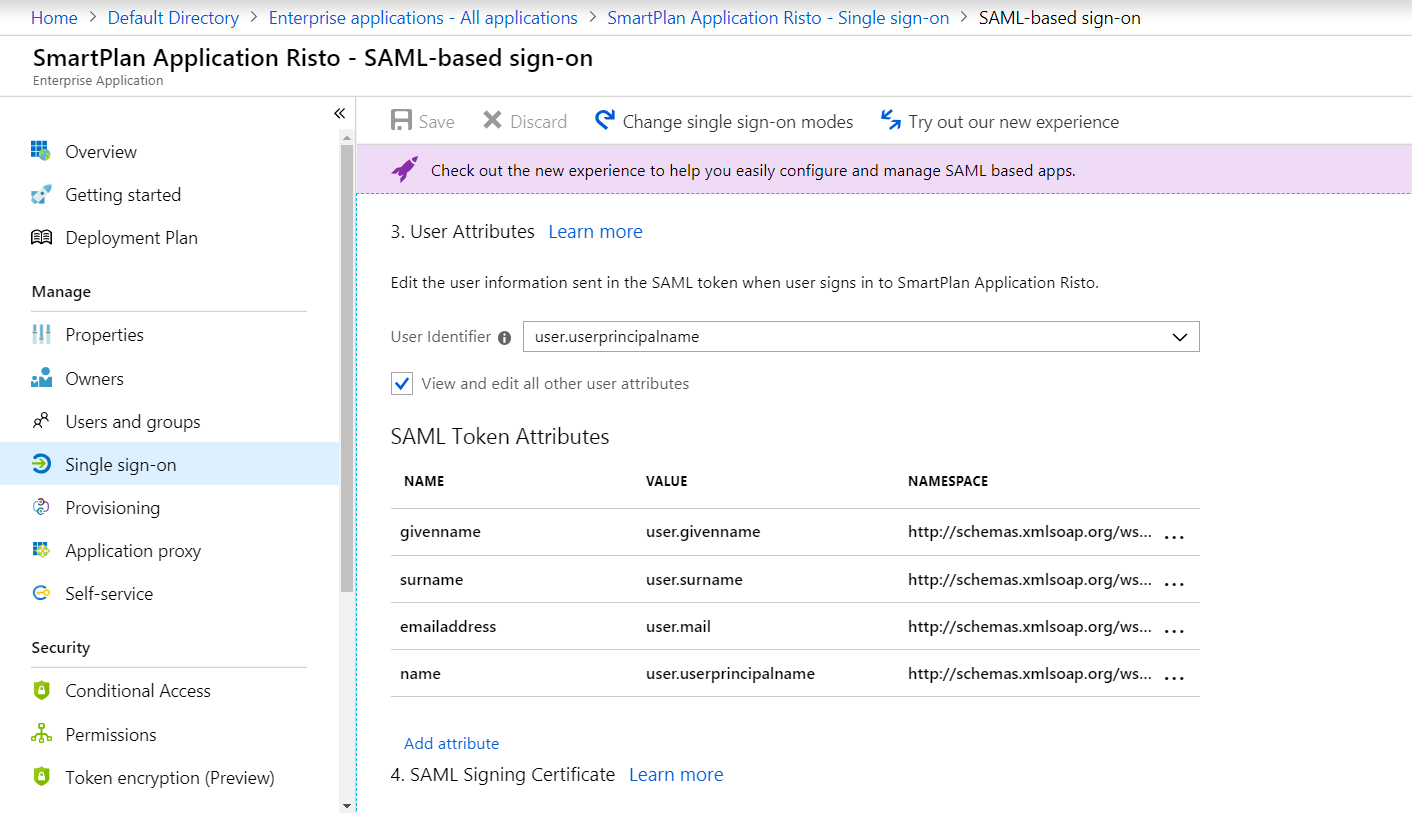
- Click on "Add attribute"
Enter following values and click on "OK". Then save the changes.
Name title Value user.jobtitle Namespace http://schemas.xmlsoap.org/ws/2005/05/identity/claims Next we modify the Authorization Policy to include user's job title from Azure AD. Go to SSO admin UI (https://login.smartplan.com:8443/ubilogin/) and navigate to Authorization Policies of site SmartPlan.
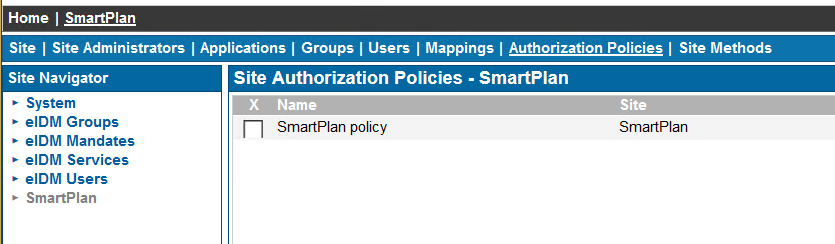
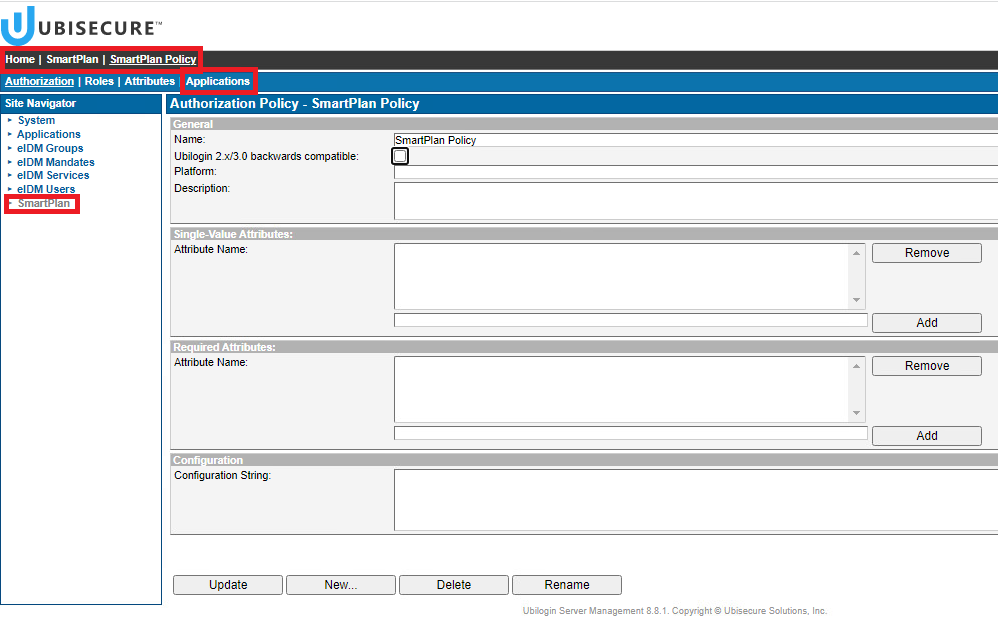
- Click on "SmartPlan policy" and select tab "Attributes".
Add new attribute as follows and click on "Update":
Group eIDM Users Name title Value method:http://schemas.xmlsoap.org/ws/2005/05/identity/claims/title 
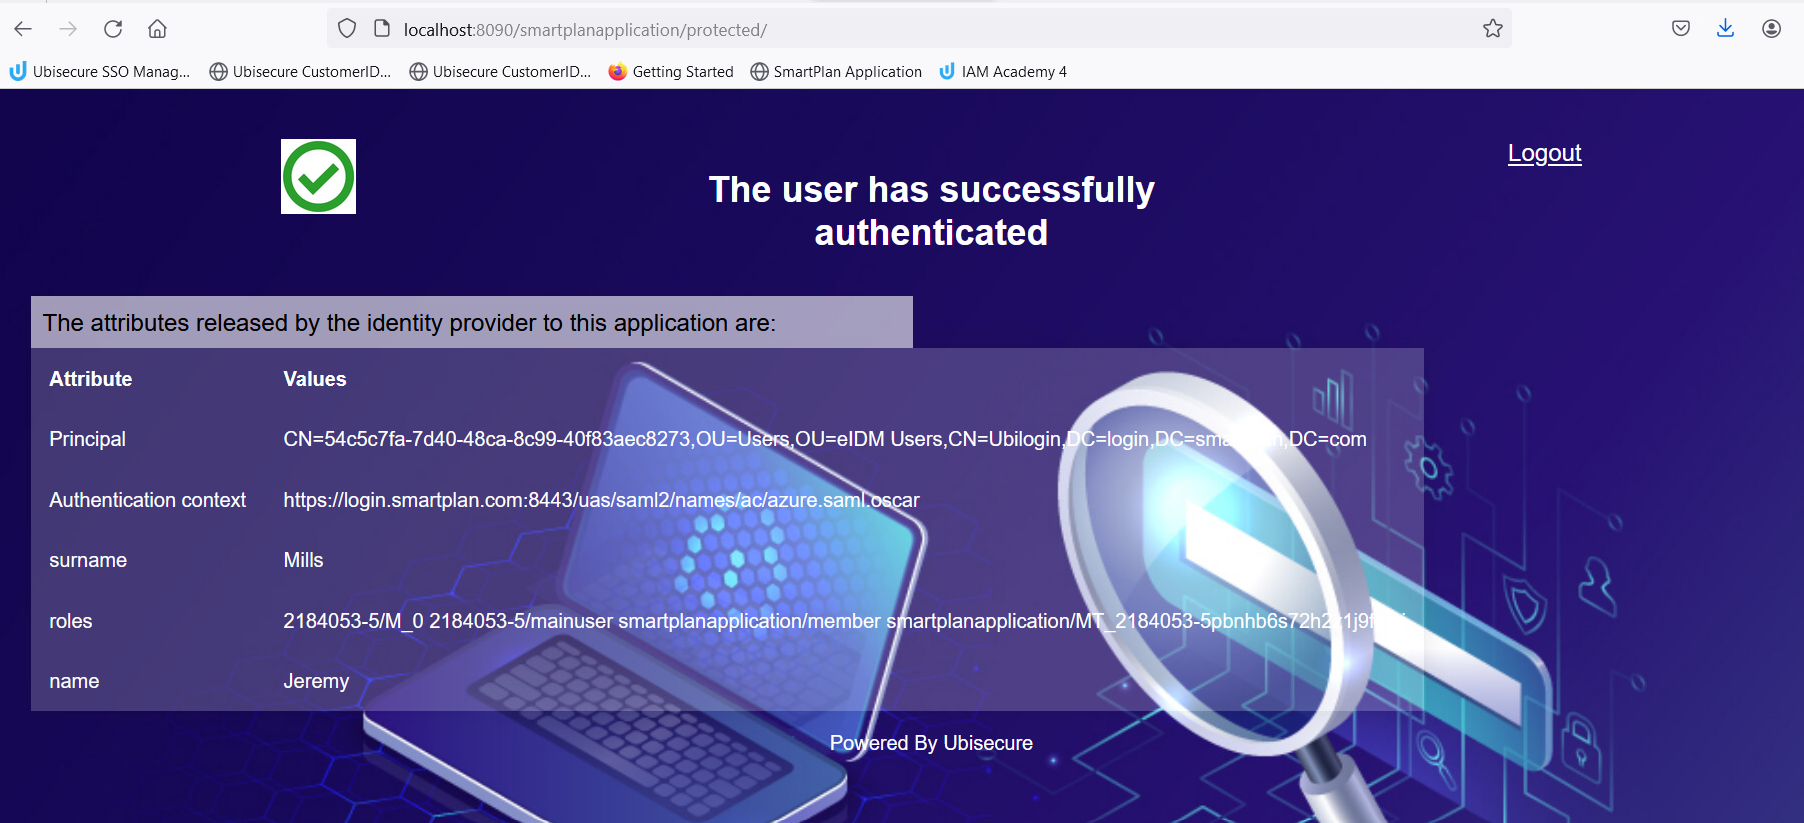
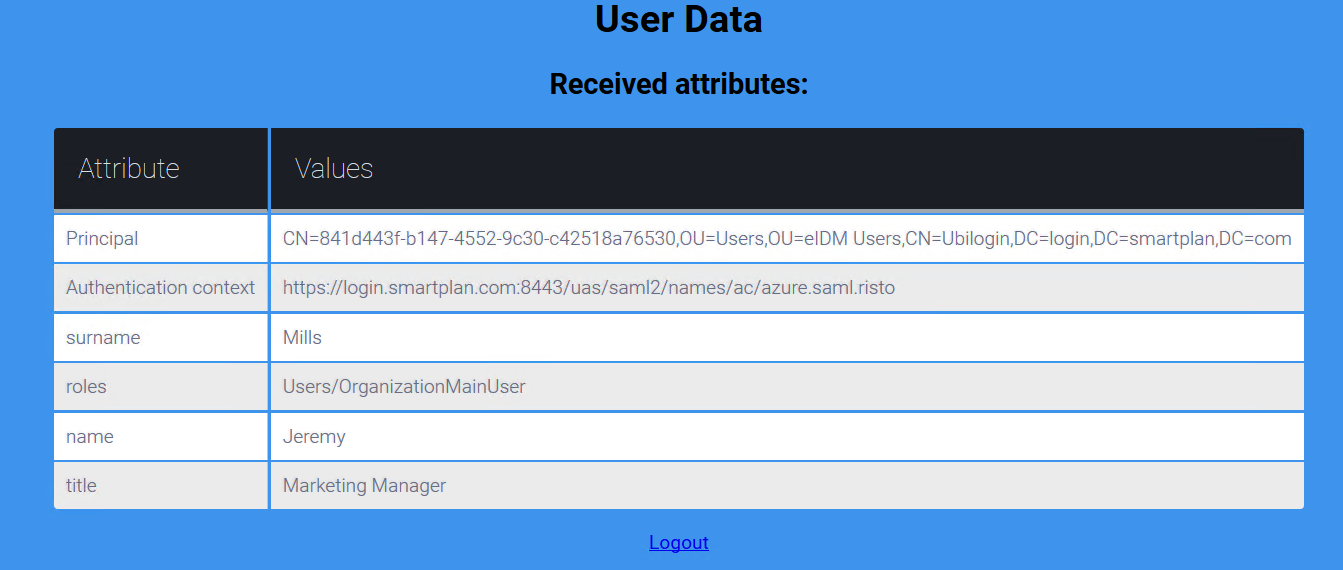
Log on to SmartPlan Application (http://localhost:8090/smartplanapplication/) via City Group AD and verify that you now see Jeremy's job title:
Extra task 2
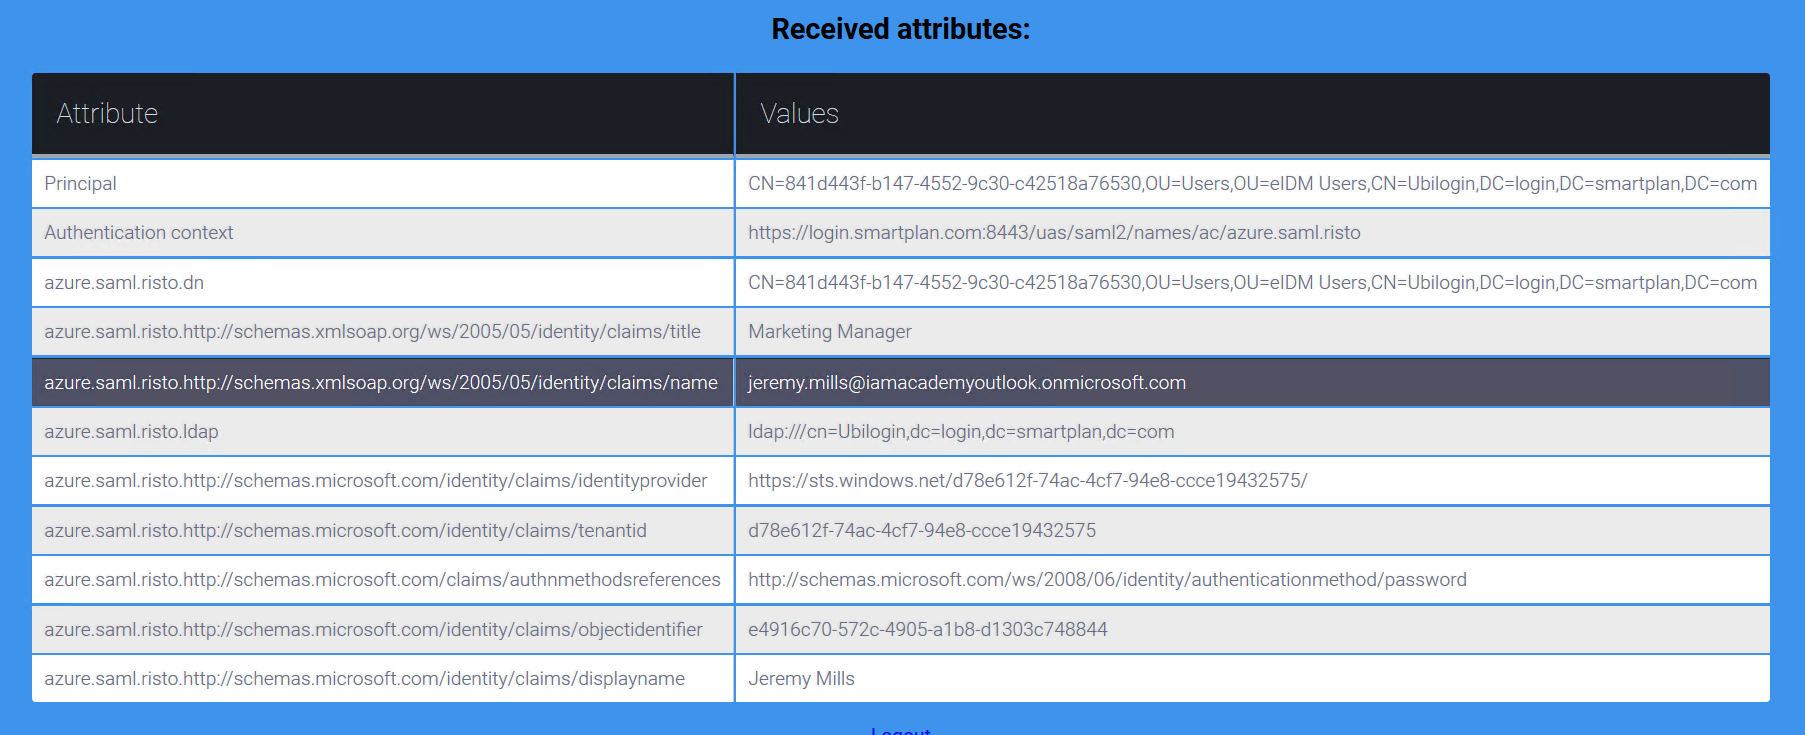
Sometimes it's useful to see all attributes received from a federation source e.g. for debugging purposes. This can be done by removing the Authorization Policy of SmartPlan Application.
- Go to SSO admin UI (https://login.smartplan.com:8443/ubilogin/) and navigate to Authorzation Policies of site SmartPlan: Home - SmartPlan - Authorization Policies.
- Select tab "Applications"
- Remove SmartPlan Application.
- Log on to SmartPlan Application (http://localhost:8090/smartplanapplication/) via City Group AD and you should see all attributes received from Azure AD: