Two node in-place upgrade on Windows - SSO and CustomerID
Last reviewed: 2022-07-06
PLEASE NOTE!
Please note that this Knowledge Base article has been created only for 2023.1
Please note that the information in this Knowledge Base has not undergone extensive testing or verification by our Engineering team. While this article offers valuable insights, it may not guarantee flawless solutions for your specific Identity Server environment and configuration.
Please contact your Ubisecure partner and/or Ubisecure Support team to obtain more information.
Two node upgrade process when SSO and CID are running on the same machine
The idea is to do node by node upgrade for SSO and CID and have minimal service break during the upgrade.
For this kind of upgrade, you will need to route production traffic only to SSO node 1 and CID node 1, when you are upgrading SSO Node 2 and CID Node 2.
Once SSO Node 2 and CID Node 2 are upgraded then route production traffic to upgraded nodes. After this start upgrading SSO Node1 and CID Node1 .
High-level plan is :
- Route production traffic only to SSO node 1 and CID node 1 (Active line of servers)
- Upgrade SSO Node 2 – Make this New active node
- Upgrade CID Node 2 (slave) – Make this new Master
- Data migration from SSO Node 1 to SSO Node 2
- Route production traffic only to SSO node 2 and CID node 2 upgraded in the above steps (These will act as Active Nodes from here onwards)
- Upgrade old SSO Node 1
- Upgrade old CID Node 1 (old master) - Make this new slave
- Restore proxy setup to configure HA setup
Let's use letters A for Active and P for Passive to avoid confusion in our current setup.
| SSO 1 = SSO A | SSO 2 = SSO P |
| CID Master = CID A | CID Slave = CID P |
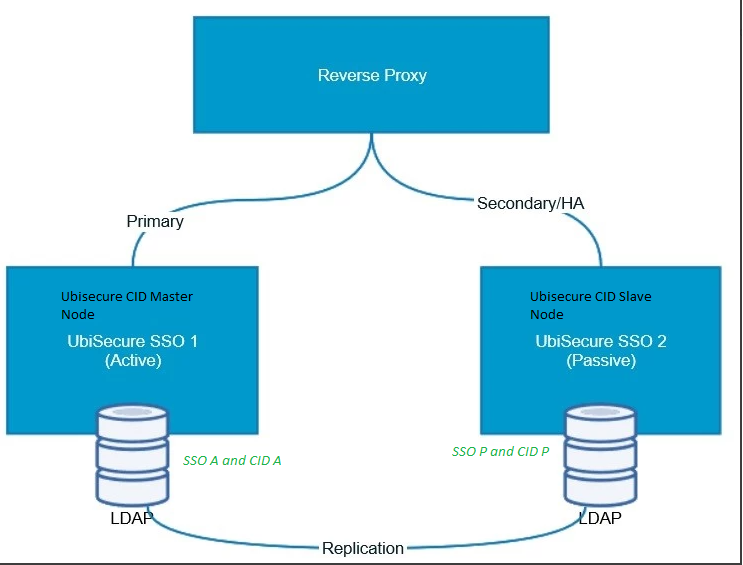
1) Traffic Switchover: Make sure all traffic is going only to SSO Node A And CID Node A (old master)
2) SSO Node P upgrade :
Kindly follow all the steps mentioned below :
You can refer to this page for details information but you need to consider SSO node1 in this document as SSO P for you. So perform all the steps for SSO Node 1 mentioned in this document (until step 6), on your SSO Node P. - Clustered upgrade on Windows - SSO
- Find out which SSO node is the schema master
- Use the Active Directory Schema snap-in to connect an AD LDS instance
- Identify the schema master , make the configuration on Node P as schema master
- Configure the reverse proxy server to route the production traffic only to the SSO A node
- Setup both SSO nodes for the activity test
- Optional: Test through the reverse proxy server which SSO node is active
- Disable traffic from the reverse proxy server to the SSO P node
- Test through the reverse proxy server which SSO node is active
- Disable the replication
- Stop the UbiloginServer process from the SSO P node
- Disable outbound and inbound replication from the SSO A node
- Disable outbound and inbound replication from the SSO P node
- Configure the metadata clean up for the retired AD LDS instances in the SSO P node
- Clean up the metadata from the SSO P node using the dsmgmt tool
- Remove the SSO A node server object from the SSO P node using the ADSI Edit tool
- Update the SSO P node
- Use document: Upgrade on Windows - SSO
Once SSO P is upgraded, move to CID P (slave) upgrade.
3) CID Node P upgrade :
Follow the steps in order. Issue all commands in the Windows command prompt using the Administrator user account.
a. Stop ubiloginserver service in SSO Node P and stop wildfly sevice in CID Node P.
b. It is a good idea to take periodic backups of running installations.
- Back up Ubisecure CustomerID. See instructions from Backup And Restore - CustomerID.
You should do this regularly but for the upgrade process we advise you in this step to move the existing installation to a specific location
customerid-oldwhich is used in this document.cd "%PROGRAMFILES%\Ubisecure" move customerid customerid-old
c. Perform on Ubisecure CustomerID P Node (slave) :
- Unpack the distribution package. See instructions from Distribution package unpacking on Windows - CustomerID.
- Your installation folder e.g.
%PROGRAMFILES%\Ubisecure\customeridmust be empty before doing this step, Deployment template extraction on Windows - CustomerID - Check Java. See instructions from Java check on Windows - CustomerID.
- Install WildFly. See instructions from Two node WildFly installation on Windows - CustomerID. (Ensure to remove the old Wildfly service before installing the new one)
- Import configuration settings from the previous installation.
In order to resume the service after the upgrade it is necessary to copy some configuration settings from the previous installation. These settings are contained in the file%PROGRAMFILES%\Ubisecure\customerid-old\application\win32.config.In the new installation the
win32.configfile is located further down the similar path in theconfigsub-folder and must first be copied to the application folder.cd /D "%PROGRAMFILES%\Ubisecure\customerid\application" copy config\win32.config
The values must be copied carefully from the previous installation as the configuration options may have changed. You should copy only those values that have the same keys on both old and new
win32.configfiles. Refer to page Setup template on Windows - CustomerID for more information about the current configuration options.NOTE: If you have made configuration changes to any of the
win32.configparameters directly ineidm2.propertiesfile after previously running thesetup.cmdensure that these changes are included in the newwin32.configfile. For example, if you have changed the REST credentials ineidm2.propertiesfile, make sure the same values are now present in thewin32.configfile.5. Run the setup script.
cd /D "%PROGRAMFILES%\Ubisecure\customerid\application"
setup.cmd
- Prepare WildFly for domain configuration. See instructions from Two node WildFly preparation on Windows - CustomerID. (In case of following error: "Failed to connect to the controller. The controller is not available at localhost:9990: java.net.ConnectException: WFLYPRT0053". Ensure wildfly is started on Node P )
- Configure HTTPS, See Two node SSL configuration on Windows - CustomerID - This generates certificate files and Keystore (default location:
%WILDFLY_HOME%\domain\configuration\keystore.pfx) is registered to WildFly in the next step - master node WildFly configuration. - Configure WildFly on CustomerID Master Node. See instructions from Two node master WildFly configuration on Windows - CustomerID
- Configure the singleton subsystem. See instructions from Two node singleton subsystem configuration on Windows - CustomerID
- Perform database schema update depending on versions.
See Database Changes.
- When upgrading from CustomerID version 5.6.x or older update CustomerID LDAP entries to facilitate REST API OAuth2 authentication. See LDAP import instructions from SSO management web applications creation on Windows - CustomerID.
10. Create JDBC data source to WildFly. See instructions from Two node JDBC data source creation on Windows - CustomerID
11. Create a Mail Session configuration for WildFly. See instructions from Two node mail session creation on Windows - CustomerID
12. Configure logging for CustomerID. See instructions from Two node logging configuration on Windows - CustomerID
13. Register "customerid.home" system property to WildFly. See instructions from WildFly system property registration on Windows - CustomerID
d. Perform on Ubisecure SSO Node P :
- Upgrade PostgreSQL JDBC driver to SSO node(s). See instructions from PostgreSQL JDBC driver installation to SSO on Windows - CustomerID.
- Upgrade Ubisecure CustomerID SSO Adapter to SSO node(s). See instructions from CustomerID SSO Adapter extension upgrade
e. Perform on the CustomerID new Master Node (Node P) :
- Deploy the Worker Enterprise Archive, CustomerID Enterprise Archive to the WildFly domain. See instructions from Two node deployment to WildFly on Windows - CustomerID.
- Restart Ubisecure CustomerID. See instructions from Restart on Windows - CustomerID.
f. Perform on Ubisecure SSO Node P:
1.Restart Ubisecure SSO. See instructions from Installation related SSO restart on Windows - CustomerID.
Data Migration :
// We are working on exact instructions to move data in ADLDS from one node to another, below are high level actions need to be taken in this part
- You can take service break at this point to take data backup from Node A and restore in Node P before taking it into use.
- Stop UbiloginServer and wildfly service in SSO Node A and CID Node A.
- Perform Data migration from Node A to Node P
- Verify the application to confirm you can access SSO Management and CustomerID (Basic flows like login works and no problems loading data on screen).
- Now SSO Node P and CID Node P are upgraded and have upto date data and will be ready to take traffic.
Traffic Switchover : After this step switch traffic to upgraded nodes SSO Node P and CID Node P (New Master Node).
1) SSO Node A Upgrade :
Kindly follow all the steps mentioned below :
Detailed steps are here in this document. You need to consider SSO node 2 in this document as SSO A for you. So perform all the steps for SSO Node 2 mentioned in this document on your Node A: Clustered upgrade on Windows - SSO (From Step 7 )
- Remove the services and the AD LDS from the SSO A node
- Check Java 8 environment variables
- Stop SSO and Accounting Service Windows services
- Remove SSO and Accounting Service Windows service configurations
- Remove the AD LDS from the SSO A node
- Enable the replication in the SSO B node
- Update the SSO A node
- Install Java 11 to the SSO A node
- Execute the steps in the document AD LDS clustering setup (node 2) - SSO
- Install the new SSO version to the SSO A node
- Update Tomcat configuration by reinstalling it to the SSO A node
- Check Single node installation finalization
- Test the functionality of the updated SSO A node
- Enable traffic from the Reverse Proxy to route production traffic to SSO A node in addition to the SSO P node
Once SSO node A is up and running with upgraded software, move to CID Node A upgrade.
2) CID Node A Upgrade :
Perform the next steps to upgrade CID node A which is the old master node and after upgrade, it will be a new slave node.
a. Perform on Ubisecure SSO Node A:
- Unpack the distribution package. See instructions from Distribution package unpacking on Windows - CustomerID.
- Upgrade PostgreSQL JDBC driver to SSO node(s). See instructions from PostgreSQL JDBC driver installation to SSO on Windows - CustomerID.
- Upgrade Ubisecure CustomerID SSO Adapter to SSO node(s). See instructions from CustomerID SSO Adapter extension upgrade.
Note : After this step you can start Ubiloginserver service in SSO Node A to restore SSO HA setup.
b. Perform on CustomerID Node A :
- Check Java. See instructions from Java check on Windows - CustomerID.
- Install WildFly. See instructions from Two node WildFly installation on Windows - CustomerID. (Ensure to remove the old Wildfly service before installing the new one)
- Transfer the installation folder from master node. See instructions from Two node installation folder transfer on Windows - CustomerID.
- Prepare WildFly for domain configuration. See instructions from Two node WildFly preparation on Windows - CustomerID.
- Configure HTTPS, See Two node SSL configuration on Windows - CustomerID - This generates certificate files and Keystore (default location:
%WILDFLY_HOME%\domain\configuration\keystore.pfx) is registered to WildFly in the next step - slave node WildFly configuration. Note- If cert keys are not changing, generation of new cert on slave node can be skipped and keystore.pfx can be copied from master node to slave node. - Configure WildFly on CustomerID Slave Node. See instructions from Two node slave WildFly configuration on Windows - CustomerID
At least under slow connections the script (config-wildfly-domain-slave.cmd) may show error message "Failed to establish connection in 6044ms" when reloading configurations. If you see it in the end-of-the script it is a good idea to verify your slave node Wildfly is running properly and can access the master node.
6. Restart Ubisecure CustomerID. See instructions from Restart on Windows - CustomerID
In case, Wildfly take a long time to stop and fails in Stopping state you need to perform step 'Fix Slave Node shutdown parameters' from Two node WildFly installation on Windows - CustomerID
c. Perform on Ubisecure SSO Node A:
- Restart Ubisecure SSO. See instructions from Installation related SSO restart on Windows - CustomerID.
d. Finalize Upgrade :
Kindly verify customerid_diag.log file to see if both CID nodes are running and logs are getting printed for both CID nodes in logs.
Ensure to check memory allocation for tomcat and wildfly from the old environment and to apply that to any new environment:
To check memory allocated to Wildfly:
Goto C:\Program Files\wildfly-21.0.2.Final\domain\configuration\domain.xml - Check value of following in old environment and update in new environments.
<jvm name="default">
<heap size="2G" max-size="2G"/>
</jvm>
To check memory allocated for tomcat:
Goto C:\Program Files\Ubisecure\ubilogin-sso\tomcat\bin\setenv.bat - Check value of following file if present in old environment and update in new environments.
set "JAVA_OPTS=%JAVA_OPTS% -Xms128m -Xmx1024m -XX:MaxPermSize=512m -server"