Installation of Windows AP on Windows 2008/2013 Server - SSO
Note: Before beginning with installation see the Installation Checklist by expanding the link below.
Verifying System Requirements
Server Roles
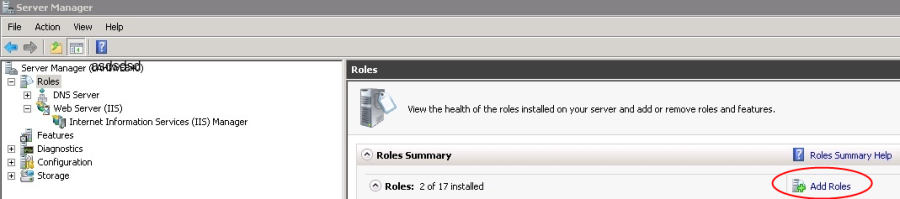
The following server roles are required. Verify if they are already installed, or install if required using Add Roles function of Server Manager as shown in Figure 1.
Server manager→Roles→Web server (IIS)→Add role services
|
|---|
Figure 1. Click Add Roles in Server Manager under Web Server (IIS) |
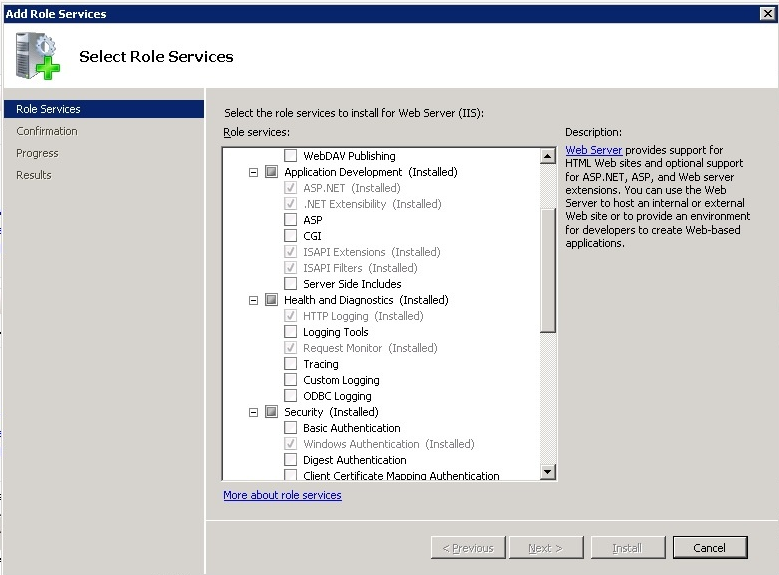
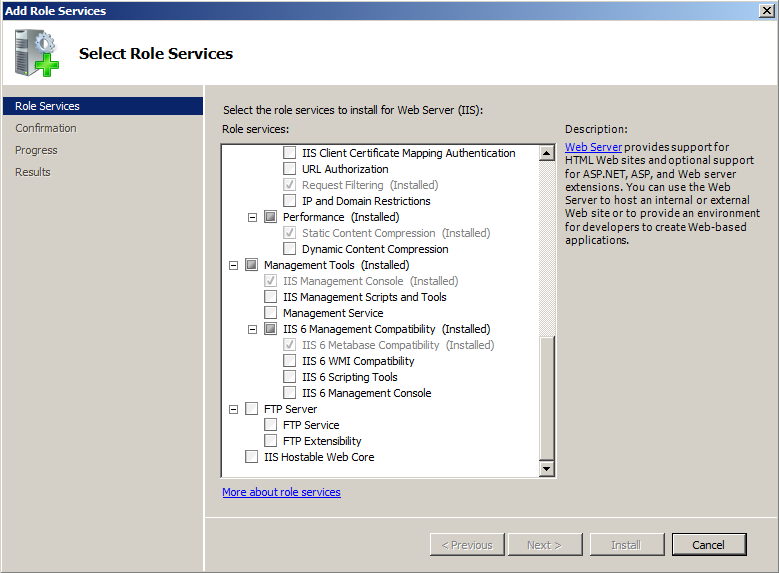
Select the following roles as shown in Figure 2 and Figure 3.
Web Server → Application Development
- ASP.NET
- .NET Extensibility
- ISAPI Extensions
- ISAPI Filters
Web Server → Security
- Windows Authentication
Management Tools → IIS 6 Management Compatibility
- IIS 6 Metabase Compatibility
|
|---|
| Figure 2. Add Role Services in Server Manager under Web Server (IIS) |
|
|---|
Figure 3. Add Role Services in Server Manager under Web Server (IIS) |
Installation Procedure
The Windows Authentication Provider software is supplied as a Microsoft Windows installer package.
The installation is initiated by double clicking the installation package file, which will then extract the software into the %PROGRAMFILES%\Ubisecure\Ubisecure.Ubilogin.UAP folder on the local file system. Typical location of %PROGRAMFILES% for Windows Server 2008:
C:\Program Files(x86)\
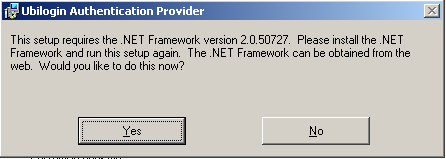
The installer requires .NET framework 2.0 and if this requirement is not already met, the installer will provide the option to download the proper .NET framework installation package from Microsoft's web site.
|
|---|
Figure 4. Installing Ubisecure Windows Authentication Provider requires .NET Framework |
The installer supports software installation and removal.
Note that the installer will not set up IIS nor set any configuration options, these must be separately configured.
In this guide, it is assumed that the Ubisecure Windows Authentication Provider is installed for all users. If a different user account was specified here, some configuration files will be in a different location on the file system.
Verifying the Installation
When the installer wizard completes, it will have created the following files on the file-system.
%PROGRAMFILES%\Ubisecure\Ubisecure.Ubilogin.UAP\setup\reg_uapsso.js
%PROGRAMFILES%\Ubisecure\Ubisecure.Ubilogin.UAP\uapsso\App_Code
%PROGRAMFILES%\Ubisecure\Ubisecure.Ubilogin.UAP\uapsso\Cancel.aspx
%PROGRAMFILES%\Ubisecure\Ubisecure.Ubilogin.UAP\uapsso\web.config
%PROGRAMFILES%\Ubisecure\Ubisecure.Ubilogin.UAP\uapsso\App_Code\LoginServlet.cs
For Windows Server 2008 installations, the installation directory is
C:\Program Files(x86)\Ubisecure\Ubisecure.Ubilogin.UAP\uapsso
Configuring Additional AD Attributes
If you need to send additional attributes from the windows domain to Ubisecure SSO, you need to edit
C:\Program Files(x86)\Ubisecure\Ubisecure.Ubilogin.UAP\uapsso\App_Code\LoginServlet.cs
private QueryString InitAttributes() function contains
info.Add("ldap", ldap);
info.Add("dn", dn);
After these you can add additional attributes like below:
	info.Add("dn", dn);
	}
	finally
	{
		cx.Undo();
	}
	// new attributes
	DirectoryEntry user = new DirectoryEntry("LDAP://" + dn);
	info.Add("upn", (string) user.Properties["userPrincipalName"].Value);
	info.Add("mail", (string) user.Properties["mail"].Value);
}
To be able to use DirectoryEntry you might need to define to LoginServlet.cs:
using System.DirectoryServices;
Configuring web.config
The main configuration of Windows AP resides in the ASP.NET configuration file located at the path %PROGRAMFILES%\Ubisecure\Ubisecure.Ubilogin.UAP\uapsso\web.config. For a basic installation, no changes to the default configuration are required. Refer to the chapter web.config configuration details for more information. Ensure a successful login can be completed using the standard default configuration before making configuration changes.
agents.xml File Placement
Save the activation file agents.xml that was generated using Ubisecure Management in the path below.
C:\ProgramData\Ubisecure\Ubisecure.Ubilogin.UAP\agents.xml
NOTE: This directory is hidden by default.
Registering the Windows Authentication Provider Web Application on IIS
- Open a command prompt as a Administrator and navigate into the setup folder of the distribution package installation folder.
- Run
cscript reg_uapsso.js -i X, where X is the instance number of the virtual server that is going to host the uapsso web application. If there is only one web site on the IIS host, the instance number is 1. For information on how to determine the instance number for an IIS virtual server, please refer to chapter Determining the instance number of an Internet Information Services (IIS) virtual server in WINAP additional information - SSO.
In the example below, Listing 1, the Ubisecure Windows Authentication Provider is installed on the default web site. Listing 2 shows the successful command output.
cd /D %PROGRAMFILES%\Ubisecure\Ubisecure.Ubilogin.UAP\setup
cscript reg_uapsso.js -i 1
Microsoft (R) Windows Script Host Version 5.6
Copyright (C) Microsoft Corporation 1996-2001. All rights reserved.
uapsso installed on IIS://localhost/W3SVC/1/ROOT
C:\Program Files\Ubisecure\Ubisecure.Ubilogin.UAP\setup>
Configure Application Pool for the SSO Application
- Open Internet Information Services (IIS) Manager and navigate into the virtual server hosting the uapsso application.
Modify the uapsso web application's Application Pool selection:
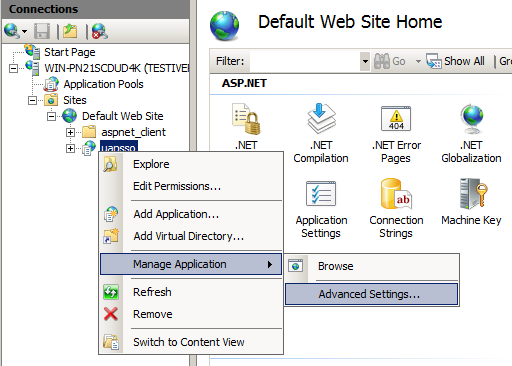
Figure 4. Modifying SSO Application
Select Classic .NET AppPool
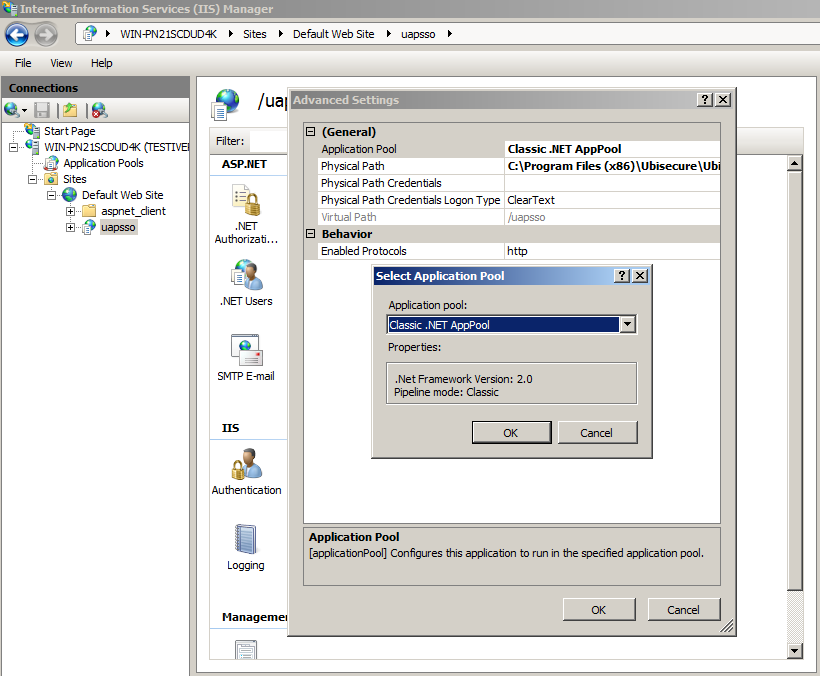
Figure 5. Changing Application pool type
Testing the Installation
The test page is enabled by default for a new installation. It tests the functionality of the Windows Authentication Provider without involving the Ubisecure Authentication Server.
Open a browser window and access the Ubisecure Windows Authentication Provider's test page. The test page shows all of the information that will be sent to the Ubisecure Authentication Server during a real login event.
Assuming the hostname of the IIS server is uap.example.com, and the application has been installed on the default web site, the address would be https://uap/uapsso/login.aspx). The web page should return a page that displays attributes. By default, username is shown in DOMAIN\shortname format. If configuration changes have been made, verify that the changes are shown. An example is shown below in Figure 6.
|
|---|
Figure 6. Test page after successful installation, showing all attributes. |
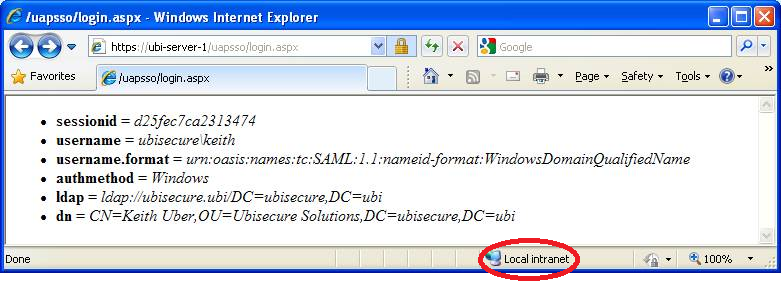
The user should not be prompted for a username and password using a supported browser. If the user is prompted for a username and password, check that the site is part of the Local intranet zone and/or a trusted site. See chapter Using Mozilla Firefox with Windows AP in WINAP additional information - SSO for configuring Firefox to use automatic NTLM authentication.
If the user is not using a supported browser or is not a domain user, for example, a Mac user connected via VPN, they will be prompted for their domain username and password during login.
If the test page fails to open, use the windows Event Viewer for the server where Windows Authentication Provider has been installed and verify that there are no error or warning entries in the application log.
For further troubleshooting, enabling logging temporarily by adjusting the web.config settings as described in chapter web.config configuration details in WINAP additional information - SSO. Reattempt authentication. Check the error file defined in the web.config file. Remember to revert the logging to a suitable setting for production use.