Lab 2.5: Authorisation Policy
- Keith Uber
- Former user (Deleted)
- Former user (Deleted)
- Sami Lindgren
The purpose of this module is to understand how to configure which user and organisation attributes are sent to applications.
- SSO installed
Overview
- An authorisation policy is used to define what data is delivered to the applications. This is sometimes known as an attribute release policy.
- The same authorisation policy can be reused and assigned to many different web agents. A web agent can only have one authorisation policy assigned to it at one time.
It is strongly recommended to use an authorisation policy for all web agents and send only the minimum amount of information required.
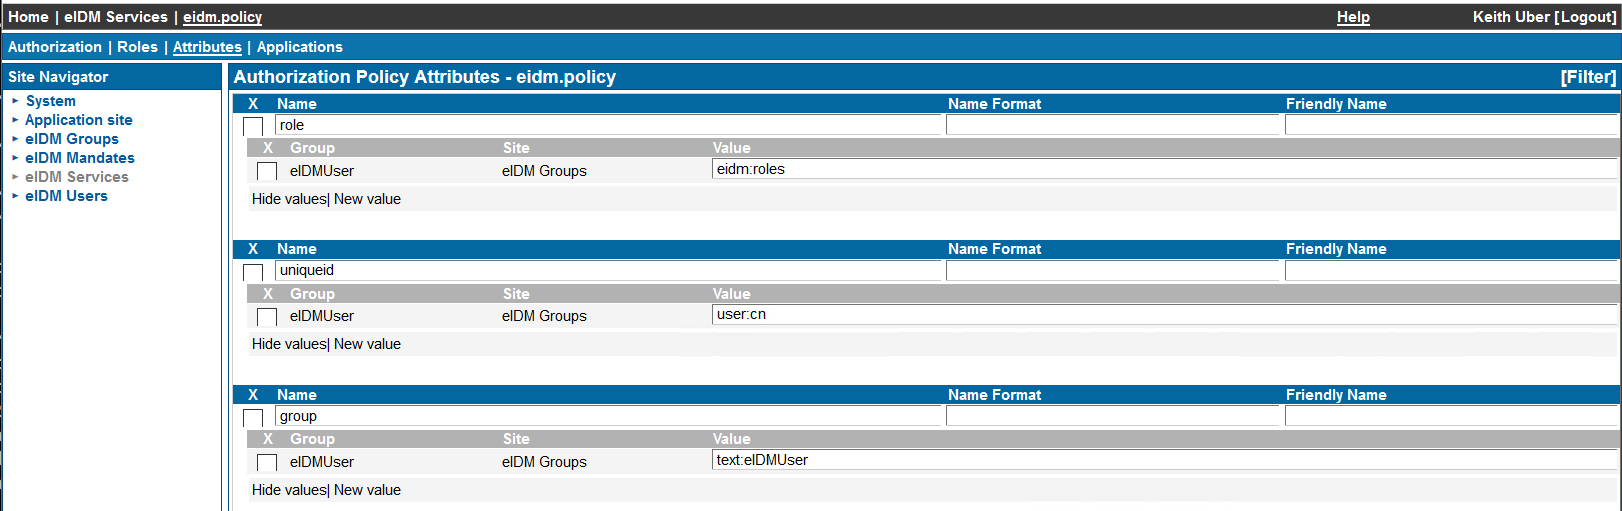
An example authorisation Policy is shown below. This policy is used by the CustomerID Administration application itself. When a user logs in, role information, the unique ID of the user and an attribute called group are sent to the application. In order to access the CustomerID Administration application, the user must be in the group eIDMUser (it is defined in the application's Allowed To tab)
Access Control with Authorisation Policies
- In addition to controlling what attributes are sent and in what format, authorisation policies can be used for Attribute Based Access Control (ABAC) by checking for the presence or absence of a user or method attribute.
- Single-Value Attribute constraint fails for the defined attribute if more than one distinct value is assigned
- Required Attribute constraint fails for the defined attribute if no value is assigned
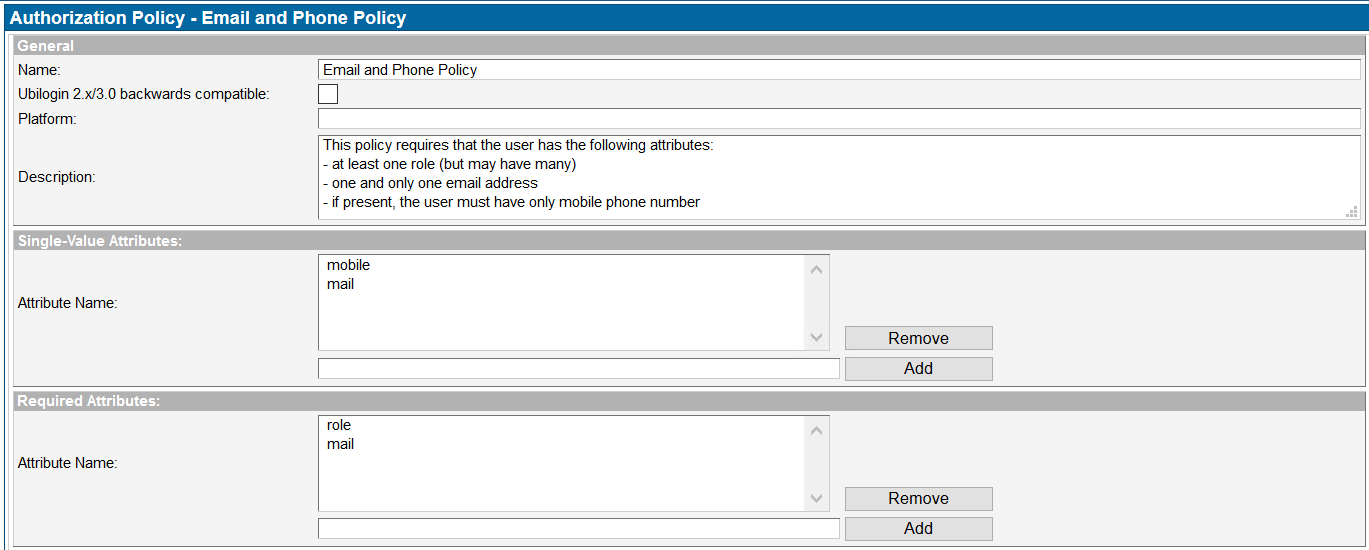
Example:
This policy requires that the user has the following attributes:
- at least one role (but may have many)
- one and only one email address
- if present, the user must have only a mobile phone number
Why is this important? If an application cannot operate without a certain attribute, or cannot handle multiple attributes, the user can be prevented access before they reach the application.
Attributes tab
An authorisation policy adds attributes with name and value to the response message for applications.
The following fields can be configured:
- Group: The user must belong to the selected group for the attribute release to be processed. eIDMUser is a special group containing all CustomerID users.
- Name: Name of the authorisation attribute as the recipient receives it
- Value: Source of the attribute value to be sent.
- Name Format: Machine-readable indication of the format of the attribute (rarely used, define only if required by integrating application)
- Friendly Name: Human-readable description of the attribute value (rarely used, define only if required by integrating application)

The rule pictured above is processed like an if statement - if the user belongs to the group "eIDMUser" in the site "eIDM Groups", send the target application an attribute named "role" with the value containing the output of the macro eidm:roles, which is a dynamic list of all CustomerID roles that the user has.
Other possible values in the Value field are:
| Attribute Values | Definition |
|---|---|
user:<name> | the value is evaluated by reading the attribute <name> from the user's directory object. For example, user:uid would return the value of the uid attribute. Typical LDAP User Attributes for Ubisecure Directory users: dn: Distinguished name (full path to LDAP object) cn: Full Name name: Full Name uid: Use ID used typically for login mobile: Mobile Phone number givenName: First Name sn: Surname mail: Email o: Organisation ubiloginEnabled: Account status TRUE or FALSE ubiloginNotBefore: YYYY-MM-DD HH:MM ubiloginNotOnOrAfter: YYYY-MM-DD HH:MM |
method:<name> | the value is evaluated by reading the attribute <name> assigned by the authentication method component. The availability of method attributes depends on the authentication method implementation. For example, the CUSTID attribute is available with the Tupas 2 authentication method. method:CUSTID would then return the value of the CUSTID attribute from the Tupas 2 authentication process. |
text:<string> | the value is literal value <string> e.g. text:GOLDMEMBER |
eidm:roles | The user’s roles in Ubisecure CustomerID. This parameter supports different authorisation role filtering and mappings. The desired policy can be given to the operation as a parameter separated by colon, i.e., eidm:roles:<policy name>. For more information see authorisation configuration - CustomerID |
| eidm:orgclaims | Organisation memberships from Ubisecure CustomerID. This macro provides structured information about the user's roles' respective organisations in a JSON format. This data can be included in the authorisation policy by invoking the authoriser with orgclaims parameter, i.e., using 'eidm:orgclaims' as the value in an authorisation policy's attribute. The parameter supports different authorisation role filtering and mappings similar to the eidm:roles operation (see the examples above). The desired policy should can be given to the operation as a parameter separated by a colon, i.e., eidm:orgclaims:<policy name>. Assuming a user has two roles Customers/1234/Representative and Organizations/OrganizationUser. The following is an example of a JSON response for the user. [{ "organizationClass" : "CustomerClass", "customerid": "1234", "technicalName" : "1234","roles": ["Customers\/1234\/Representative"],"friendlyName" : "Customer 1234","entityName":"Customers\/1234" },{ "organizationClass" : "OrganizationClass","technicalName" : "Organizations", "roles" :["Organizations\/OrganizationUser"], "friendlyName" :"Organizations container", "entityName":"Organizations"}]For more information see authorisation configuration - CustomerID |
user:<name>;binary | The attribute <name> is returned to Web Agents as Base64 coded string. For example, user:objectGuid;binary would return a value such as sFy0xj0cXU6QpjsQRCzG5Q== Encoding is based on LDAP binary option mechanism (http://www.rfc-editor.org/rfc/rfc2251.txt , Chapter 4.1.5.1). |
Applications tab
To be used, the authorisation policy must be attached to an application using the Applications tab. The same authorisation policy can be reused and assigned to many different applications. An application can only have one authorisation policy assigned to it at one time.
Instructions
Exercise 1 Create a new authorisation policy for the SmartPlan application.
- Log in to the SSO Management console.
Go to the SmartPlan site
From the Authorization Policies tab, click New Policy and name it "SmartPlan policy"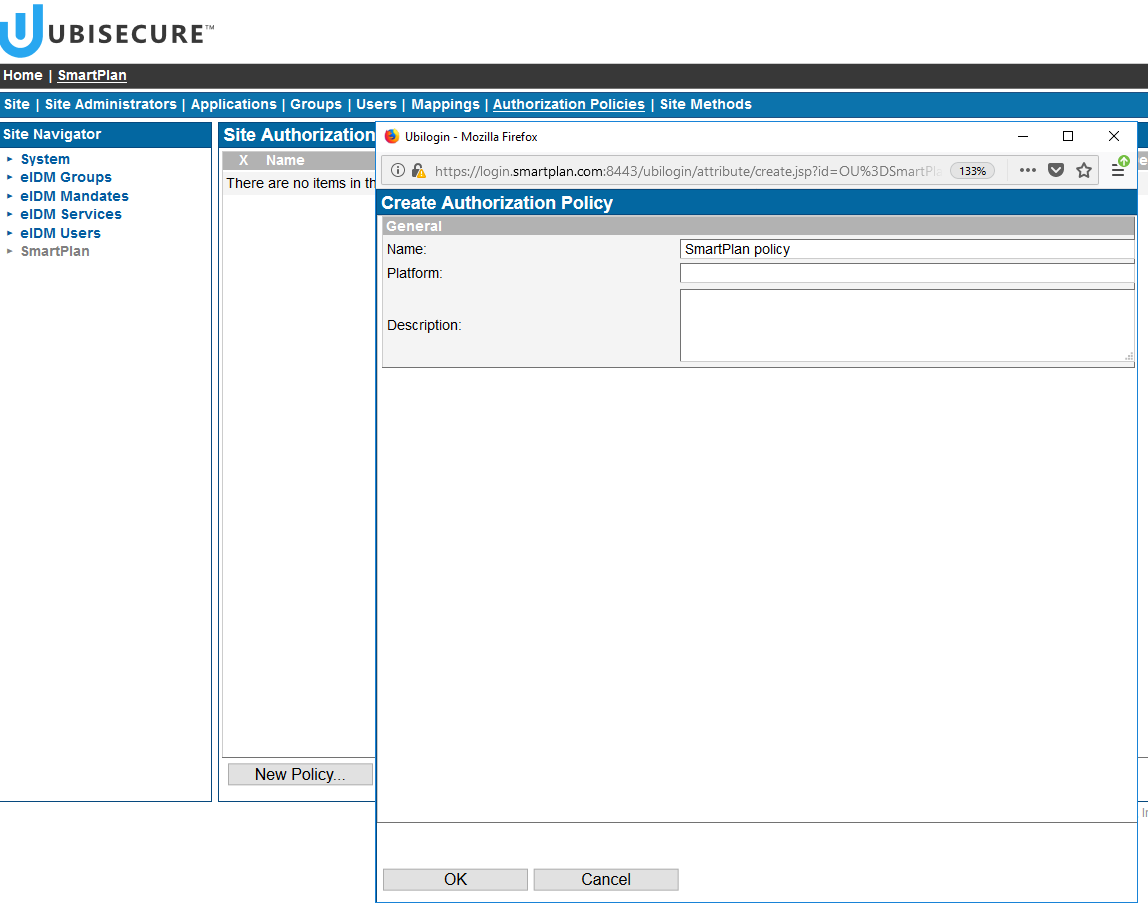
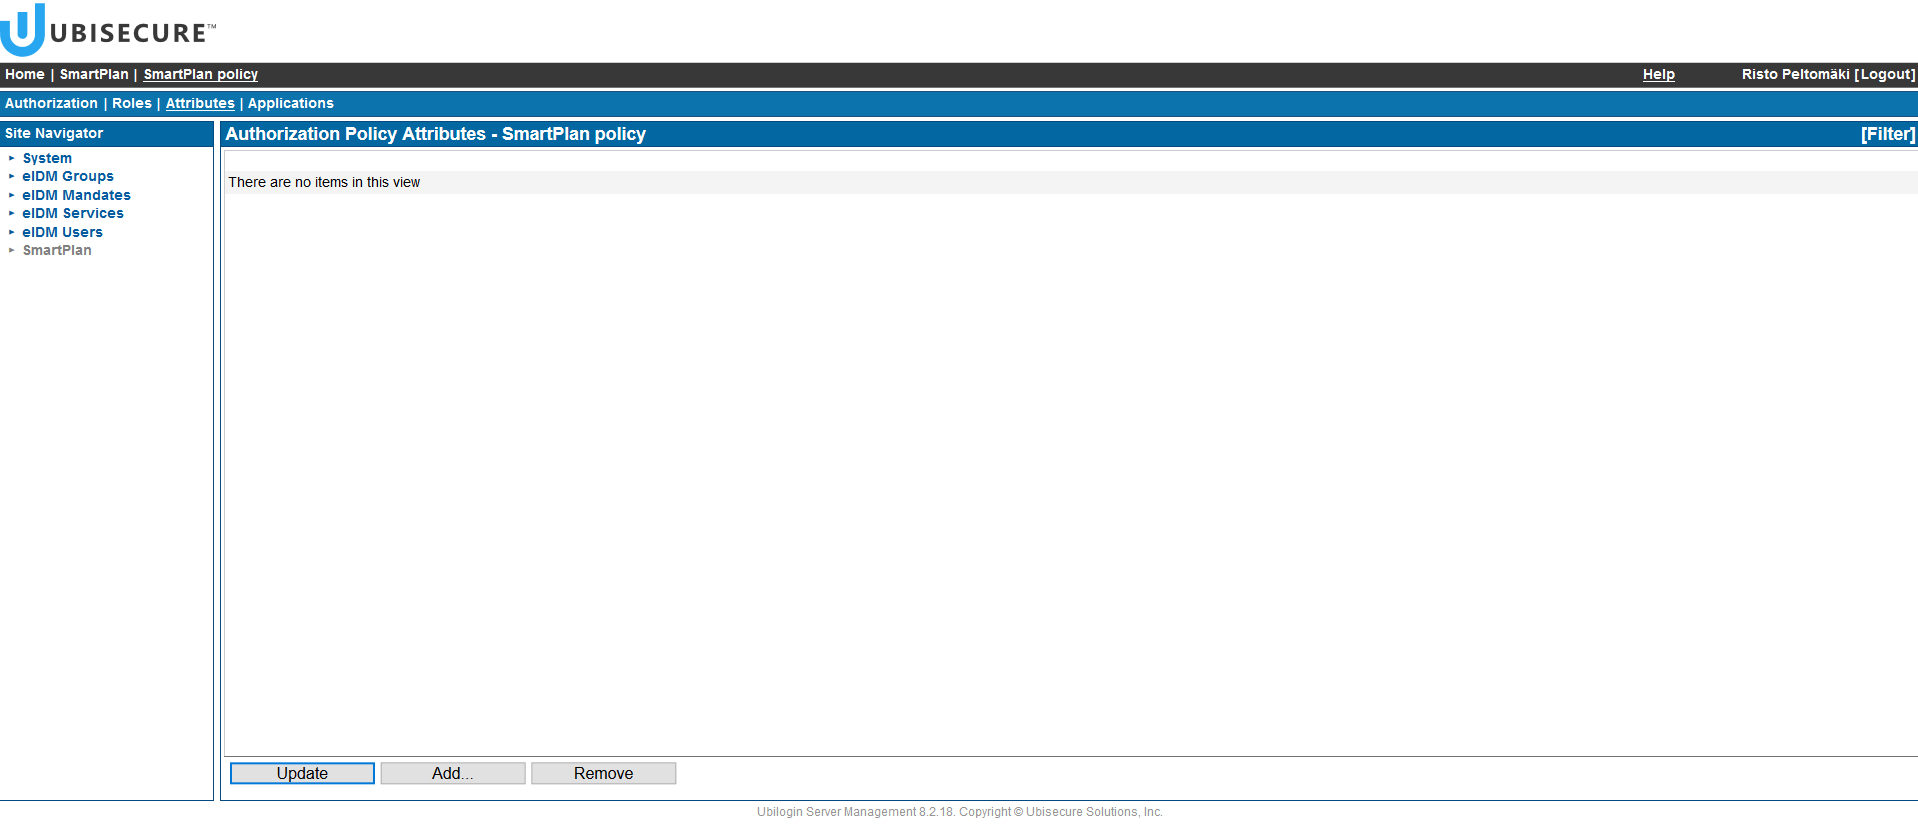
- On the next screen, you will see this. Then go to the "Attributes" tab
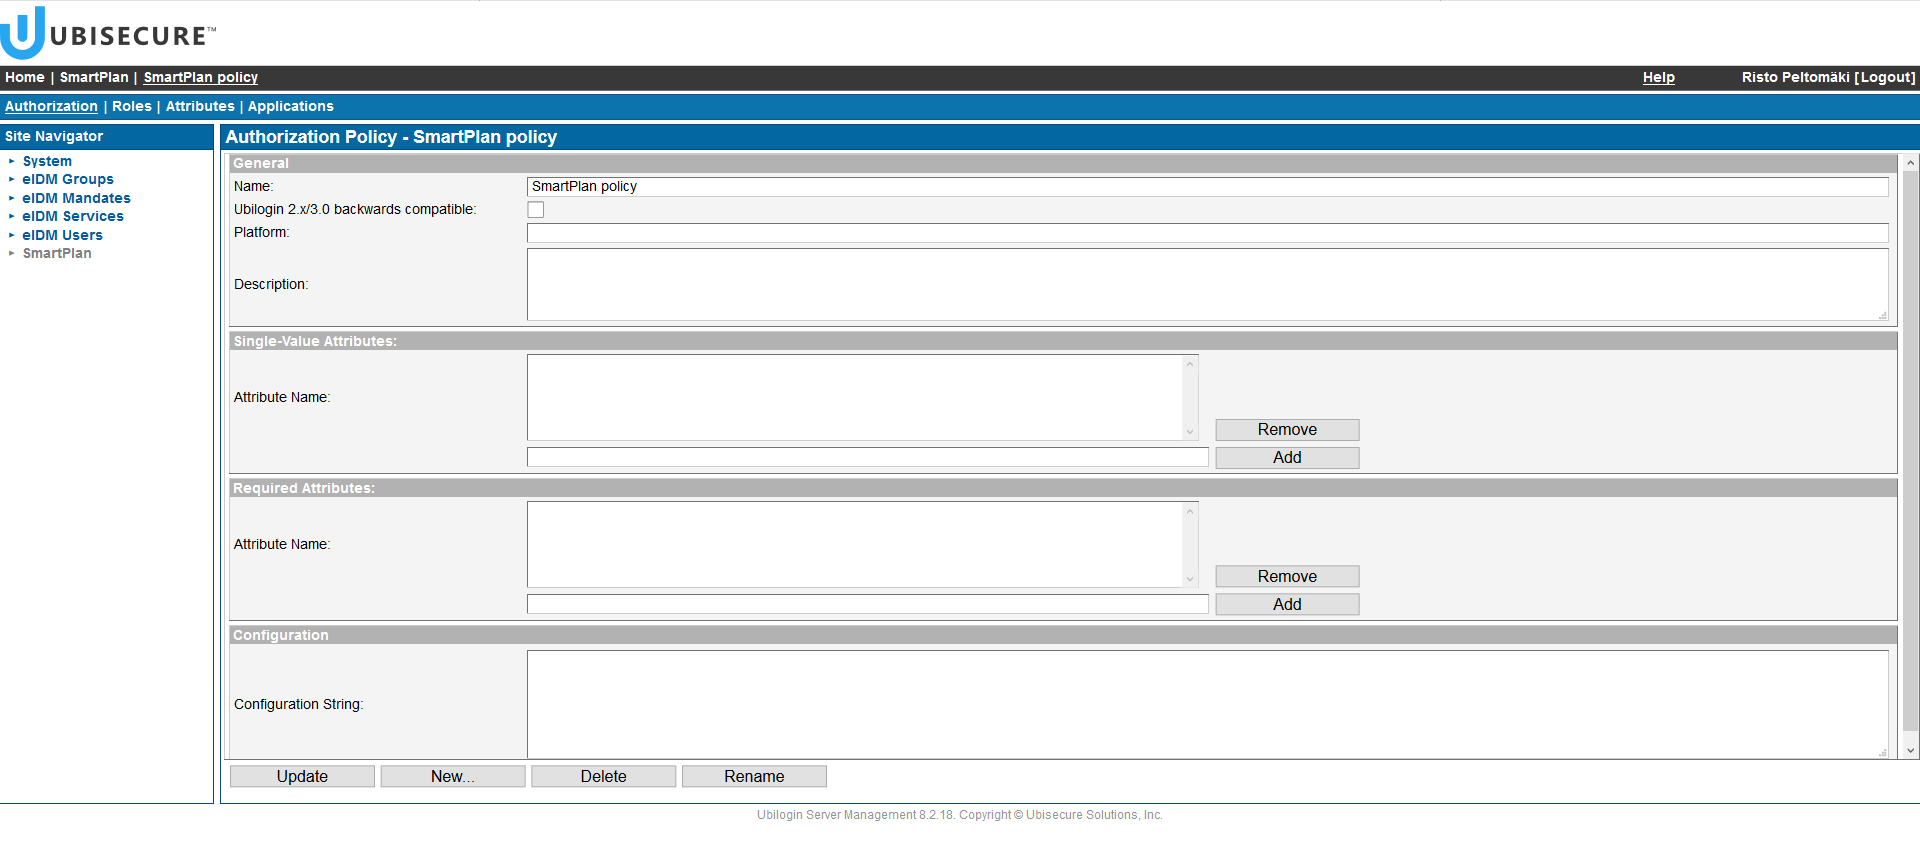
- The Attributes screen looks empty at first:
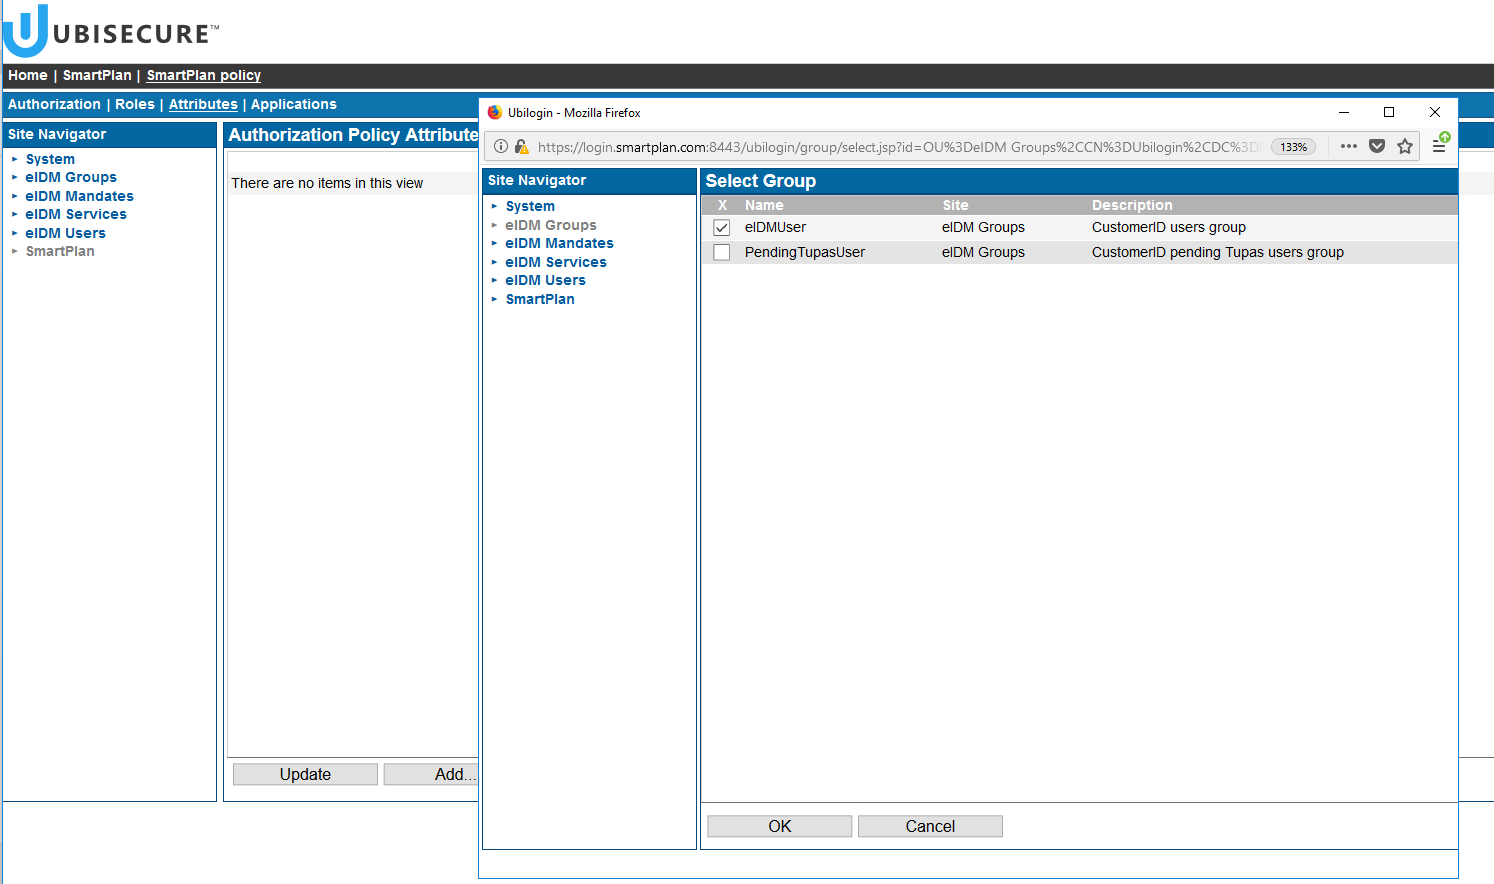
- Click the "Add" button at the bottom. On the left side, select "eIDM Groups", and then on the right side "eIDMUser" group.
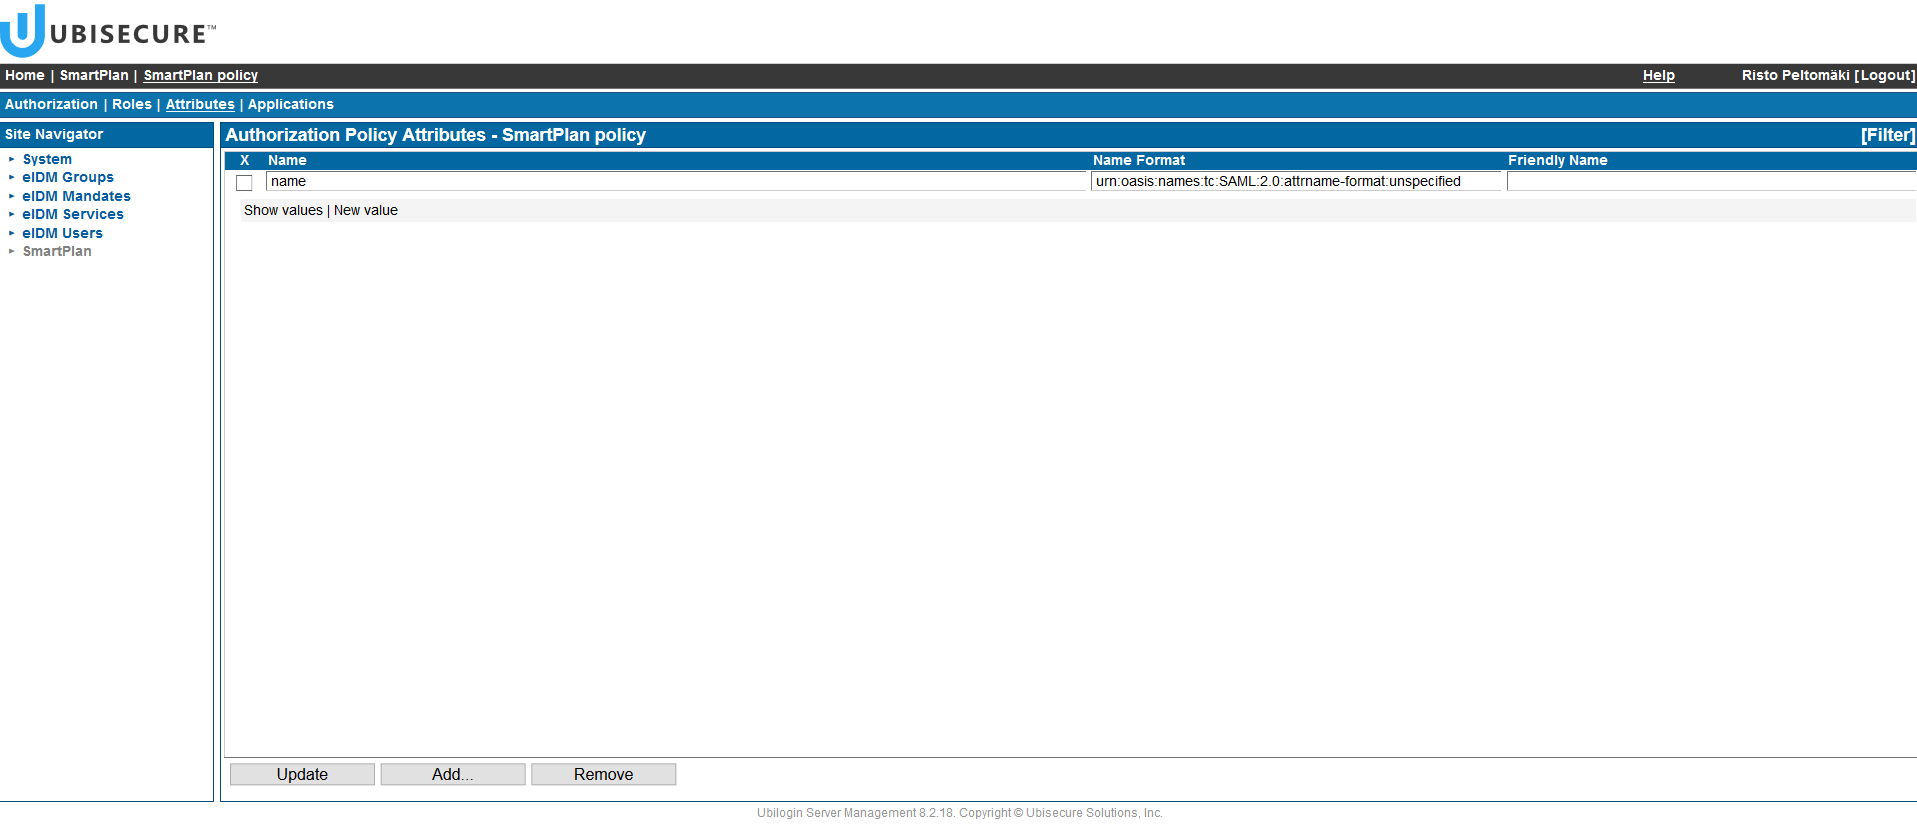
- Once you click "OK" you will see the following view. The attribute name is listed, and you can click "Show values" to see more details.
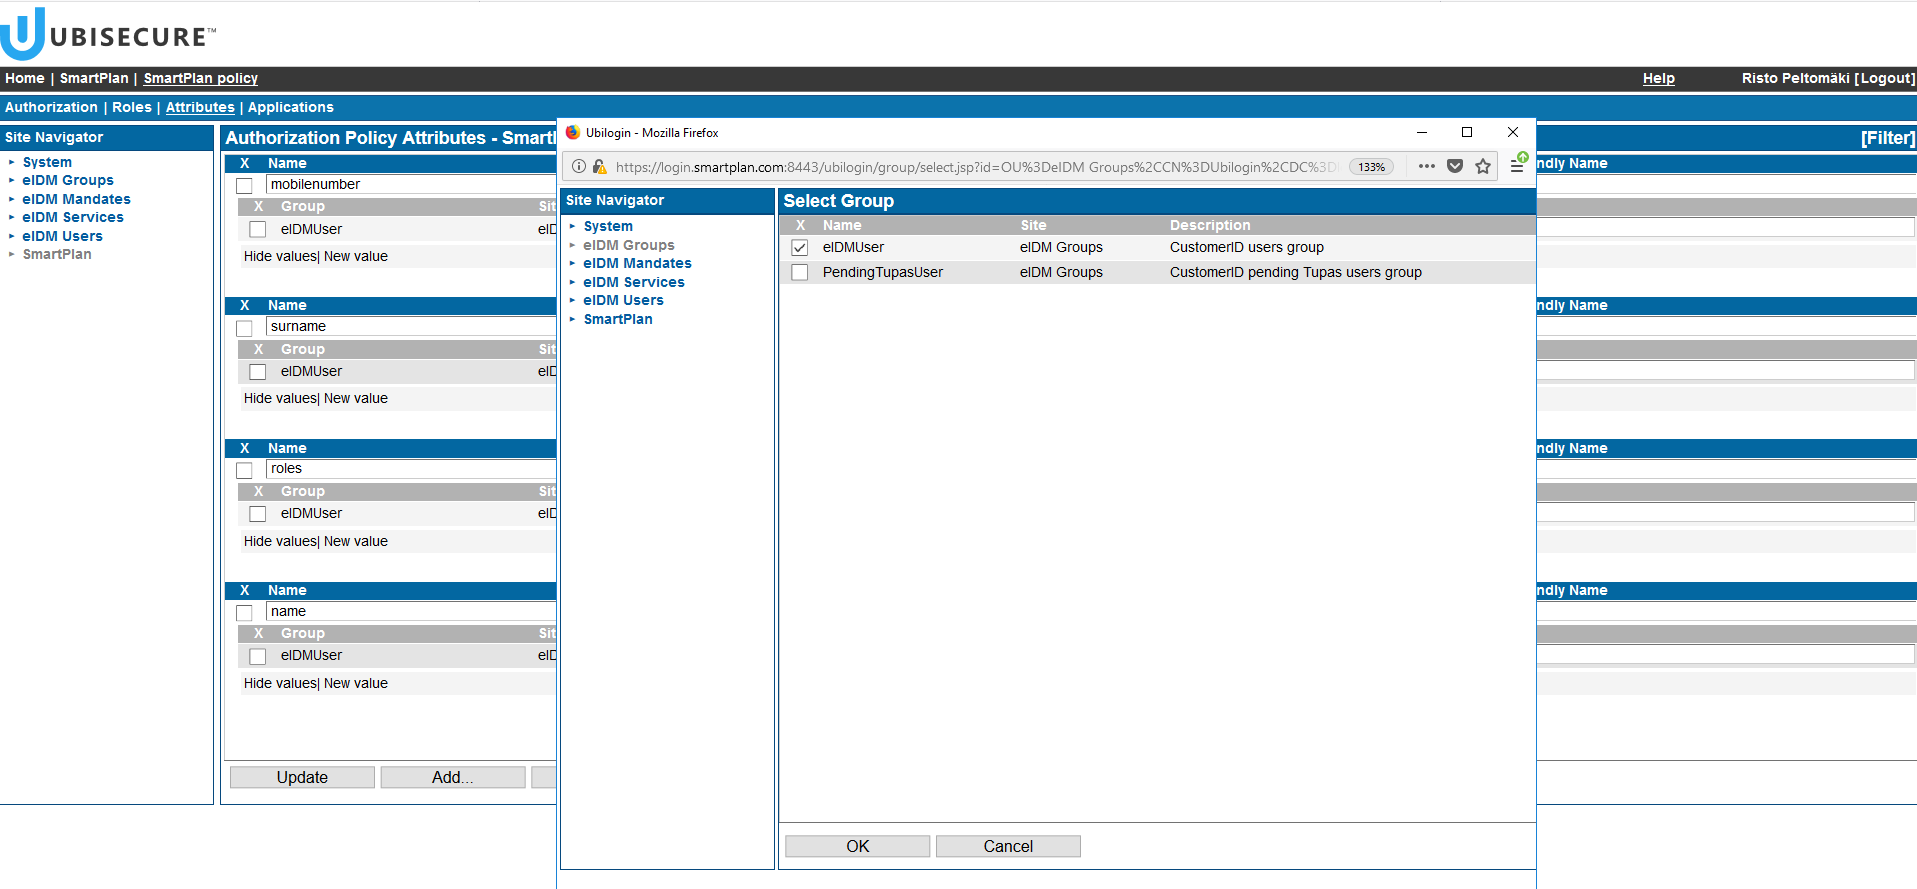
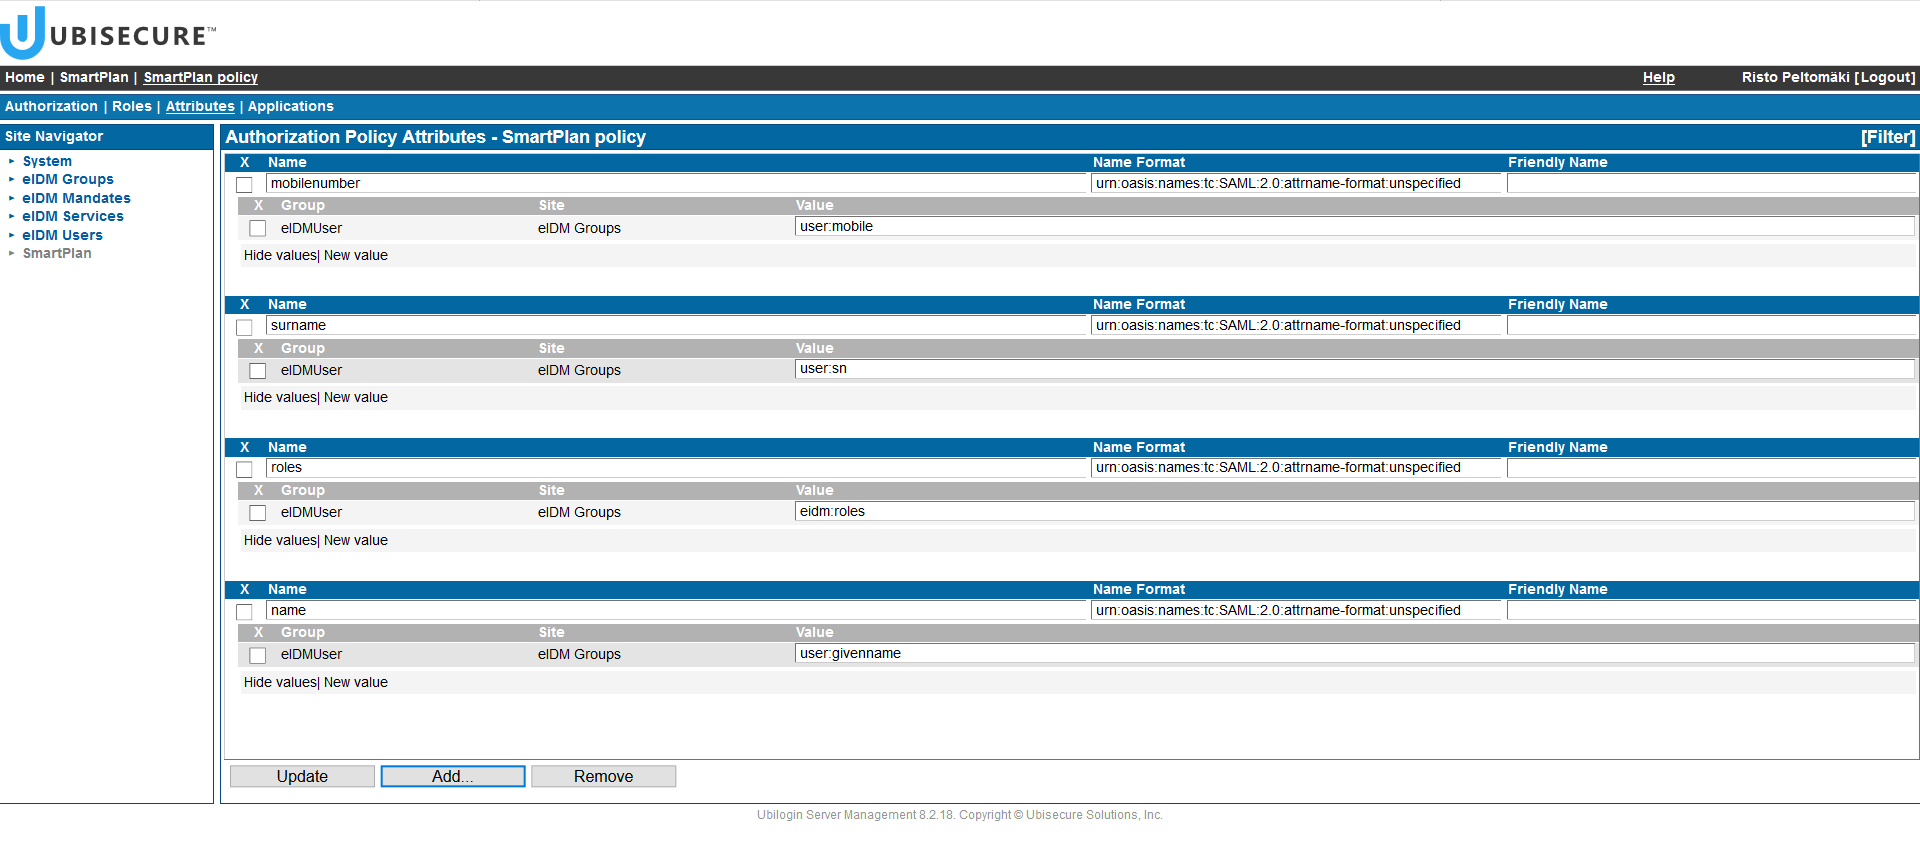
Now you can add as many attributes as you wish to transmit to the application. Let's add: first name, last name, mobile phone and roles. In order to do that, you must edit the "Value" that appears when you show values. Also, make sure that the "Name" field doesn't have spaces but a single word. The following table shows the values you must add for each attribute:
Attribute Name Value First name name user:givenname Surname surname user:sn Mobile phone number mobilenumber user:mobile Roles roles eidm:roles In order to add any of the attributes, you must select "eIDM Groups" in Site Navigator, and then select eIDMUser group. Add attributes one by one and click the Update button after adding each value.
- Once all attributes are added, you would see something like this. Make sure that you have ticked "show values" for all attributes.
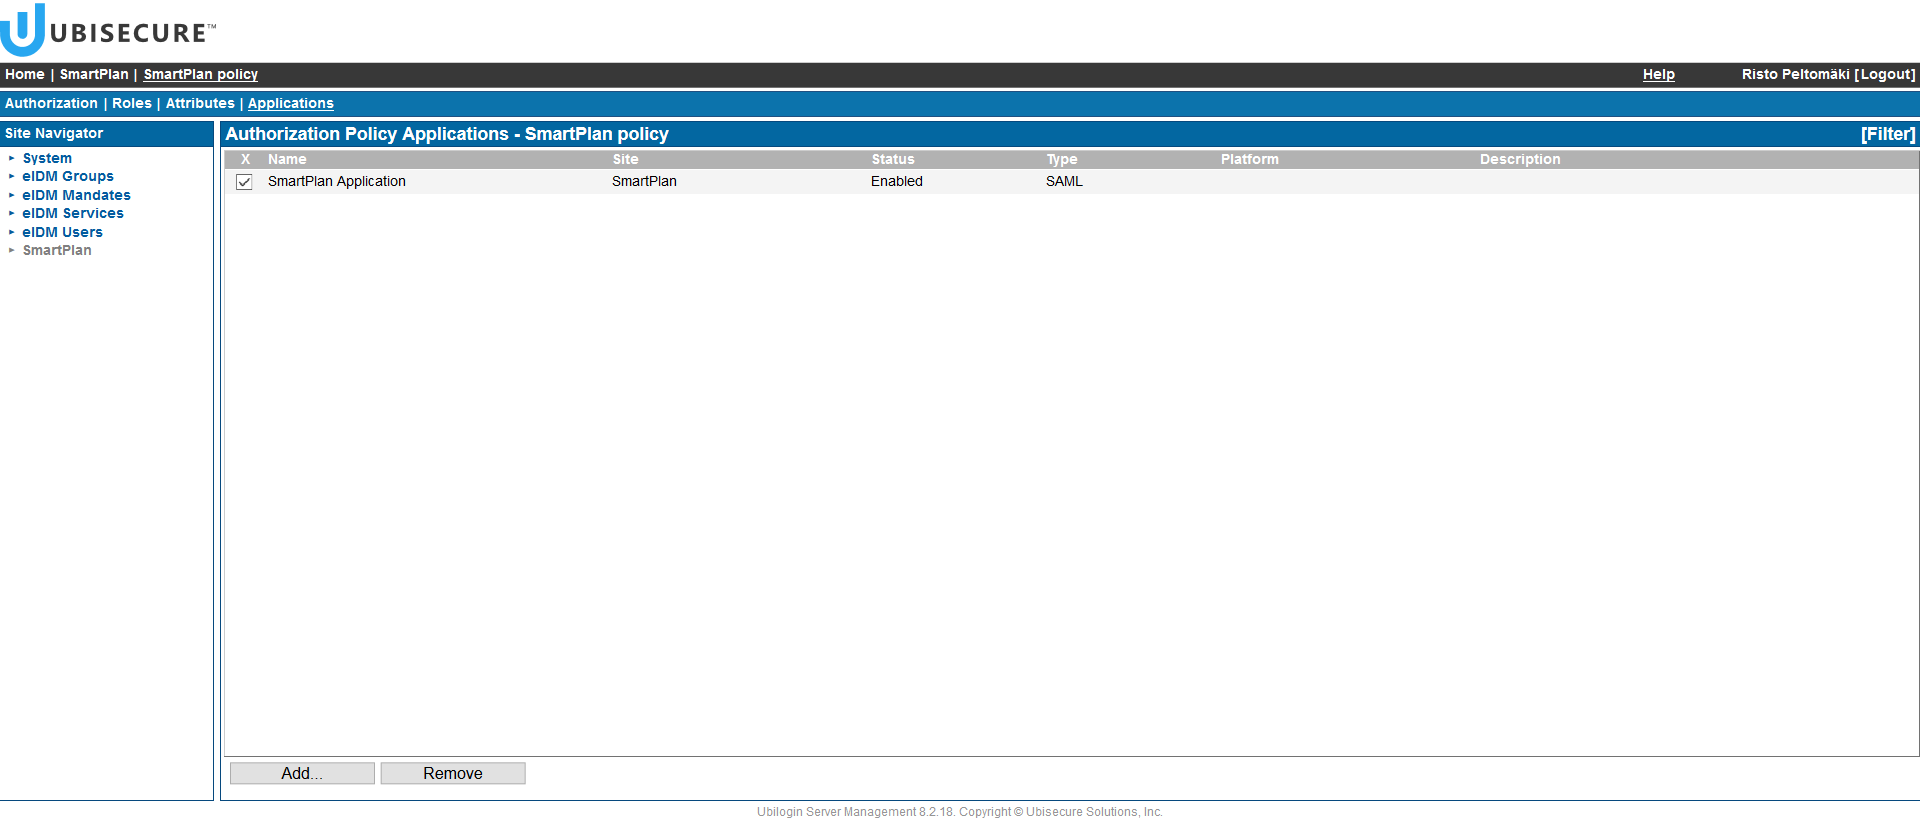
- Click the Applications tab to attach the authorisation policy to the sample application. Select the SmartPlan application.
- Now to verify, you must go to http://localhost:8090/smartplanapplication/ and log in as Scott Long. For easier login, we recommend you disable the SMS OTP authentication method and enable CustomerID Password (password.2). In order to do this, on SSO Management console:
- Go to the "SmartPlan" site and select the Applications tab
- Open SmartPlan application
- Select Methods tab
- Uncheck method ”ubikey.sms.1”
- Check method ”password.2” and click Update
- Once you log in, the result will be:
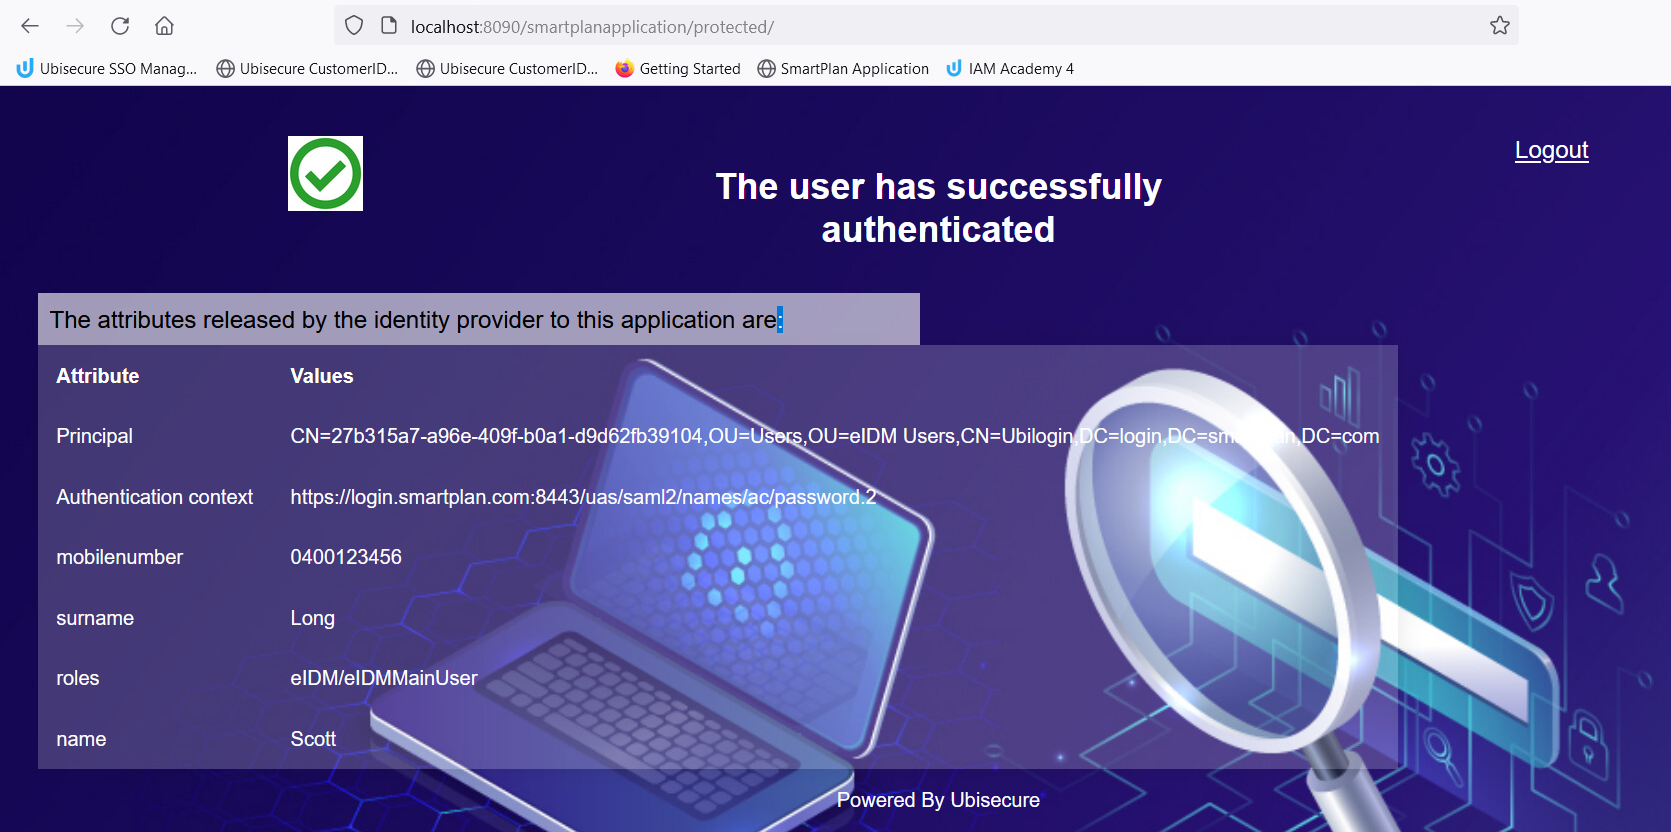
- You can see Scott Long's attributes: first name, last name and roles. You can't see his phone number because it was never set in his user profile.
Extra tasks:
Modify the "SmartPlan policy" to prevent access from users without mobile phone numbers. Hint: use the ABAC (Attribute Based Access Control) settings on the Authorization page.
Try to log in with a user that does not have a mobile phone number assigned in the CustomerID.
- Make sure that Google authentication is enabled for the SmartPlan application (the sample application).
- Modify the SmartPlan policy to include the following:
Add one new rule for the attribute Email including both the "eIDMUsers" and the "Google login users" groups (one rule including both groups).
Group Attribute Name Value eIDMUser Email email user:mail Google login users Email email method:email
Login to the Sample Application
a) As Scott Long using the password method
b) Using your Google credentials
- Modify the SmartPlan policy to include the following:
Add a new rule for the attribute "Full Name" for the "Google login users"
Group Attribute Name Value Google login users Full Name fullname method:name Login to the Sample Application using your Google credentials.
Exercise 4. Modify the role attribute to be in a more readable format.
- Click the following link to open a Knowledge Base article Authorization Policy examples
- Find the title "List value modifications"
- Find the rule to exclude the path of role names
- Modify the SmartPlan policy to exclude the path of role names.
Group Attribute Name Value eIDMUser Roles roles <value found from the KB article> Login to the Sample Application as Scott Long using the password method.
- Modify the SmartPlan policy to exclude the path of role names.
Exercise 5. Add a rule for a modified attribute.
- Modify the SmartPlan policy to include the following:
- Add a Domain attribute
| Group | Attribute | Name | Value |
|---|---|---|---|
| eIDMUser | Domain | domain | ${re:replace(user['mail'][0], ".*@", "")} |
Login to the Sample Application as Scott Long using the password method.
Try to modify the Domain rule to add the "Google login users" group. Hint: modify the Value field: user → method, mail → email.
Login to the Sample Application using your Google credentials.
Using Java Expression Language in Authorization Policies
It is possible to use Java EL expressions in place of attribute values. This enables more sophisticated techniques available in Java EL syntax for building attribute values, such as the concatenation of strings. Complex attribute manipulations can be performed using Expression Language.
Refer to the Ubisecure SSO Management Guide for a full description Manage authorization policies - SSO
Example:
