Lab 3.2: API Protection
- The purpose of this module is to protect an API using OAuth 2.0 instead of just API keys (the old way).
- SSO which will act as authorisation server
- An API
- A client (single page application)
Overview
This lab configures API Protection using OAuth 2.0. The API to be protected is SmartPlan energy meter, which gives real time data on buildings and charging stations. Electric Green Cabs has developed a mobile app (Green cabs Mobile) that will fetch data from SmartPlan API. Users will log in with their existing SmartPlan credentials (CustomerID users' repository).
As a refresher on OAuth2, let us review the three main elements and its equivalent in our SmartPlan use case:
| Term in OAuth 2.0 | Description | In this lab |
|---|---|---|
| Client | For example a web browser that a person uses to access a web application | SimpleSPA (single page application) |
| Authorisation Server | Server that owns the user identities and credentials | Ubisecure SSO (login.smartplan.com:8443/ubilogin) |
| Resource Server | The protected application | SimpleAPI (SmartPlan API) |
The diagram below also shows the interactions among these three components.
All three elements will run on your local environment. Both SimpleSPA and SimpleAPI require Apache HTTP Server running.
SimpleSPA will be installed on port 5000.
SimpleAPI will be installed on port 5001.
In a real deployment, each of these services can and would be in different environments: Electric Green Cabs would host the client (mobile app), SmartPlan would run the API. For the lab, all services will be run from the same host.
Business benefits
SmartPlan is now able to securely open their APIs to third-parties like Electric Green Cabs company and ensure that data access is done with the permission of the data owner.
Access to the API can be controlled through permissions and revoked at any time.
Partners and customers are able to develop innovative new services based on these APIs.
SmartPlan gets competitive advantage and possible additional revenue streams from this service.
Customers are happy that they authorise access to the API using their familiar, existing account.
Instructions
The diagram below shows the main steps on this lab.
Part 1: Install Apache HTTP server
First you need to install Apache HTTP server on your own instance.
- To install Apache HTTP server, copy the file httpd-2.4.39-win64-VC14.zip (from "IAM Academy Software" folder) to Downloads folder.
- Unzip the compressed file so it will create a subdirectory \Downloads\Apache24
- For reference, Apache HTTP server can be downloaded from Apache Lounge website from https://www.apachelounge.com/download/VC14/
- C++ Redistributable Visual Studio 2015 has been already pre-installed on your environment.
Part 2: Install SimpleAPI
Next you have to install SimpleAPI, a simple API example built for testing purposes that requires an OAuth2 token to use.
Step 1: Install SimpleAPI
Unzip the package SimpleAPI (from "IAM Academy Software" folder) to Downloads\Apache24 folder. It will create the folder "C:\Users\StudentX\Downloads\Apache24\SimpleAPI-smartplan"
Replace with actual username
Remember to replace "StudentX" with the real username that the instructor has assigned you (e.g. Student1). Keep it in mind for coming steps in this lab.
Step 2: Install mod_auth_openidc
mod_auth_openidc is an authentication/authorisation module for the Apache 2.x HTTP server that authenticates users against an OpenID Connect Provider. It can also function as an OAuth 2.0 Resource Server, validating access tokens presented by OAuth 2.0 clients against an OAuth 2.0 Authorization Server. Source: https://www.mod-auth-openidc.org/
- Install mod_auth_openidc from the given file mod_auth_openidc-2.3.8-apache-2.4.x-win64.zip. You will find it at "IAM Academy Software" folder too. Simply extract the zip file to Downloads folder so it will create the folder "C:\Users\StudentX\Downloads\mod_auth_openidc-2.3.8-apache-2.4.x-win64".
- On the package you are using, login.smartplan.com certificate has been added to mod_auth_openidc's trusted root store. This is required because login.smartplan.com has a self-signed certificate and by default is not trusted.
Additionally, a self-signed certificate has been generated for greencabs.com. Both the certificate and the key file are located in C:\Users\StudentX\Downloads\Apache24\conf
Step 3: Invoke SimpleAPI
Open the command prompt
Run cd %USERPROFILE%\Downloads\Apache24\SimpleAPI-smartplan
Then execute
run-apache.cmdto start Apache HTTP server- The API is now running in https://greencabs.com:5001/simple. Open the URL on Firefox browser and accept the security warnings. You will get a 401 Unauthorized error. That is fine because you still need a client to invoke the API. In next section (Part 3) you will install a single page application (the client) to invoke the API and get a response from it.
- Keep the command prompt window running. Don't close it until asked.
localhost
Windows' hosts file has been already edited so localhost redirects to greencabs.com
127.0.0.1 greencabs.com
Part 3: Customise SimpleAPI to your authorisation server
Your local SSO installation will become the authorisation server. Now you must customise SimpleAPI to connect it with SSO (authorisation server) via OAuth 2.0.
On SSO Management Console
- In SmartPlan site, create new application "SimpleAPI." Select type "OAuth 2.0," tick Enabled box and press OK button.
- Under "ID and Activation" press "Activate" button. This will generate a client_id and client_secret.
- Save generated file as simpleapi.json in a temporary folder (e.g. Downloads).
- Press "Update" at the bottom
You must also upload metadata. First, create a JSON file with the minimum metadata needed using the example below. As this is an API, it's important that redirect_uris and grant_types are empty.
metadata-api-client.json{"redirect_uris":[] , "grant_types":[] }- Save this JSON file as metadata-api-client.json and then upload the file as seen below.
- Press "Update" at the bottom
- Next, add "CustomerID Password" in Allowed Methods, and "eIDMUser" in Allowed To tab.
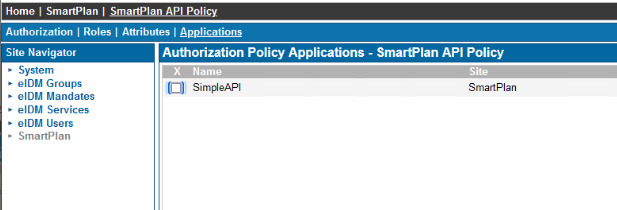
- Our SimpleAPI uses mod_auth_openidc for validating the access tokens and mod_auth_openidc expects the user identity as the "sub" claim when validating the tokens. To achieve this, add an Authorization Policy "SmartPlan API Policy" to the SmartPlan site and configure it as follows.
Go to "Single Value Attributes" and write "sub" at the bottom (without quotation marks, as shown in the image below). Then click on "Add" button, and press "Update" at the bottom.
Then go to "Attributes" tab and add the attribute sub with value user:mail as shown below - On the Applications tab, assign the SmartPlan API Policy to SimpleAPI
On the Simple API
We'll now configure client_id and client_secret to the SimpleAPI configuration, to integrate SSO and the SimpleAPI.
Edit httpd.conf file with the values of your server. Open C:\Users\StudentX\Downloads\Apache24\SimpleAPI-smartplan\conf\httpd.conf in Notepad++.
Below you can see the two lines to be edited. Replace YOUR-CLIENT-ID and YOUR-CLIENT-SECRET with the actual values from simpleapi.json
C:\Users\StudentX\Downloads\Apache24\SimpleAPI-smartplan\conf\httpd.conf# OAuth 2.0 resource server OIDCOAuthIntrospectionEndpoint https://login.smartplan.com:8443/uas/oauth2/introspection OIDCOAuthClientID YOUR-CLIENT-ID OIDCOAuthClientSecret YOUR-CLIENT-SECRET
- Save the file. Now the simple API is configured to connect to your SSO installation.
When an API request comes with an access token, the mod_auth_openidc module in front of the SimpleAPI app will call the OAuth2 Token Introspection Endpoint ( https://login.smartplan.com:8443/uas/oauth2/introspection ), using the client_id and client_secret and credentials. In response, information about the token will be returned in JSON format - if the token is valid, access will be granted and the API will return results.
Part 4: Install and start SimpleSPA
Now you need a client that connects to the API. For this purpose, Ubisecure has designed a single page application called SimpleSPA, which runs on Apache HTTP Server too.
As you have Apache already installed, you can copy the single page application to your computer
- Unzip the package SimpleSPA-greencabs.zip (from "IAM Academy Software" folder) to Downloads\Apache24 folder. It will create the folder "C:\Users\StudentX\Downloads\Apache24\SimpleSPA-greencabs"
- Open another command prompt without closing the one used for SimpleAPI.
- Run cd %USERPROFILE%\Downloads\Apache24\SimpleSPA-greencabs
- Then execute
run-apache.cmdto start this other Apache HTTP server instance - Now the single page application is running. Open https://greencabs.com:5000/spa.html in a browser
- You can load the application, but can't login yet. The next step is configuring the authorisation server.
Part 5: Register SimpleSPA to the Authorisation Server
Now that the single page application is running, we will configure it to connect to our local SSO installation (login.smartplan.com).
On SSO Management Console
The first part of the configuration is done in SSO Management Console (https://login.smartplan.com:8443/ubilogin).
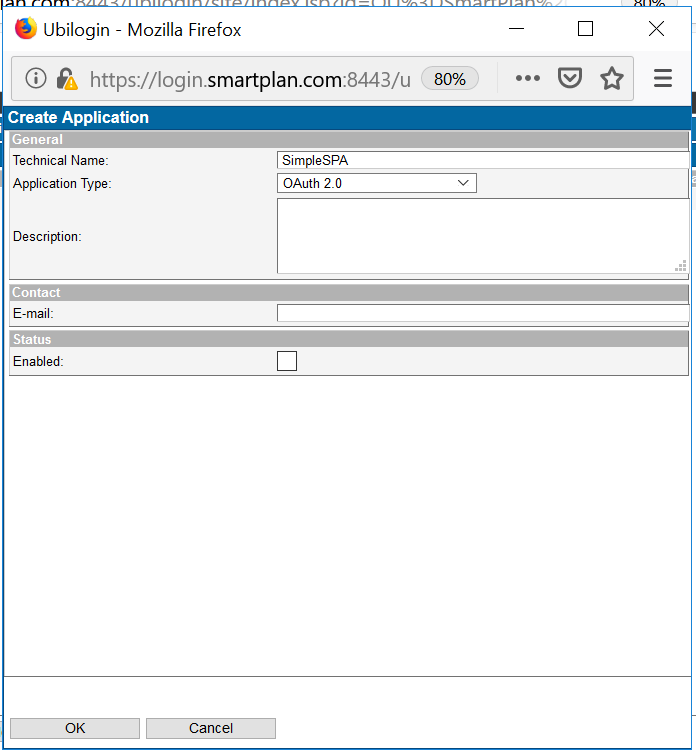
- In SmartPlan site, create new application "SimpleSPA." Select type "OAuth 2.0," tick "Enabled" box and press OK button.
- Under "ID and Activation" press "Activate" button. This will generate a client_id and client_secret.
- Save generated file simplespa.json on a temporary folder such as Downloads. You will use it for next step.
- Press "Update" at the bottom
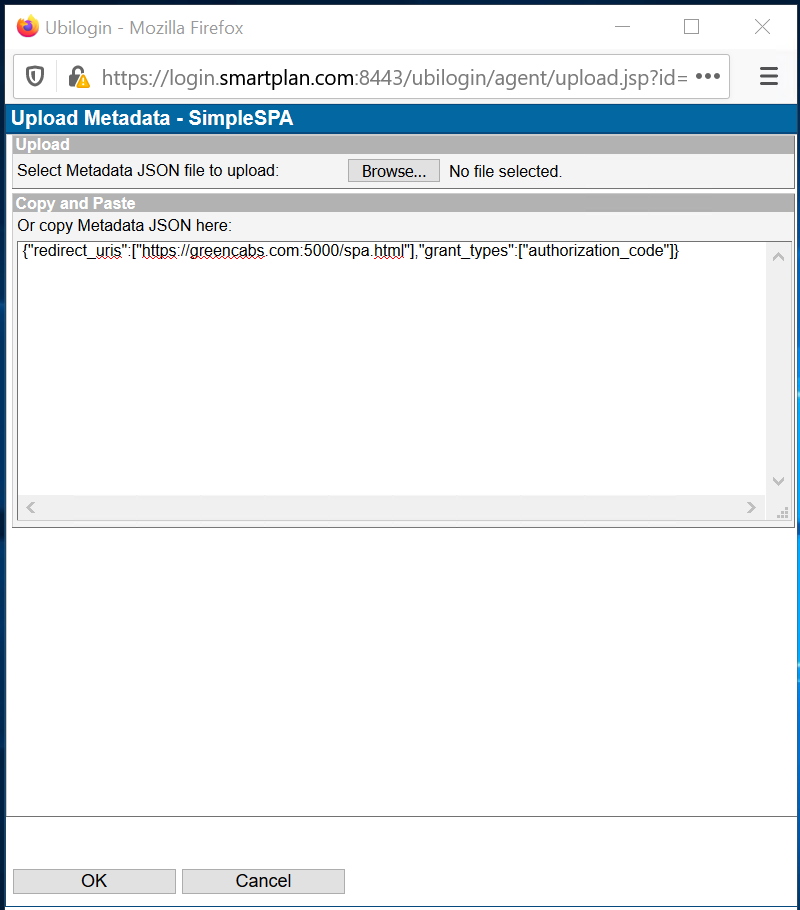
Also under "ID and Activation" you will see "Client Metadata." Click "Upload" button and in the pop up windows that opens enter the following text:
{"redirect_uris":["https://greencabs.com:5000/spa.html"],"grant_types":["authorization_code"]}Click "OK"
- Press "Update" at the bottom.
- This has specified the redirect URI of the application and that Authorization Code is the OAuth 2.0 grant type that will be used.
- Finally, add "CustomerID Password" in Allowed Methods, and "eIDMUser" in Allowed To tab.
On the Single Page Application
We will now use the client_id and client_secret generated in the previous step. This will complete the integration between SSO and the single page application, so the single page application will get an access token for API calls.
The single page application's logic is on file C:\Users\StudentX\Downloads\Apache24\SimpleSPA-greencabs\docs\spa.html. You need to edit a few lines on it to match the authorisation server.
First, add the client_id and client_secret values, which are inside the file simplespa.json you saved earlier.
Edit line 230 as explained in the table below
Parameter
Replace it with SimpleSPA value of client_id on simplespa.json public value of client_secret on simplespa.json
Below is an example how the line will look after the changes:When the single page application request the access token, it must specify the target application of that access token. In this case is the SimpleAPI. Finally, edit line 274 as explained in the table below
Parameter Replace it with SimpleSPA value of client_id on simplespa.json api value of client_id on simpleapi.json (← Obs. this value comes from SimpleAPI's JSON file)
Below is an example how the line will look after the changes:- Now the single page application is configured.
Part 6: Connect from your single page application to the protected API
- First, restart both the API and the single page application. Do Ctrl-Z on the two command prompts, and then start them again as when were invoked for the first time.
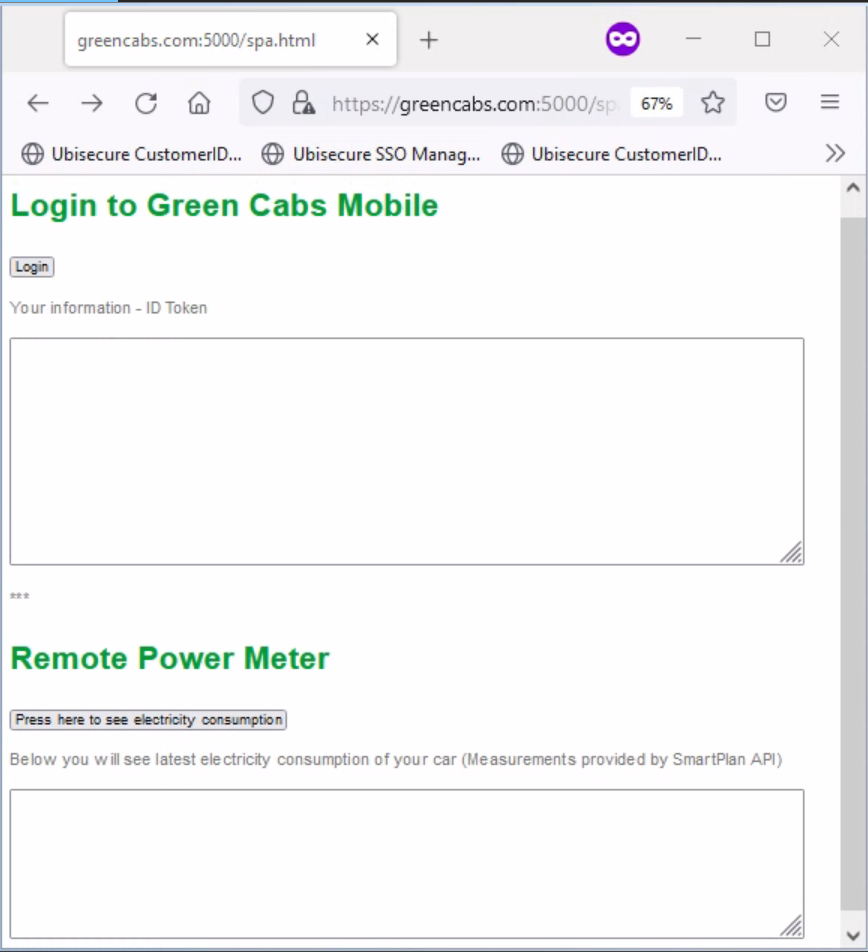
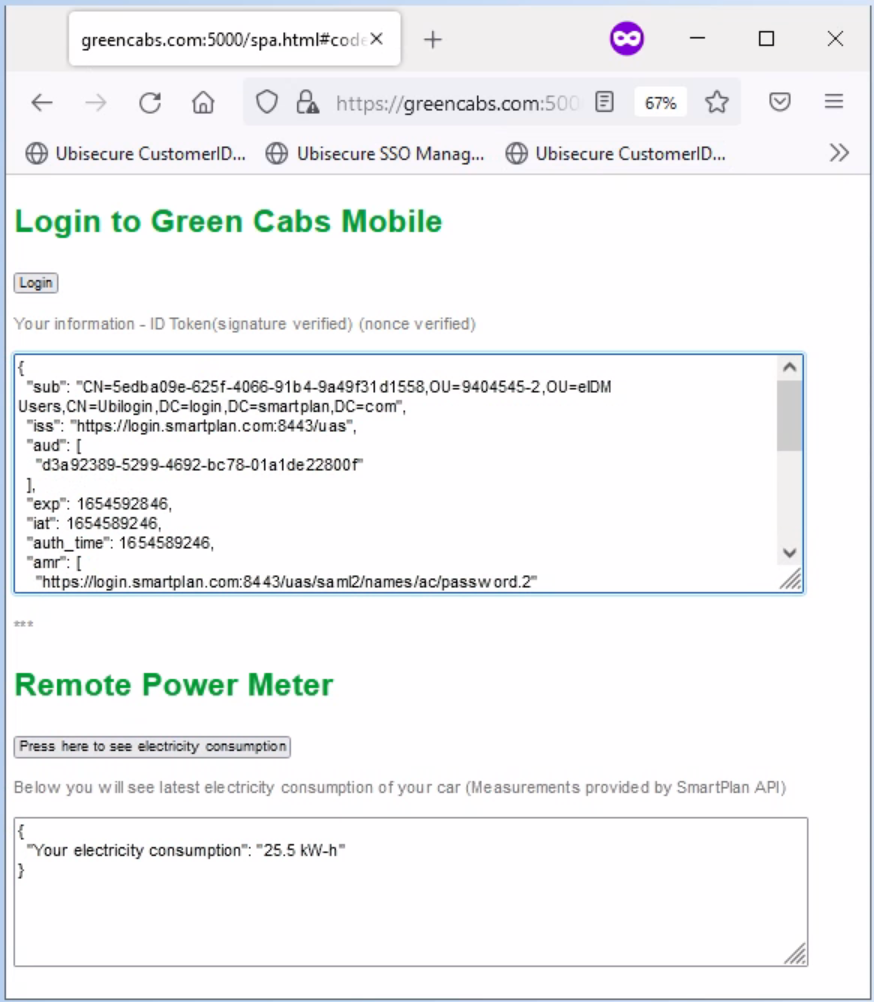
- Open https://greencabs.com:5000/spa.html on your browser:
- Click "Login" button and authenticate with your CustomerID user account. Use Karl Kearnes (karl@kokomedia.local) account which was created in Lab 2.2: CustomerID Workflow Configuration. Password: Qwerty1234
- You will see your ID Token on the upper box.
- Next, invoke the API
- You will get a response from the API as you see below.
Obs: the electricity consumption is a static value on this exercise. If you get a response, you're done.
Part 7: Create an authorisation policy for the application
At this point, all CustomerID users can log in to Green Cabs Mobile and from there can call SmartPlan API. The next step is to make that only a group of authorised users can access the application and API.
Another inconvenience you might have noticed is that the "sub" field in the ID Token reveals too much information about the data structure of the authorisation server .We'll use Persistent ID Mapping to solve this challenge.
Persistent ID Mapping
SSO Management Console allows user mappings. Mappings are used to map a Ubisecure user's user id to a user id required by an application.
Persistent ID (UUID format) mapping sends a Persistent ID to the target application. This ID will not change after logout so every time the user logs in, the same ID will be used.
For more information, visit the page Management UI Mappings - SSO
Let's do the following two improvements:
- Mask user distinguished name by creating and assigning a Persistent ID Mapping. Thus the authorisation server will send that persistent ID instead of the distinguished name, and will appear in ID token's "sub" field.
- Create an authorisation policy that:
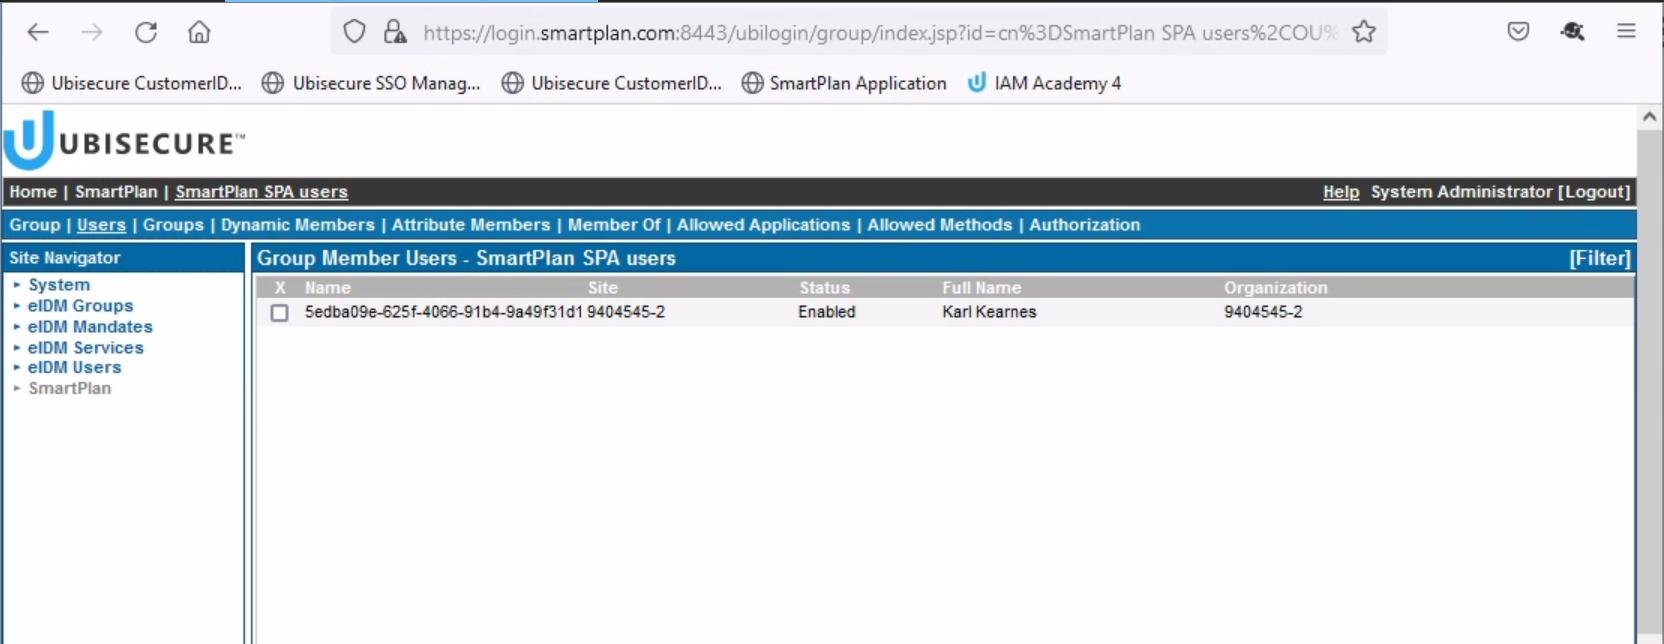
- Allows access to the application and API only to a new group called "SmartPlan API users." Include only Karl Kearnes in this group.
- Has two attributes so you can visualize name and surname along with the ID token fields.
Step 1: Create a Persistent ID Mapping
Open SSO Management Console.
Go to SmartPlan site
Mappings
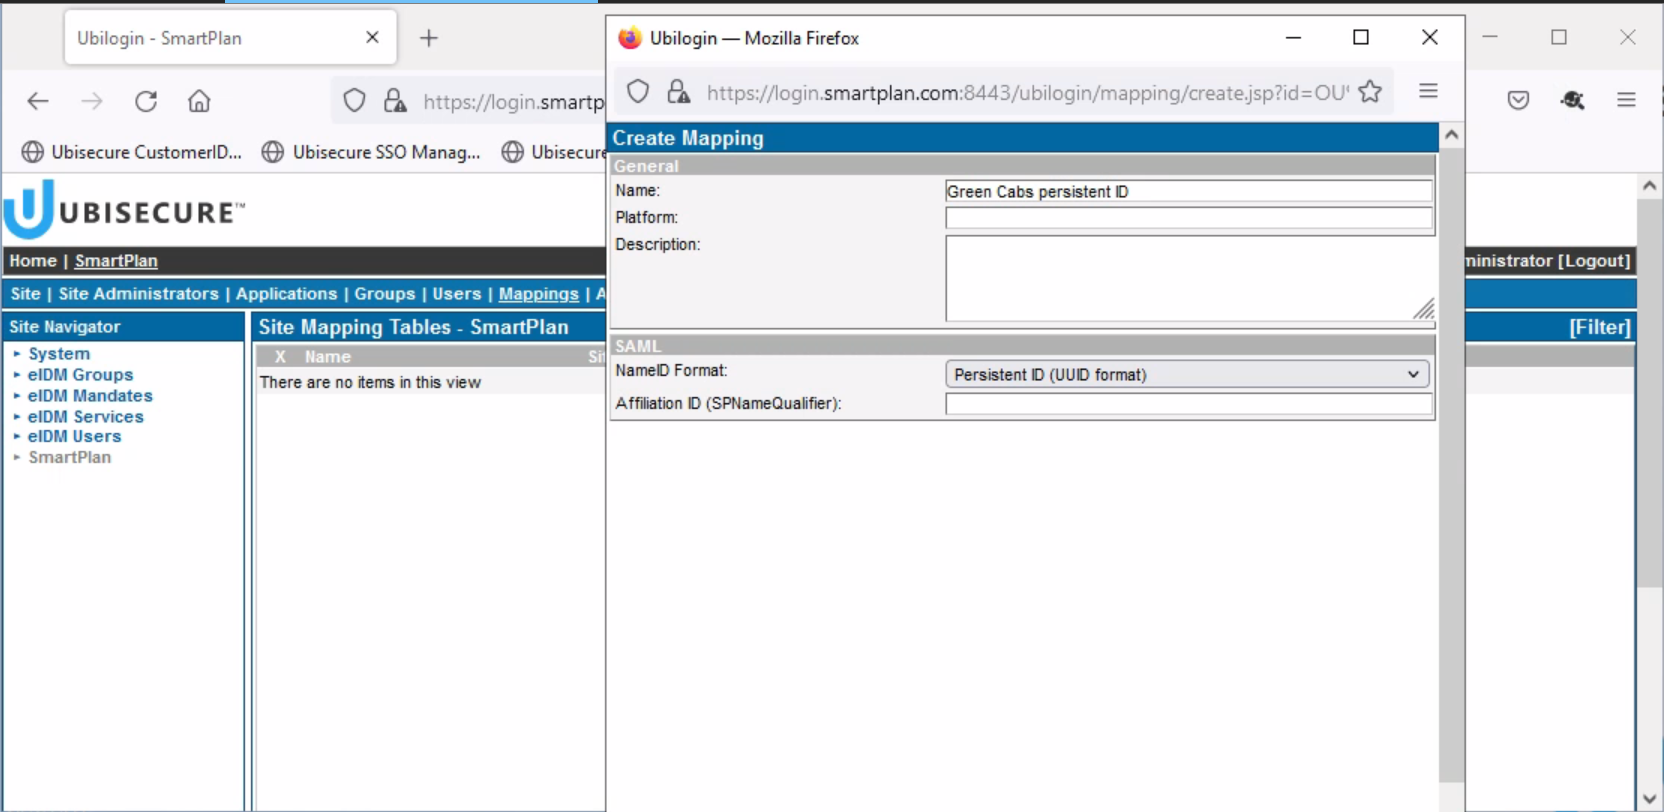
New Mapping ...
Name: Green Cabs persistent ID
NameID Format: Persistent ID (UUID format)
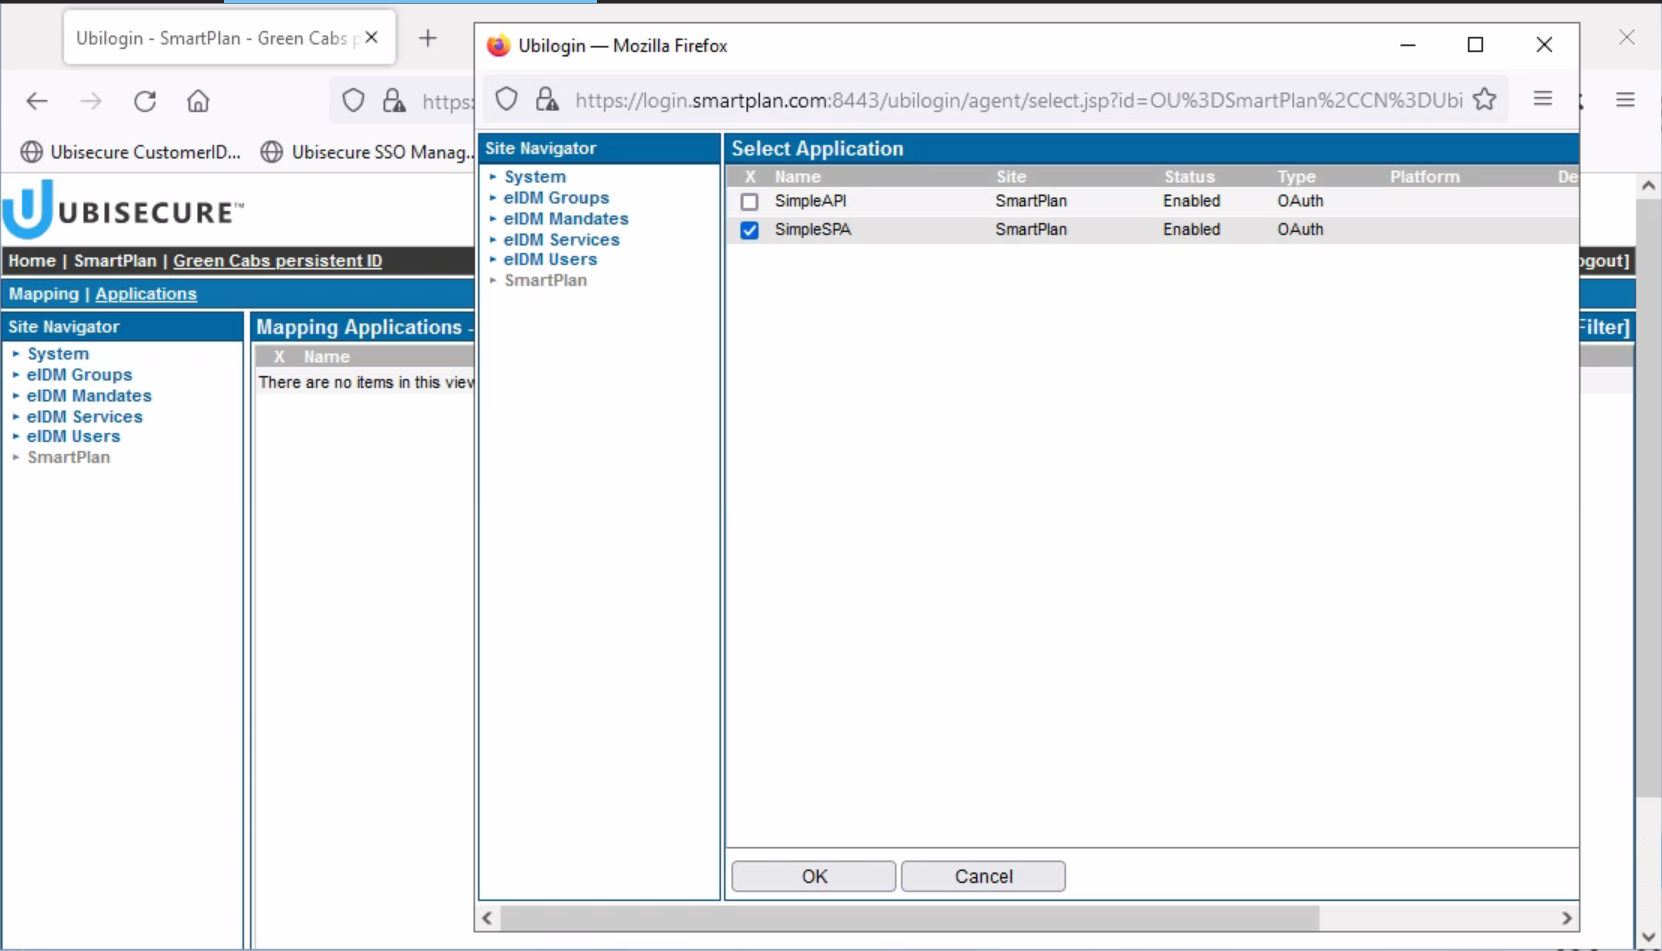
Finally, connect the Persistent ID Mapping to the SimpleSPA application. On the screen below, tick "SimpleSPA" and press OK button at the bottom.
Step 2: Create an authorisation policy
Go to SmartPlan site
Groups
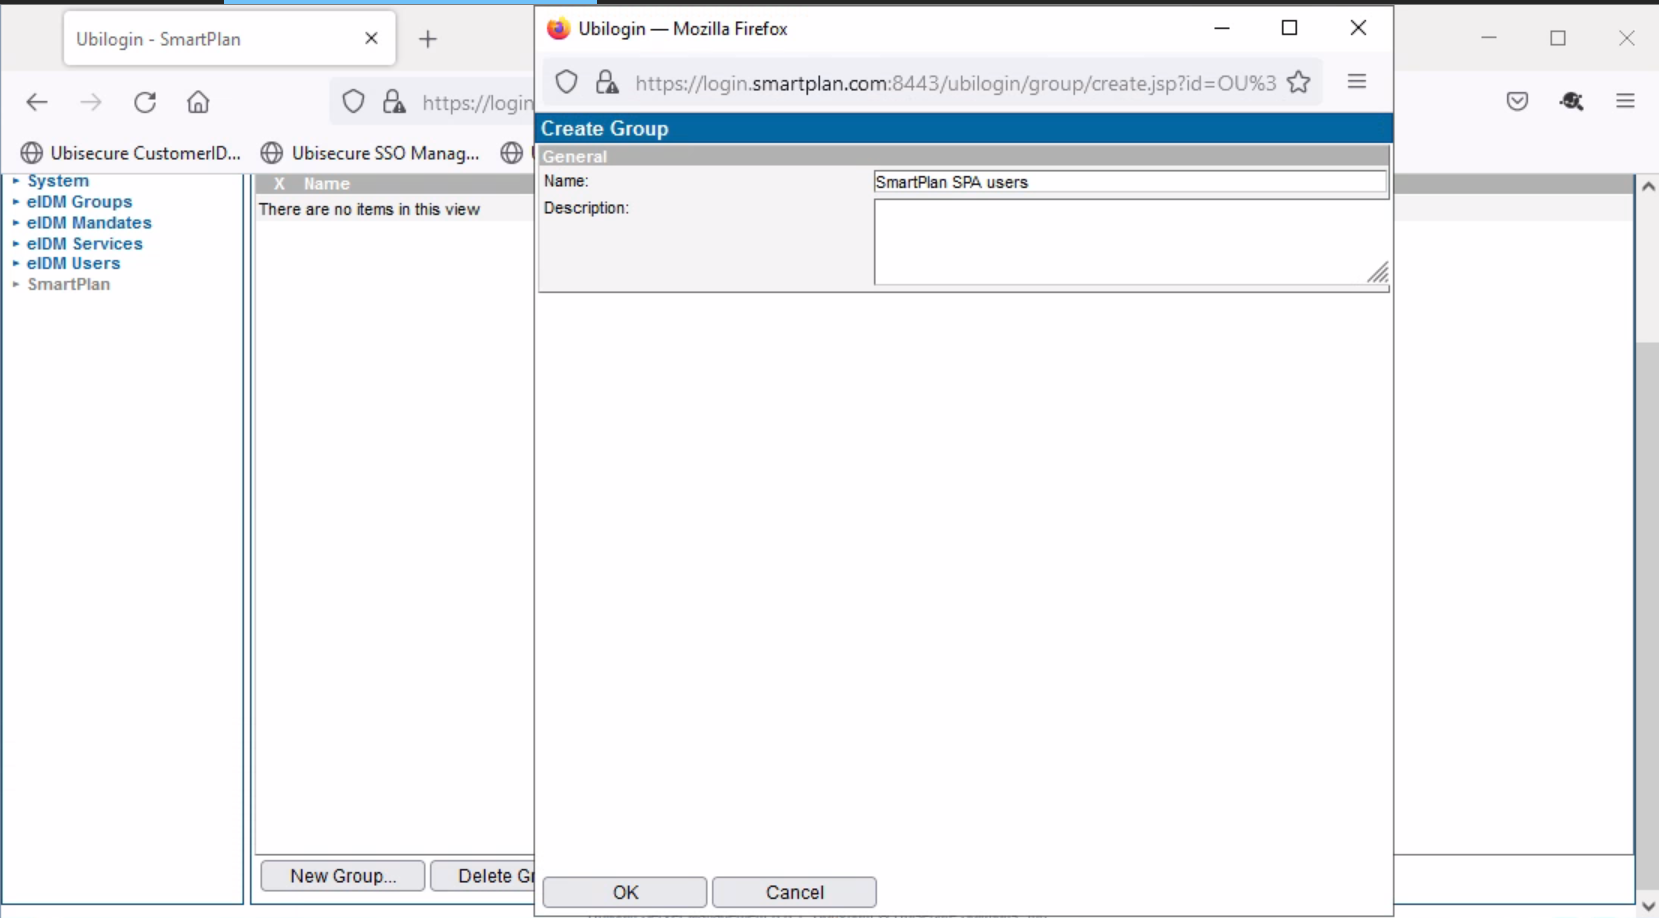
New Group
Create group: SmartPlan SPA users
Go to "Users" tab, click "Add..." button.
Add Karl Kearnes
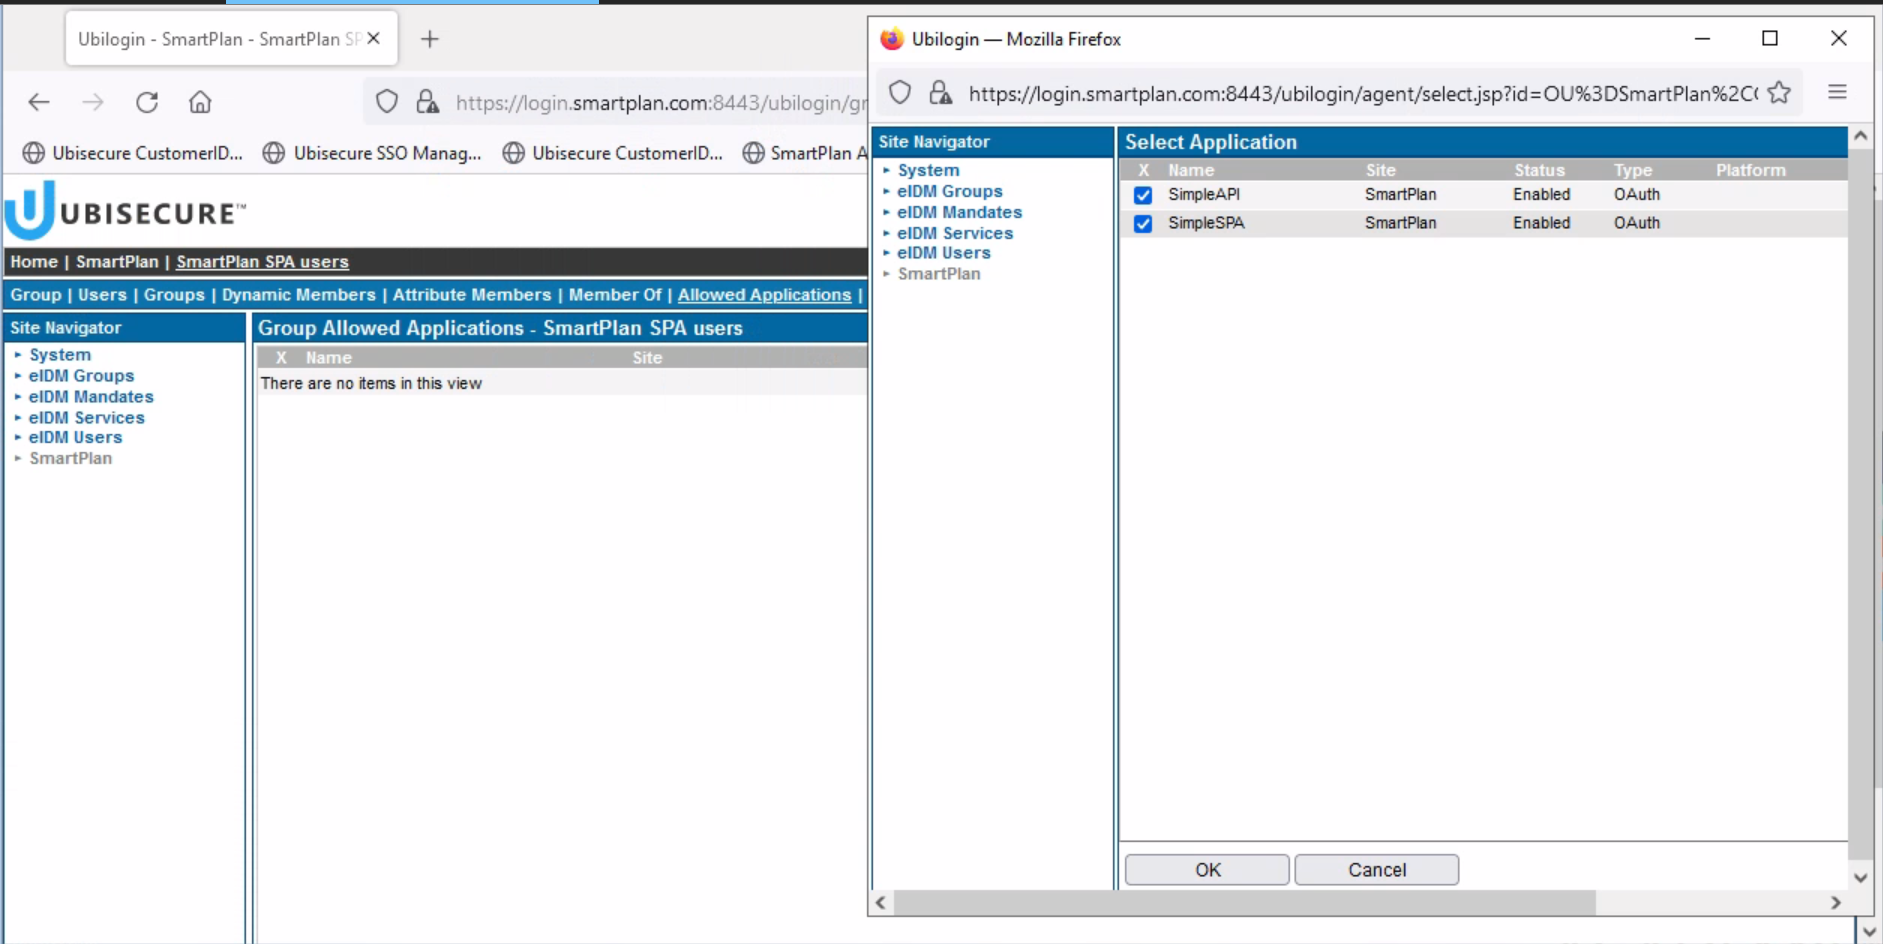
In Allowed Applications tab, add both SimpleAPI and SimpleSPA
Go to SmartPlan site
Authorization Policies
New policy
Create "SmartPlan SPA Policy"
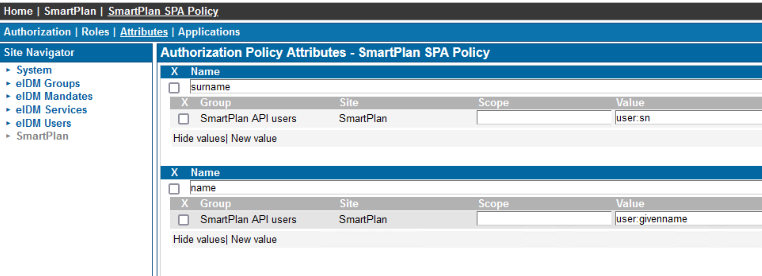
In Attributes add name and surname
| Attribute | Name | Value |
|---|---|---|
| First name | name | user:givenname |
| Surname | surname | user:sn |
In "Applications" tab add SimpleSPA
You still need to do a final step. At this point all users on CustomerID repository will be able to log in, as earlier in this lab you authorised them all. Now, remove eIDMUser group from both applications SimpleSPA and SimpleAPI. After that, only users from the new group "SmartPlan API users" will be authorised.
Once this is done, verify that Karl Kearnes can access the API but other normal users can't. Use Mary Smith (the user you created on Lab 2.2: CustomerID Workflow Configuration, Part 1)
Additional Exercise (Optional): Use Postman to view the access tokens
SimpleSPA (Green Cabs Mobile) has allowed you to see the contents of ID tokens.
Now use Postman as the client to authenticate yourself and visualize the access tokens.
Use the access token to get response from SmartPlan API.
*** END OF THIS LAB ***
For more information
The code used in this exercise was developed by Petteri Stenius. Full repository of SimpleAPI and SimpleSPA are available at GitHub:
https://github.com/psteniusubi/SimpleAPI
Obs: to install SimpleAPI properly, you need to install Visual Studio C++ 2015 aka VC14, newer versions don't work with mod_auth_openidc.


