Login screens - SSO
Ubisecure SSO includes several login screens that can be customized using the methods described in this page. The login screens are not visually customized separately but they are still described briefly in this page because they are also present in the CSS design package and the texts are screen specific. The screenshots include the text customization keys in place of the actual default texts.
Jump to a specific login screen by clicking a link:
Note: Some of the login screen screenshots read "Identify and authorize. Enable secure business" as a header. The parameterized fields for the header are HEADER_TEXT1 and HEADER_TEXT2
Menu screen
The menu screen is the default starting screen of the sign in process. By default it contains an Intro box, Help box and depending on the authentication methods available it will also contain either a Login box or an External box.
Parameterized fields:
- MENU_INTRO_TEXT
- {0} → url (host) of the service the user is trying to access
- NOTE: This field is used by default
- MENU_INTRO2_TEXT
- {0} → url (host) of the service the user is trying to access
- {1} → name of the service the user is trying to access (Client name is read from agent metadata – OAuth2/SAML2)
- NOTE: This field is used only if agent metadata contains client name. For OAuth2 agents, the name is set in the client_name value of the metadata. For SAML2 agents, the name is set in the mdui:DisplayName value of the metadata.
|
|---|
| Figure 1. Menu Screen with Text Keys |

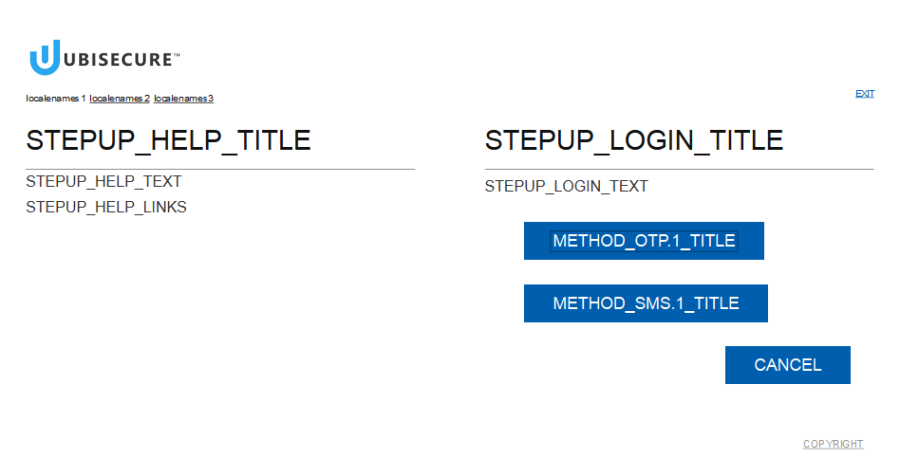
StepUp screen
The step-up screen is used for selecting a suitable authentication method when the normal password authentication method is not strong enough for the service in question.
|
|---|
| Figure 2. StepUp Screen with Text Keys |
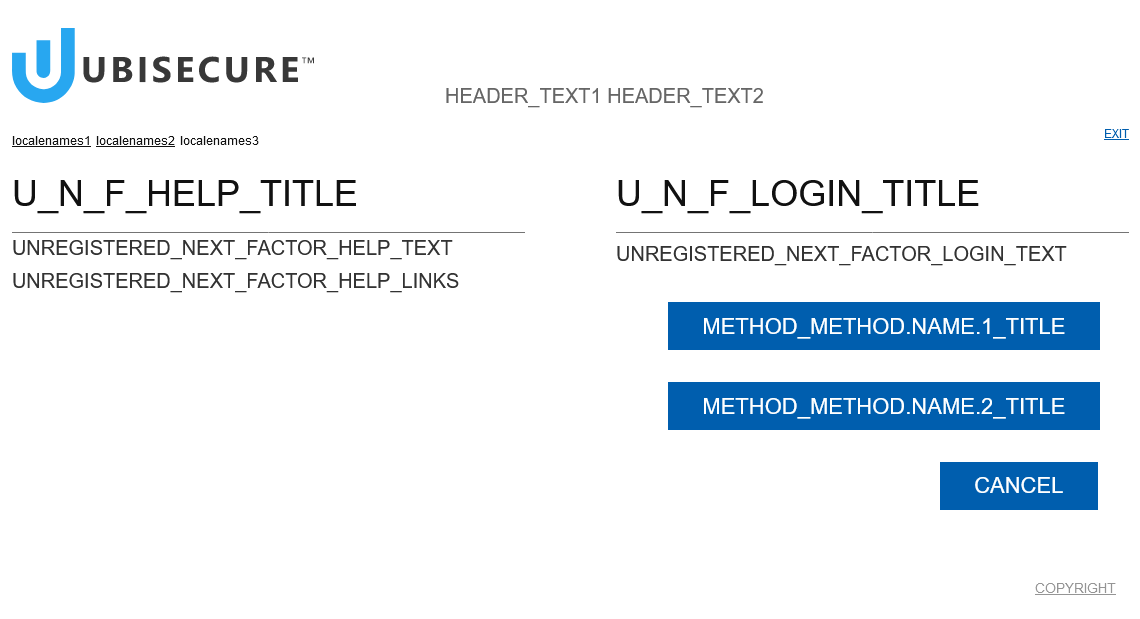
Unregistered Next Factor Menu screen
The unregistered next factor screen is used for selecting a suitable authentication method when the OpenID Connect or SAML authentication method is not strong enough for the service in question.
|
|---|
Figure 3. Unregistered Next Factor Menu Screen with Text Keys Note that U_N_F prefix (used in HELP_TITLE and LOGIN_TITLE) is shortened from UNREGISTERED_NEXT_FACTOR. |
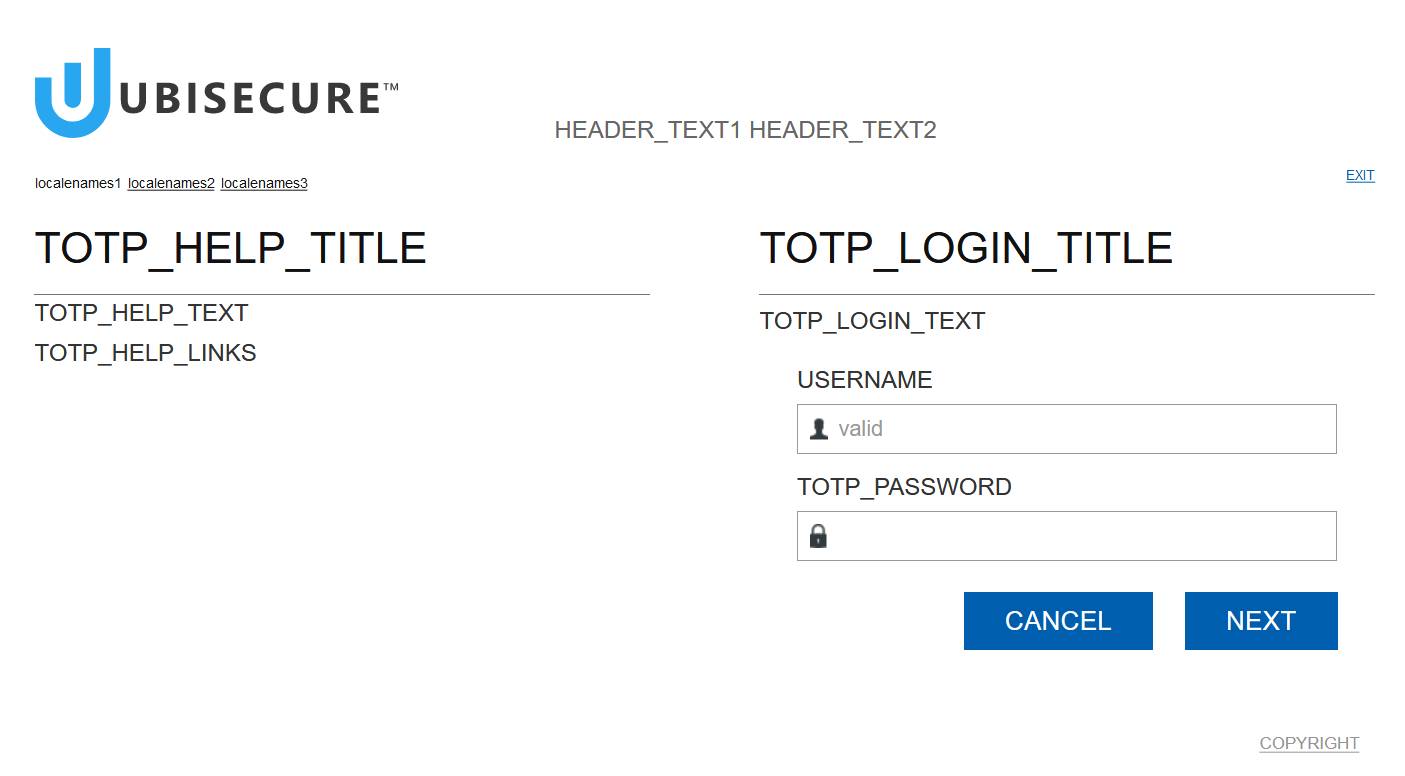
TOTP screen
The TOTP screen is used for giving the one-time password from the TOTP Authenticator application when using the TOTP authentication method.
|
|---|
| Figure 4. TOTP Screen with Text Keys |
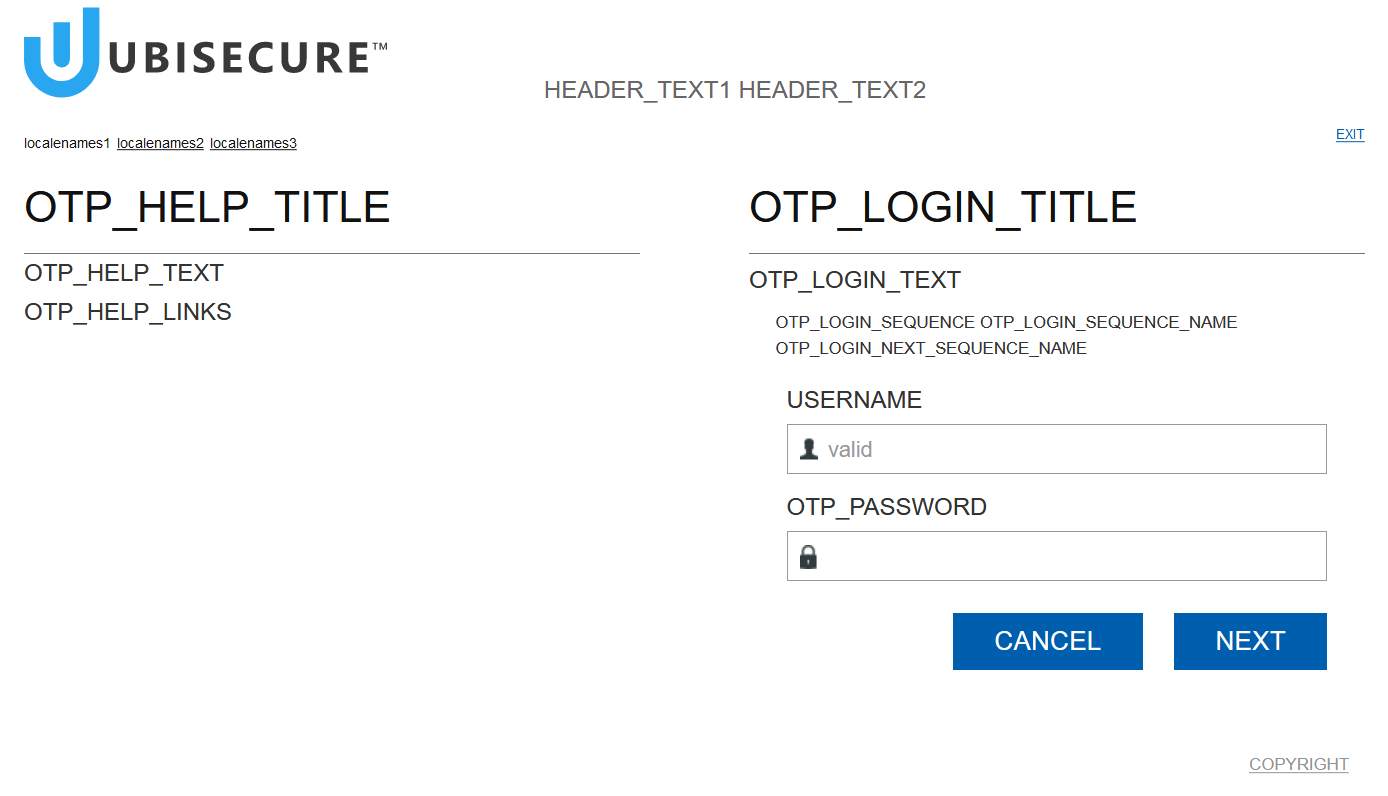
OTP screen
The OTP screen is used for giving the one-time password from the OTP list when using the OTP authentication method.
Parameterized fields:
- OTP_LOGIN_SEQUENCE
- {0} → Identifier of the requested one-time password
- OTP_LOGIN_SEQUENCE_NAME
- {0} → Identifier of the currently active OTP list
- OTP_LOGIN_NEXT_SEQUENCE_NAME
- {0} → Identifer of the currently passive OTP list
- OTP_LOGIN_REMAINING_PASSWORD_AMOUNT
- This field has multiple options and some of it is controlled by
otpWarnLimitmethod configuration string. See chapter "Additional Configurations" in OTP Printout authentication method - SSO - {0}
- Number of remaining one-time password in the active OTP list when remaining is less than
otpWarnLimit - No text when remaining is above
otpWarnLimitorotpWarnLimitis not set - Informs that there aren't any remaining passwords when all passwords have been used or the user doesn't have any OTP lists associated
- Number of remaining one-time password in the active OTP list when remaining is less than
- This field has multiple options and some of it is controlled by
|
|---|
| Figure 5. OTP Screen with Text Keys |
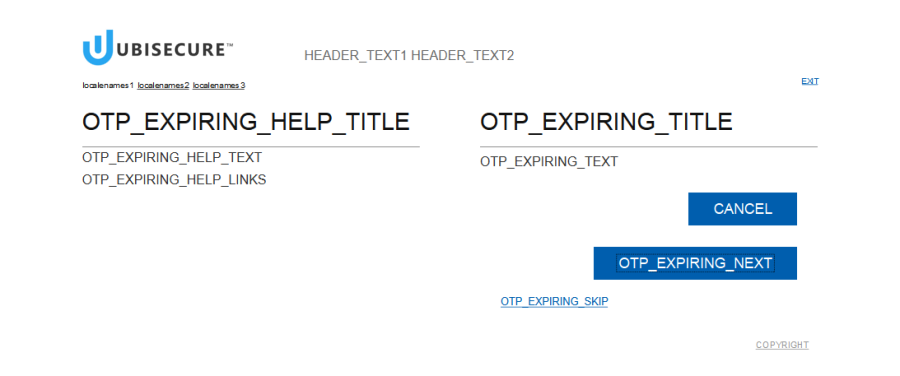
OTP expiring screen
The OTP Expiring screen is used when user logs in with a One-time Password which is expiring.
|
|---|
| Figure 6. OTP Expiring Screen with Text Keys |
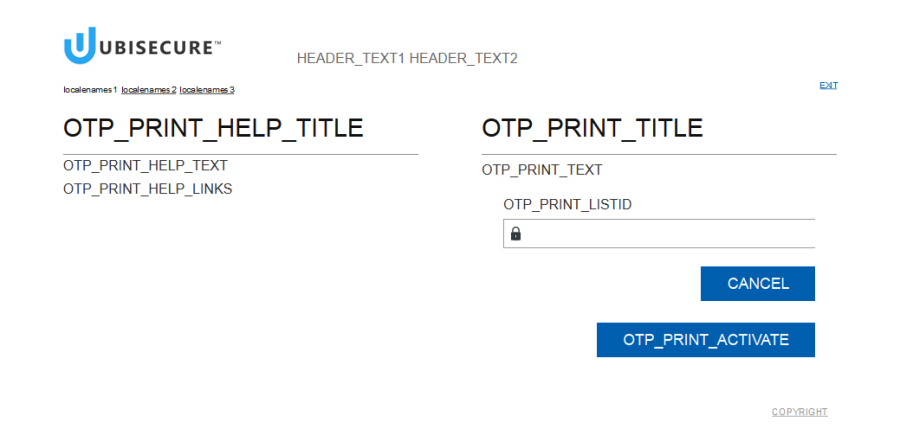
OTP print screen
The OTP Print screen is used for printing and activating new One-time Password lists.
Parameterized fields:
- OTP_PRINT_LIST_TEXT
- {0} → OTP List ID
|
|---|
| Figure 6.1. OTP Print Screen with Text Keys |
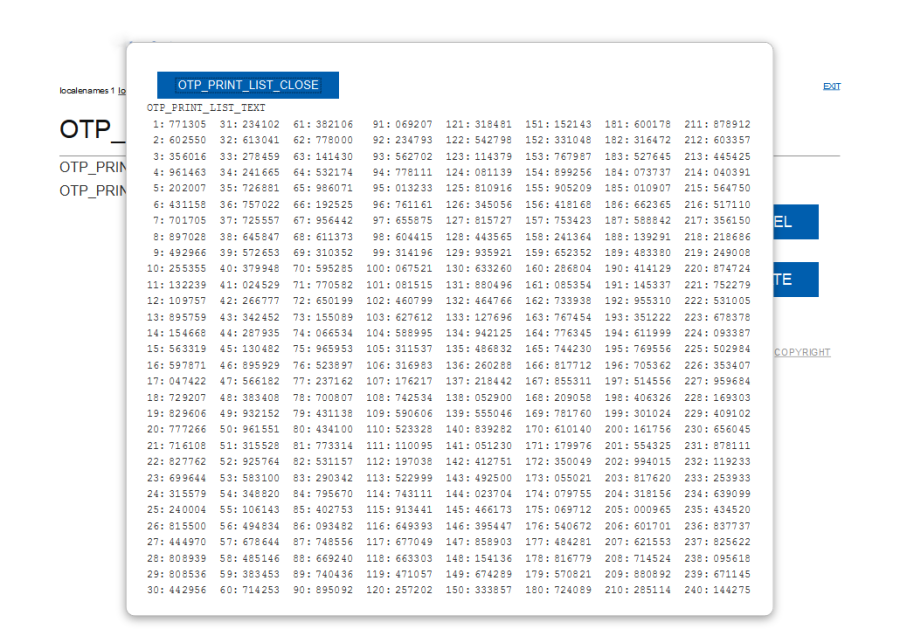
Parameterized fields:
- OTP_PRINT_LIST_CLOSE
- {0} → Close
|
|---|
| Figure 6.2. OTP Print Screen showing the printable OTP list |
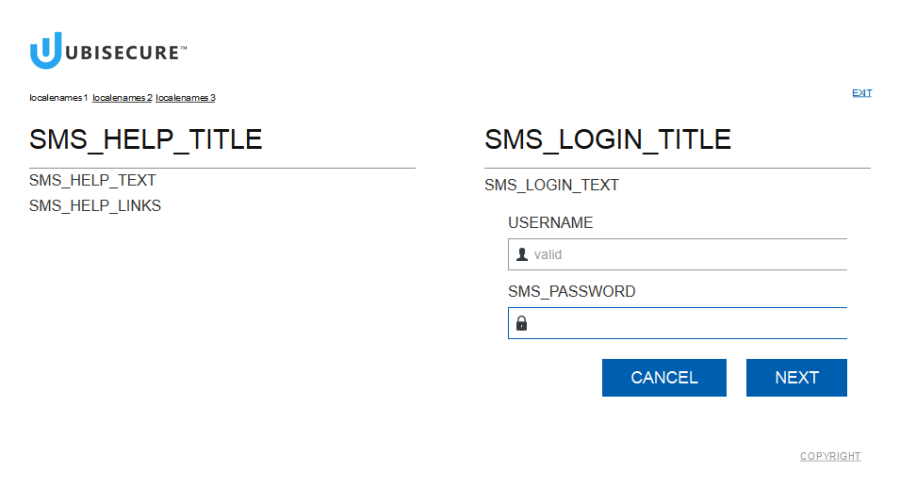
SMS screen
The SMS screen is used for giving the one-time password sent to the user's mobile phone when using the SMS OTP authentication method.
|
|---|
| Figure 7. SMS Screen with Text Keys |
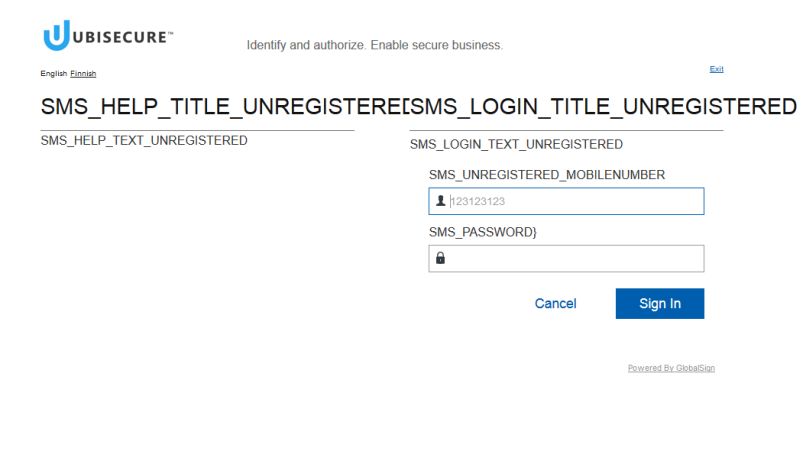
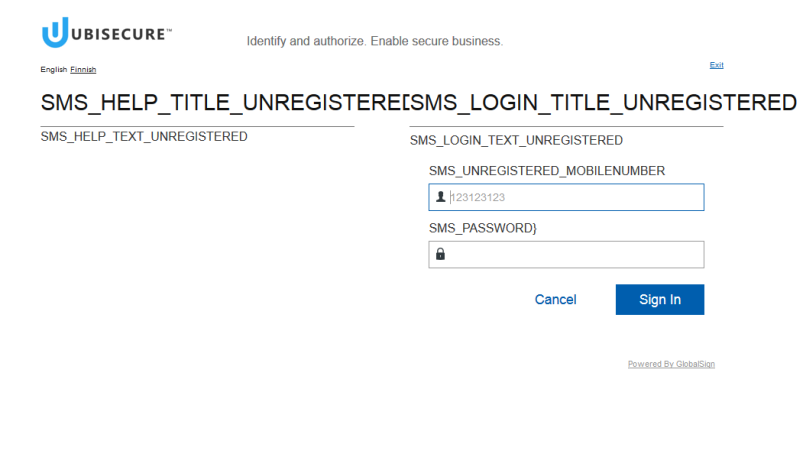
SMS unregistered screen – insert phone number
The SMS screen is used for giving the one-time password sent to the user's mobile phone when using the SMS OTP authentication method.
|
|---|
| Figure 8 SMS unregistered phone number entry screen with text keys |

|
|---|
| Figure 9 SMS unregistered one time password entry screen with text keys |
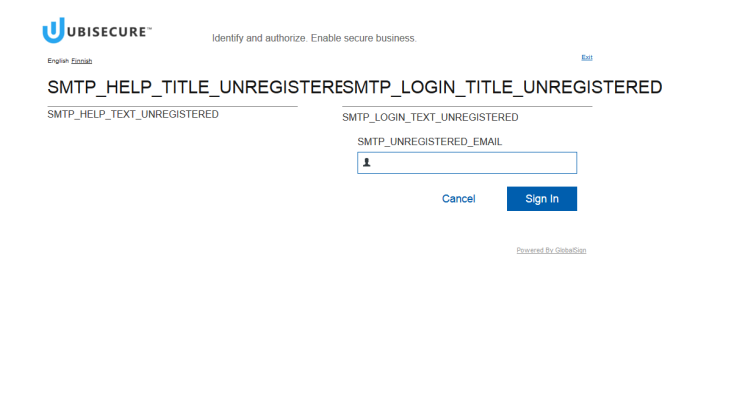
SMTP unregistered screen – insert phone email
The SMTP screen is used for giving the one-time password sent to the user's mobile phone when using the SMTP OTP authentication method.
|
|---|
| Figure 10 SMTP unregistered phone number entry screen with text keys |
|
|---|
| Figure 11 SMTP unregistered phone number entry screen with text keys |
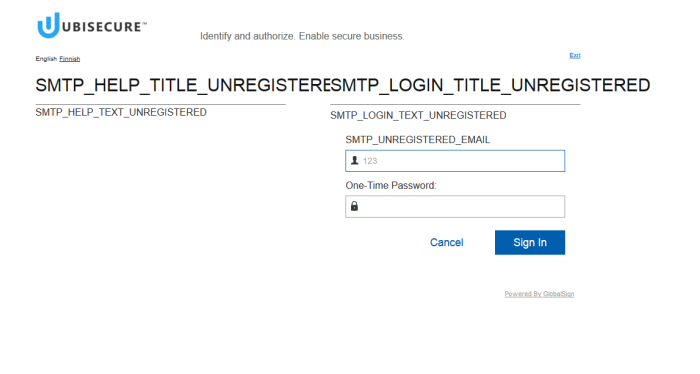
|
|---|
| Figure 12 SMTP unregistered one time password entry screen with text keys |
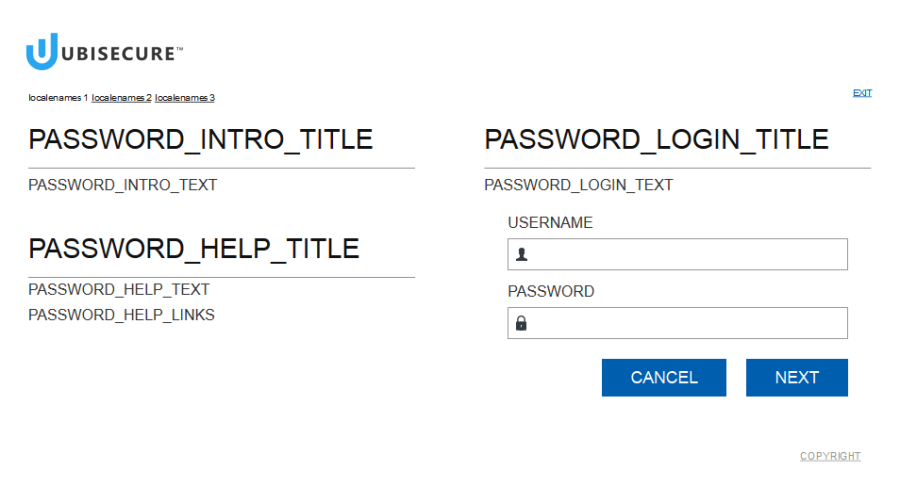
Password screen
The password screen may also be a starting screen of the sign in process. It is used as the starting screen when only the password authentication method is available.
- PASSWORD_INTRO_TEXT
- {0} → url of the service the user is trying to access
- PASSWORD_INTRO2_TEXT
- {0} → url (host) of the service the user is trying to access
- {1} → name of the service the user is trying to access (Client name is read from agent metadata – oAuth2/SAML2)
- NOTE: This field is used only if agent metadata contains client name metadata
|
|---|
| Figure 13. Password Screen with Text Keys |
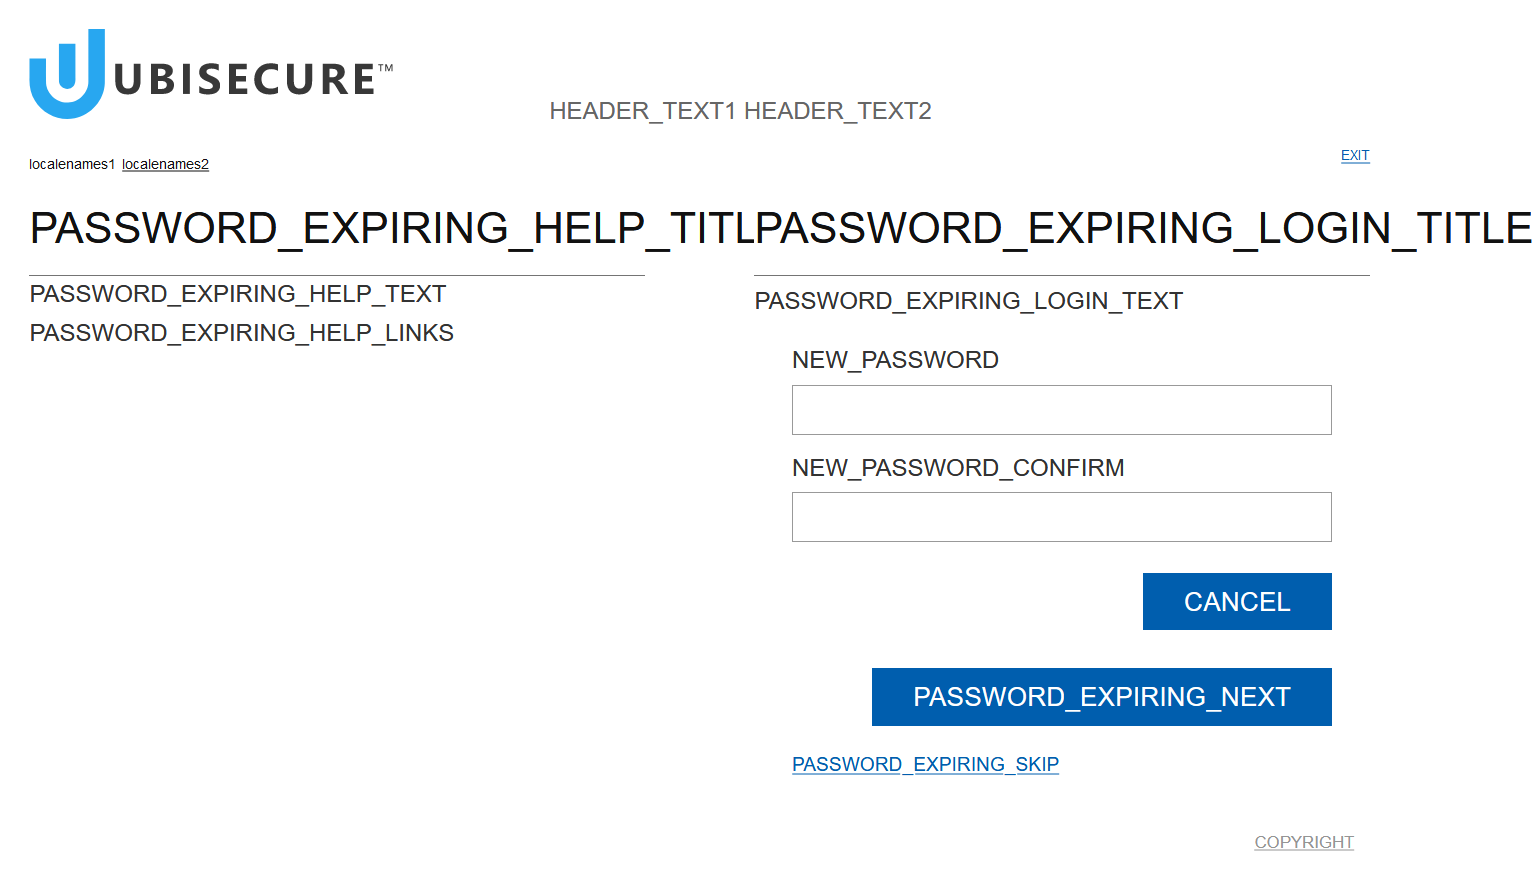
Password expiring screen
The password expiring screen is used for giving the user the opportunity to change the password that will expire in the near future.
|
|---|
| Figure 14. Password Expiring Screen with Text Keys |
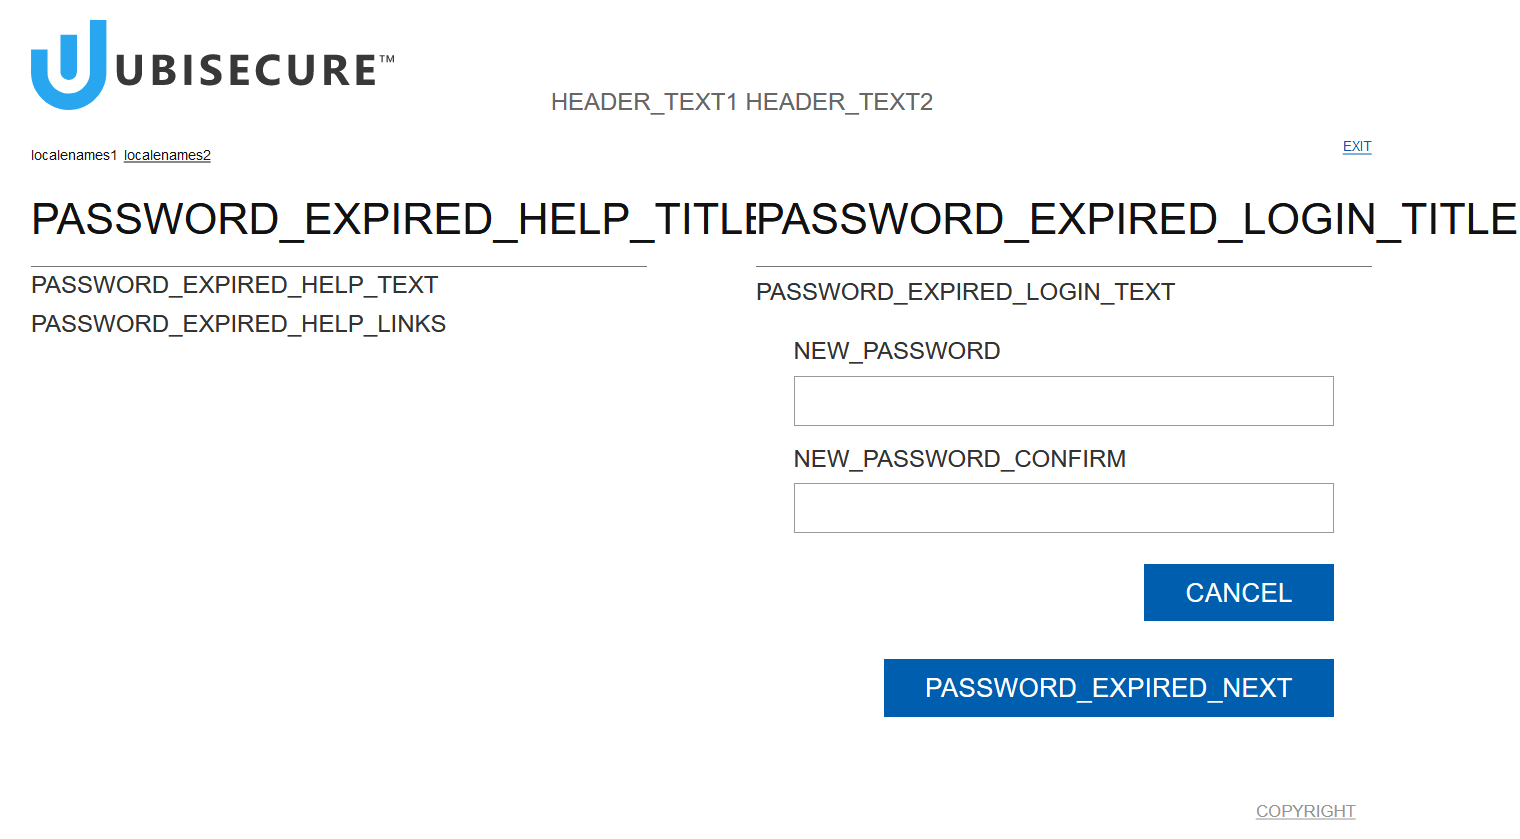
Password expired screen
The password expired screen is used for forcing the user to change a password that has been expired before giving the user access to the requested service.
|
|---|
| Figure 15. Password Expired Screen with Text Keys |
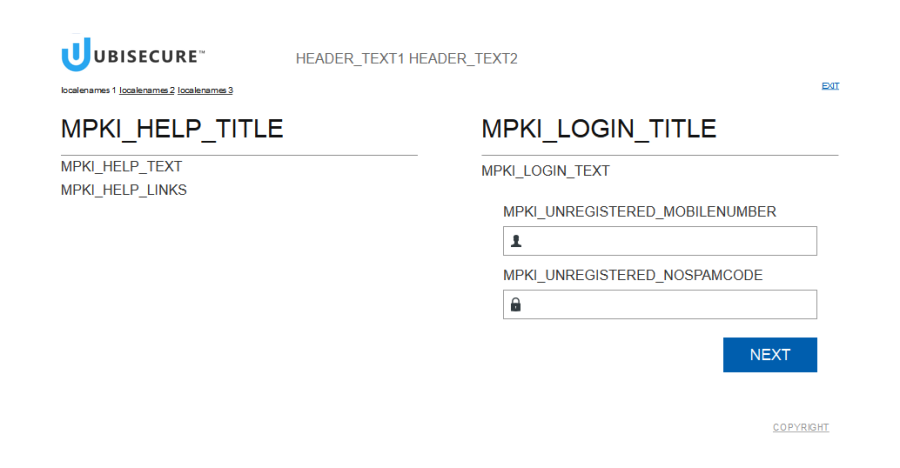
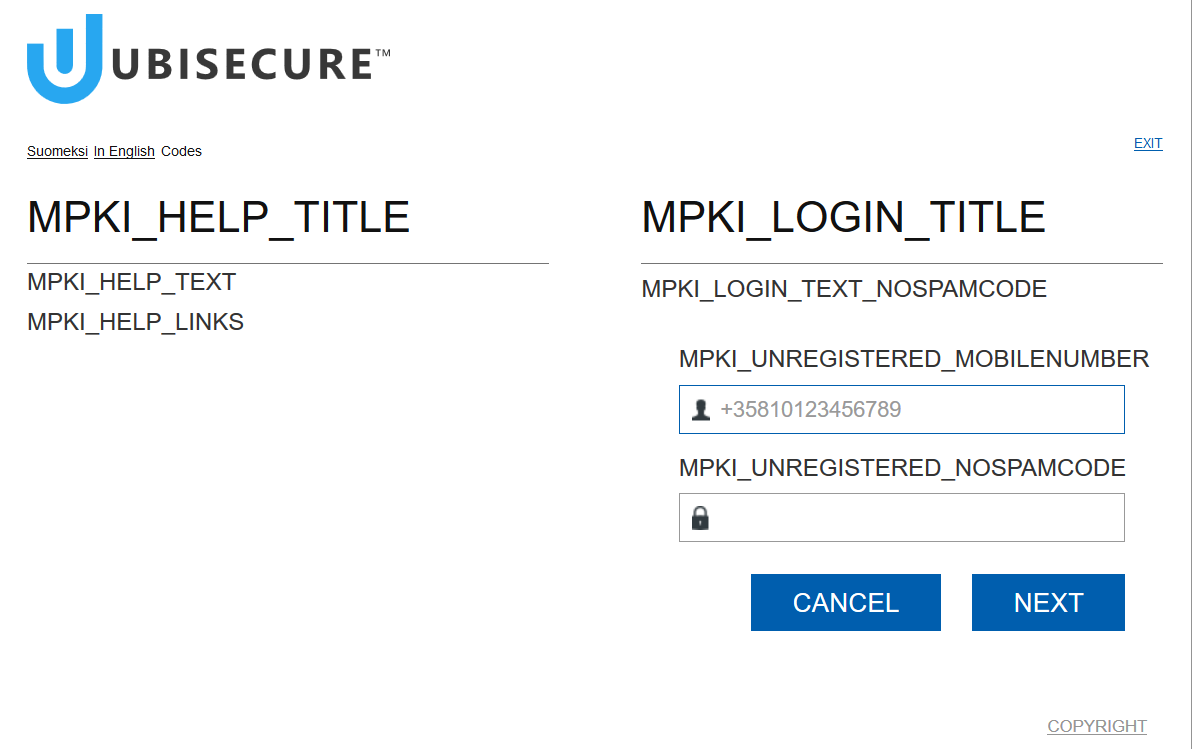
ETSI MSS Mobile PKI unregistered screen
The unregistered mobile PKI screen is used for asking user's mobile phone number and spam prevention code are requested for MPKI authentication.
|
|---|
| Figure 16. Mobile PKI Unregistered Screen with Text Keys |
Note that "MPKI_LOGIN_TEXT_NOSPAMCODE" is used instead of "MPKI_LOGIN_TEXT" if first login without spamcode has failed – when method configuration parameter "spamcode_required" is set to "false". In that case also the spamcode is not asked, and the text field "MPKI_UNREGISTERED_NOSPAMCODE" is not used/visible.
|
|---|
| Figure 17. Mobile PKI unregistered screen asking for user's spamcode afer a failed attempt without it |
Possible error messages:
- LOGIN_CANCEL: User cancelled the authentication on the mobile phone.
- LOGIN_EXPIRED: Authentication wasn't finished during the timeout period, which is set in configuration parameter ae.timeout.
- INVALID_CREDENTIALS: Given spam prevention code is not correct.
- USER_NOT_FOUND: Given phone number is not valid.
- EXTERNAL_FAILURE: Unexpected failure occurs.
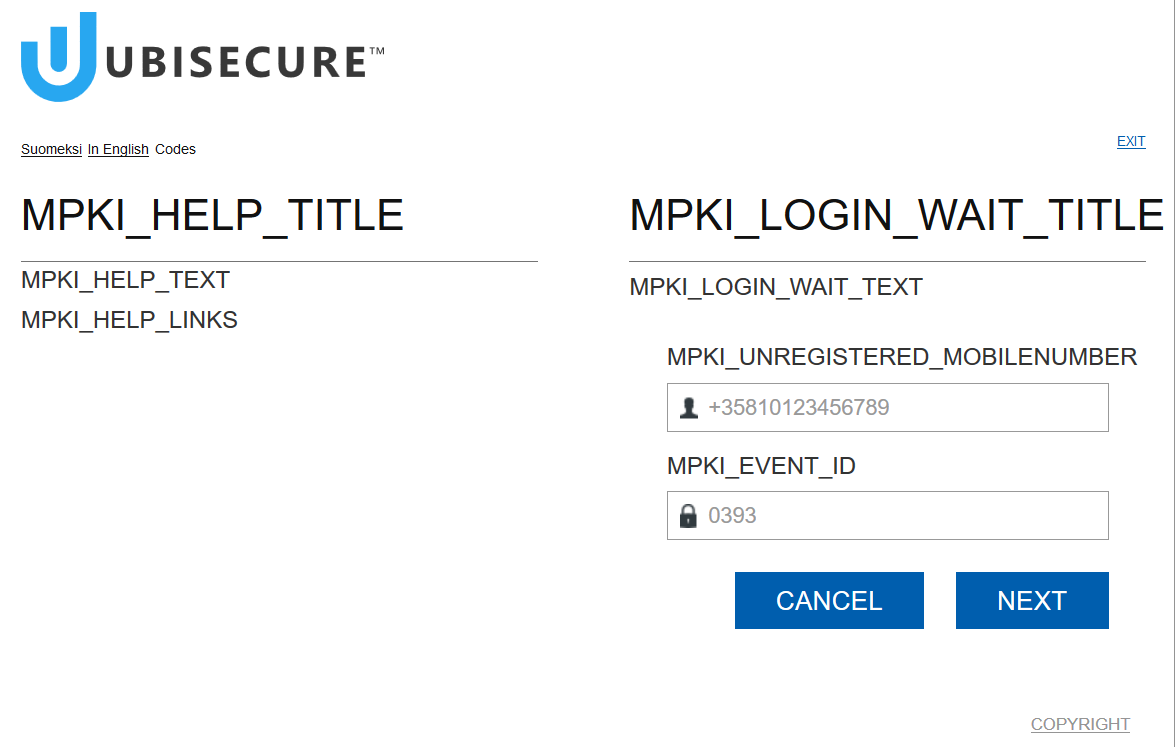
ETSI MSS Mobile PKI unregistered wait screen
Used when user has entered mobile phone number and spam prevention code, and MPKI authentication is to be waited for.
Parameterized fields:
- MPKI_LOGIN_WAIT_TEXT
- {0} → Progress in percents when waiting for mpki authentication
|
|---|
| Figure 18. Mobile PKI Unregistered Wait Screen with Text Keys |
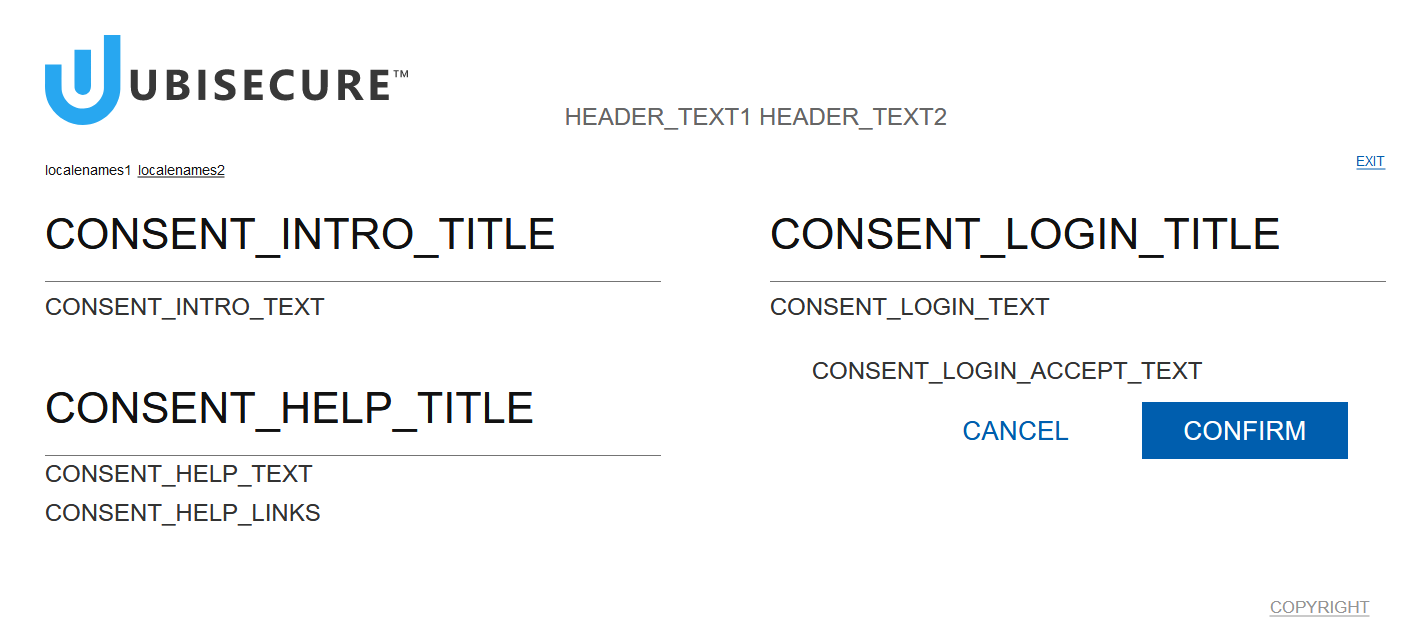
Consent screen
Consent Screen can be shown if user consent is required for releasing user attributes to an application.
Parameterized fields:
- CONSENT_INTRO_TEXT
- {0} → Name of the service the user is trying to access
- CONSENT_LOGIN_TEXT
- {0} → Username of the user trying to access the service
|
|---|
| Figure 19a. User Consent Screen with Text Keys |
Consent With Scopes screen
Consent With Scopes screen can be shown if user consent is required for releasing user attributes to an OAuth 2.0 application and there are attributes with a scope associated.
Note that in the image below there are shown the text keys for two scope names example1 and example2, which are respectively SCOPE_EXAMPLE1_TITLE and SCOPE_EXAMPLE2_TITLE (see Scope name internationalization). These keys are shown here only for demonstration purposes and will not be present in your environment, unless you have Authorization Policy Items with scopes "example1" and "example2" set, and OAuth 2.0 / OIDC request with scopes "example1" or "example2".
The key CONSENT_SCOPES_LOGIN_ACCEPT_TEXT can be used for setting a generic text shown every time regardless of requested scopes, which is located at the same level with the scope names. Generally there's no reason to show such text, so by default it's empty.
Parameterized fields:
- CONSENT_INTRO_TEXT
- {0} → Name of the service the user is trying to access
- CONSENT_SCOPES_LOGIN_TEXT
- {0} → Username of the user trying to access the service
|
|---|
| Figure 19b. User Consent With Scopes screen with Text Keys |

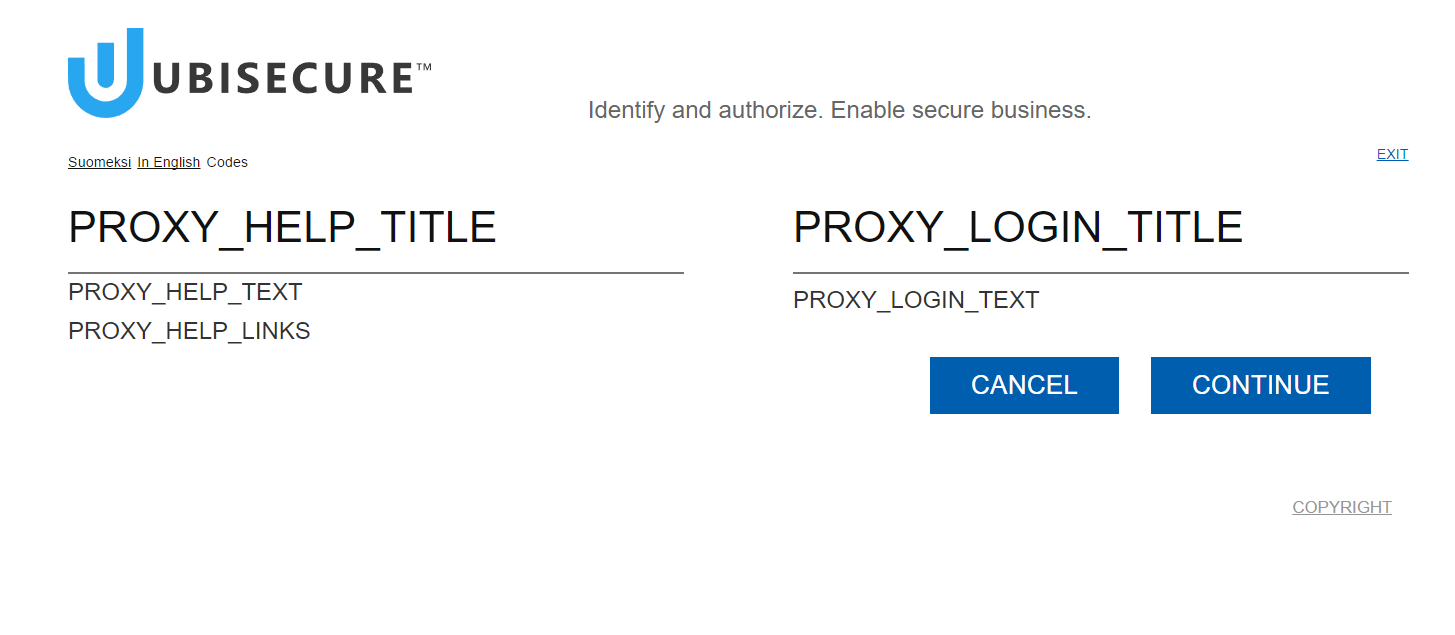
Proxy screen
The proxy screen is used as a backup when making an automated redirection to the authentication provider. The redirection can be made manually from this screen.
|
|---|
| Figure 21. Proxy Screen with Text Keys |
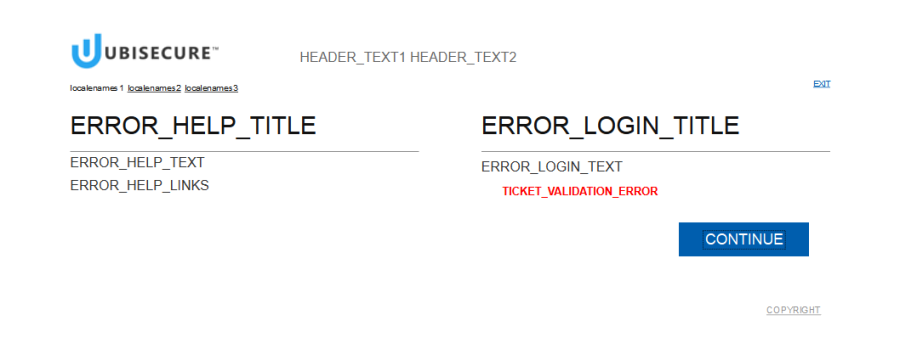
Error screen
The error screen is used for informing the user of certain kinds of errors that mean that the authentication process cannot be continued. In some cases the error screen may automatically redirect to the service if the error can also be transmitted to the service.
|
|---|
| Figure 22. Error Screen with Text Keys |
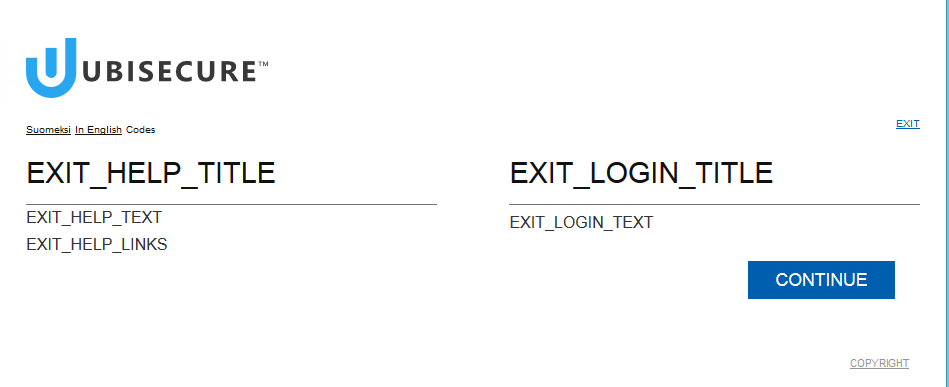
Exit screen
The exit screen is used as a backup when making an automated redirection to the service without a successful authentication. The redirection can be made manually from this screen.
|
|---|
| Figure 23. Exit Screen with Text Keys |
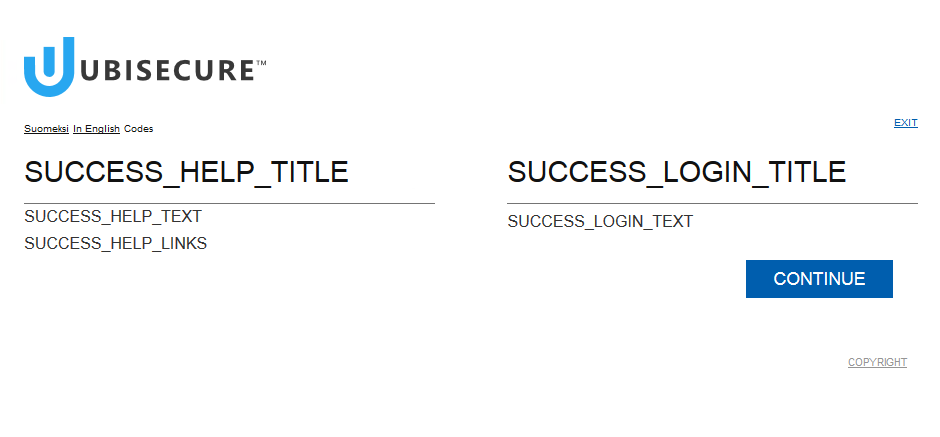
Success screen
The success screen is used as a backup when making an automated redirection to the service after a successful authentication has been performed. By the default this screen is shown very briefly and does not required that the user presses continue. The redirection can be made manually from this screen.
|
|---|
| Figure 24. Success Screen with Text Keys |
Generally users are transferred to service automatically by using javascript. In some cases it maybe desirable to show further instructions or usage policies and require user to click a button. Please refer to page Templates - SSO.
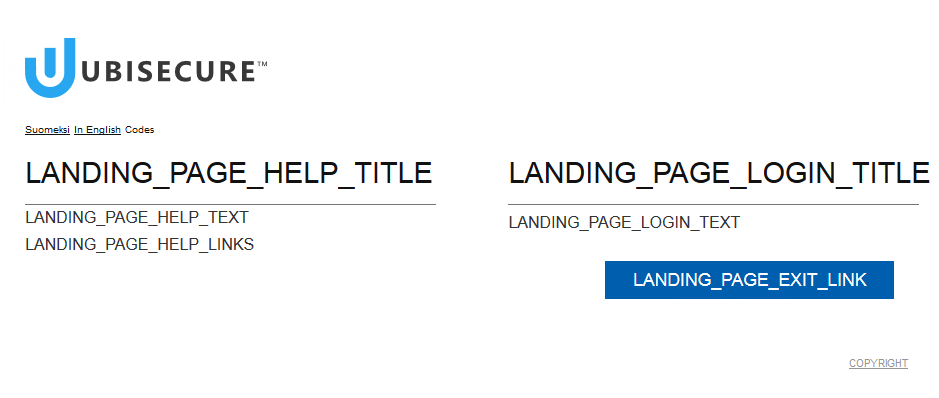
Landing page screen
The landing page screen is used when a request has been made to the authentication server out of context. Usually this means that the user does not have a valid session to which the request would belong to.
|
|---|
| Figure 25. Landing Page Screen with Text Keys |
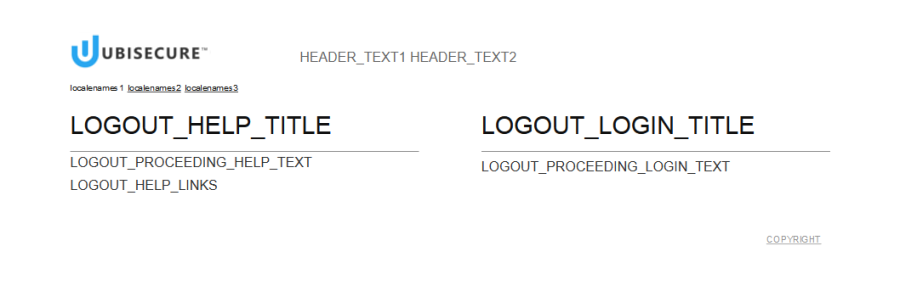
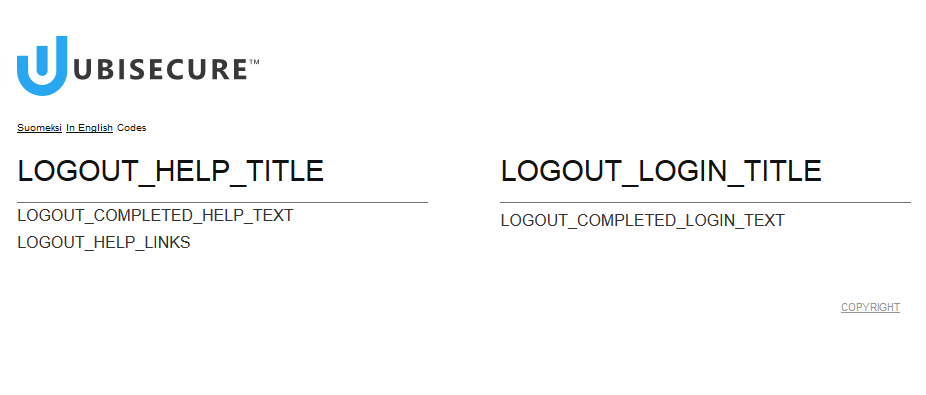
Logout screen
The logout screen is used for informing the user of the status of the logout procedure.
|
|---|
| Figure 27. Logout Proceeding Screen with Text Keys |
|
|---|
| Figure 28. Logout Completed Screen with Text Keys |
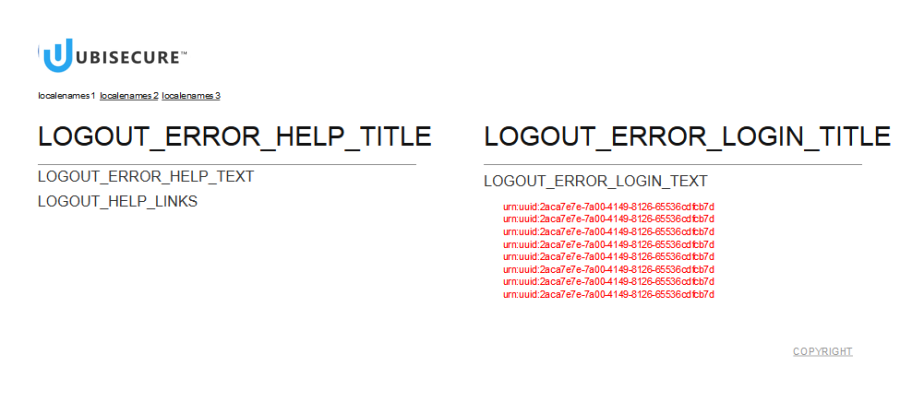
Logout error
The logout error screen is displayed in the event of single logout failure. If backchannel logout was used, the URLs of the applications that did not respond or rejected the logout request are listed on the screen to warn the user of logout failure. An example is that the application has stopped responding. In these cases the user should be instructed to close all browser windows to terminate any possible application sessions. LOGOUT_ERROR_HELP_TITLE = Help
LOGOUT_ERROR_HELP_TEXT = Single logout was not completed successfully. Please logout manually from all individual applications and close all browser windows.
LOGOUT_ERROR_HELP_LINKS =
LOGOUT_ERROR_LOGIN_TITLE = Logout failed
LOGOUT_ERROR_LOGIN_TEXT = Could not complete logout.
|
|---|
| Figure 29. Logout Error Screen with Text Keys |
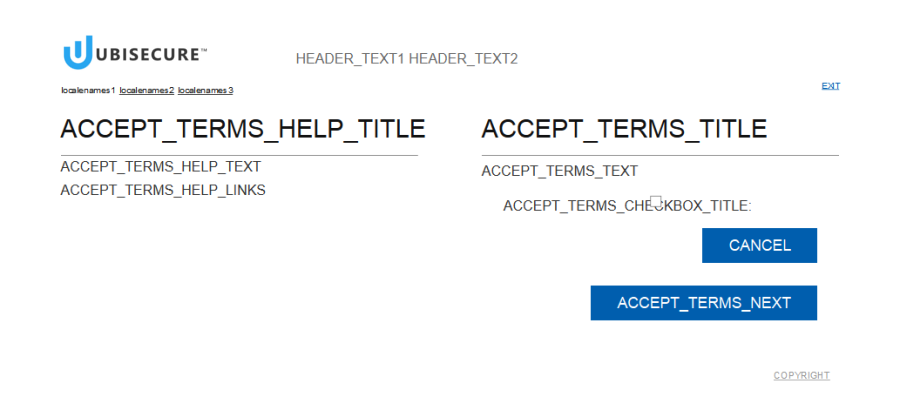
Accept terms
This screen will appear if the user has not accepted the current Terms of Use. The user cannot proceed until the checkbox is selected and the next button is pressed.
ACCEPT_TERMS_HELP_TITLE = Help
ACCEPT_TERMS_HELP_TEXT = You must accept Terms of Use before continuing.
ACCEPT_TERMS_HELP_LINKS =
ACCEPT_TERMS_TITLE = Accept terms
ACCEPT_TERMS_TEXT = Accept Terms of Use.
ACCEPT_TERMS_CHECKBOX_TITLE = Accept Terms of Use
ACCEPT_TERMS_NEXT = Continue
|
|---|
| Figure 30. Accept Terms Screen with Text Keys |