SAML protocol tracing - SSO
- Former user (Deleted)
To help solving problems with SAML protocol issues, it is possible to activate protocol tracing with UAS (as an IDP or IDP Proxy) and with SAML SP for Java.
Protocol tracing is disabled by default.
Please note that various third party browser plugins are available to record and display SAML messages sent between a user's browser and the SAML SP or IDP services. These browser plugins cannot decrypt the message traffic and cannot display messages sent and received directly between an SP and IDP or SP and Attribute Authority using back channel techniques.
Protocol tracing is a diagnostic tool that can expose user and message information in both encrypted and unencrypted format. Access to the protocol tracing URL could compromise system security and therefore should be restricted by the environment firewall and/or application server. Do not use in production environments. Always deactivate protocol tracing after the problem has been solved.
This page describes how to enable protocol tracing on UAS and how to enable tracing using SAML SP for Java.
Enable Protocol Tracing on UAS
To enable recording of the SAML protocol messages on UAS:
Enable Protocol Trace on UAS. Set enabled to true to view through a web browser only. Set file-output to true to additionally record all individual messages to the file system (tomcat\temp).
C:\Program Files\Ubisecure\ubilogin-sso\ubilogin\webapps\uas\WEB-INF\web.xml
<servlet>
<servlet-name>com.ubisecure.saml2.trace.TraceServlet</servlet-name>
<servlet-class>com.ubisecure.saml2.trace.TraceServlet</servlet-class>
    <init-param>
        <param-name>enabled</param-name>
        <param-value>true</param-value>
    </init-param>
    <init-param>
        <param-name>file-output</param-name>
        <param-value>true</param-value>
    </init-param>
    <load-on-startup>1</load-on-startup>
</servlet>
Activate the change by running update:
C:\Program Files\Ubisecure\ubilogin-sso\ubilogin\config\tomcat> update.cmd
Do an authentication request:
Check that SAML requests are viewable with web browser at the address
https://{sso-server address}/uas/trace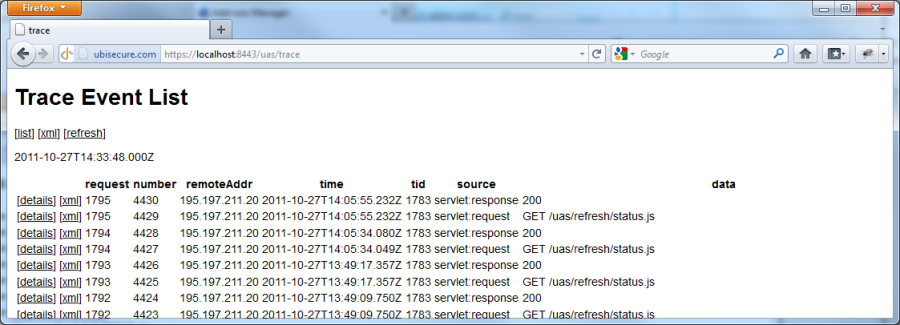
Figure 1. Example of a trace Check that requests are recorded to the filesystem:
C:\Program Files\Ubisecure\ubilogin-sso\tomcat\temp\Trace\uas
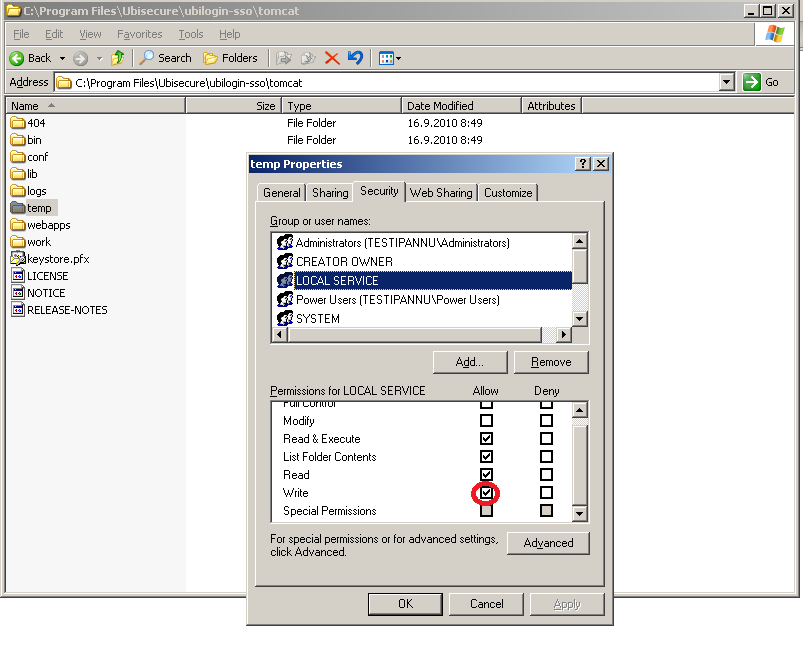
If log files are not generated, check that in Windows the LOCAL SERVICE account has write-privileges to the application server's temp directory.
|
|---|
| Figure 2: Checking LOCAL SERVICE Write permission in Windows environment |
To disable recording of the SAML protocol messages on UAS:
Disable Protocol Trace on UAS. Set
enabledtofalseto view through a web browser only. Setfile-outputtofalseto additionally prevent recording of all individual messages to the file system (tomcat\temp).
C:\Program Files\Ubisecure\ubilogin-sso\ubilogin\webapps\uas\WEB-INF\web.xml<servlet> <servlet-name>com.ubisecure.saml2.trace.TraceServlet</servlet-name> <servlet-class>com.ubisecure.saml2.trace.TraceServlet</servlet-class> <init-param> <param-name>enabled</param-name> <param-value>false</param-value> </init-param> <init-param> <param-name>file-output</param-name> <param-value>false</param-value> </init-param> <load-on-startup>1</load-on-startup> </servlet>Activate the change by running update:
C:\Program Files\Ubisecure\ubilogin-sso\ubilogin\config\tomcat> update.cmdDo an authentication request:
- Check that SAML requests are not viewable with web browser at the address
https://{sso-server address}/uas/trace
- Check that SAML requests are not viewable with web browser at the address
- Check that requests are not recorded to the filesystem:
C:\Program Files\Ubisecure\ubilogin-sso\tomcat\temp\Trace\uas
Enable Tracing on SAML SP for Java
To enable the recording of the SAML protocol messages on SAML SP for Java:
Add the following to the
web.xmlconfiguration of the application protected by the SP. Setenabledtotrueto view through a web browser only. Setfile-outputto true to additionally record all individual messages to the file system (temporary directory of application server).<!-- Protocol Tracing --> <filter> <filter-name>com.ubisecure.saml2.trace.TraceServlet</filter-name> <filter-class>com.ubisecure.saml2.trace.TraceServlet</filter-class> </filter> <filter-mapping> <filter-name>com.ubisecure.saml2.trace.TraceServlet</filter-name> <url-pattern>/*</url-pattern> </filter-mapping> <servlet> <servlet-name>com.ubisecure.saml2.trace.TraceServlet</servlet-name> <servlet-class>com.ubisecure.saml2.trace.TraceServlet</servlet-class> <init-param> <param-name>enabled</param-name> <param-value>true</param-value> </init-param> <init-param> <param-name>file-output</param-name> <param-value>true</param-value> </init-param> <load-on-startup>1</load-on-startup> </servlet> <servlet-mapping> <servlet-name>com.ubisecure.saml2.trace.TraceServlet</servlet-name> <url-pattern>/trace/*</url-pattern> </servlet-mapping>Do an authentication request:
- Check that SAML request are viewable with web browser on address /
{application context root}/trace(e.g .,http://localhost:8080/palvelu/trace). - Check that requests are recorded to the application server's
temp directory.
- Check that SAML request are viewable with web browser on address /