CertAP installation on Linux - SSO
- Former user (Deleted)
Analytics
Install Server JRE
You can find instructions on how to install the Server JRE from the Linux single node installation - SSO page.
CertAP depends on the JAVA_HOME environment variable, which needs to be in /etc/environment. Use the same instructions to set the JAVA_HOME environment variable.
Unpacking the Software
Unpack the packet
cd /usr/local/ubisecure/
tar xzvf certap-x.x.x.tar.gz
Modifying the Configuration Template
Open the unix.config configuration file in a text editor.
cd /usr/local/ubisecure/certap/certap
nano unix.config
Specify the parameter certap.url and save the file. The Certificate Authentication Provider will be deployed to this URL.
certap.url = https://certap.example.com:9443
Run the setup.cmd script to create the configuration files.
cd /usr/local/ubisecure/certap/certap
./setup.sh
if setup.sh execution does not finish quickly, you will have to check that entropy generation settings are in order. Consult this blog post http://www.usn-it.de/index.php/2009/02/20/oracle-11g-jdbc-driver-hangs-blocked-by-devrandom-entropy-pool-empty/ for more information.
Setting the PKI Policies
Next step is to define which certificates the Certificate AP is to trust. The folder /ubilogin-certap/certap/samples/Exampe CA/ contains sample configurations for testing purposes.
By default two-way SSL authentication is used so the Tomcat must be told which client certificates to trust when creating the SSL connection between the client and Certificate AP
cd /usr/local/ubisecure/certap/certap
cp samples/Example\ CA/cacerts.jks custom/tomcat/
Copy the sample policy.xml file
cd /usr/local/ubisecure/certap/certap
cp samples/Example\ CA/policy.xml webapps/certap/WEB-INF/uap/pki/
The corresponding certificate containing the private key and the password protecting the key are found in samples/Example\ CA/test@example.com.pfx.
The password protecting the key is found in samples/Example\ CA/test@example.com.txt
Finish the Certificate Authentication Provider installation
Configure the application server and configure users
cd /usr/local/ubisecure/certap/certap/config/tomcat
./install.sh
If you are on a systemd system, run the install_systemd.sh script, this will install the systemd unit file, enable on-boot startup and start the CertAP server:
cd /usr/local/ubisecure/certap/certap/config/tomcat
./install_systemd.sh
If you are on a SysV system, run the install_initd.sh script and start the CertAP server:
cd /usr/local/ubisecure/certap/certap/config/tomcat
./install_initd.sh
/etc/init.d/certap-server start
Disable and enable startup on system startup
You can manage CertAP with standard systemctl commands. To disable automatic startup, use following command:
sudo systemctl disable certap-server
You can enable automatic startup again, by using the command:
sudo systemctl enable certap-server
Tweaking memory settings
The CertAP unit file is generated based on settings in the unix.config file. The unit file is generated from a template every time the setup.sh script is run, so any changes will be replaced at that time. If you need to change the memory settings for CertAP, first change the corresponding values in the unix.config file, then run setup.sh, remove.sh and install_systemd.sh The settings are, as follows:
| unix.config | description |
|---|---|
| certap.mem.ms | Initial Java heap size. Note that you will need to specify a unit for the value (e.g. 128m for 128 MB) |
| certap.mem.mx | Maximum Java heap size. Note that you will need to specify a unit for the value (e.g. 128m for 128 MB) |
After updating values as needed, run following commands:
sudo /usr/local/ubisecure/certap/certap/setup.sh
sudo /usr/local/ubisecure/certap/certap/config/tomcat/remove.sh
sudo /usr/local/ubisecure/certap/certap/config/tomcat/install_initd.sh
Testing Example CA
This step is done on Windows.
Import the key to your system with the Certificate Import Wizard in order to authenticate yourself to the Certificate AP by double clicking the test@example.com.pfx file.
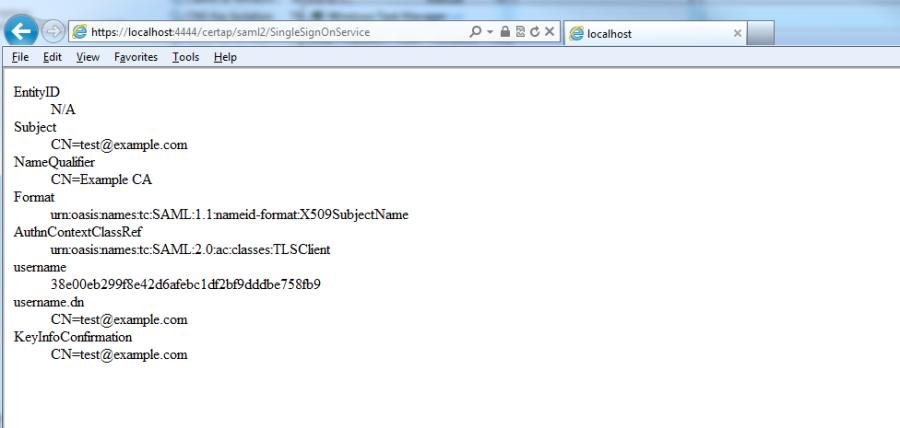
Verify that the Certificate AP is successfully installed by visiting the following url. Use of Internet Explorer is recommended. When the browser prompts for a client certificate select the previously installed certificate.
https://certap.example.com:9443/certap/saml2/SingleSignOnService
The following web page is shown:
|
|---|
| Figure 1. Web page indicating the successful installation of Certificate AP |