TUPAS IDP setup - SSO
- Former user (Deleted)
Analytics
Tupas Endpoint
/uas/tupas
Application
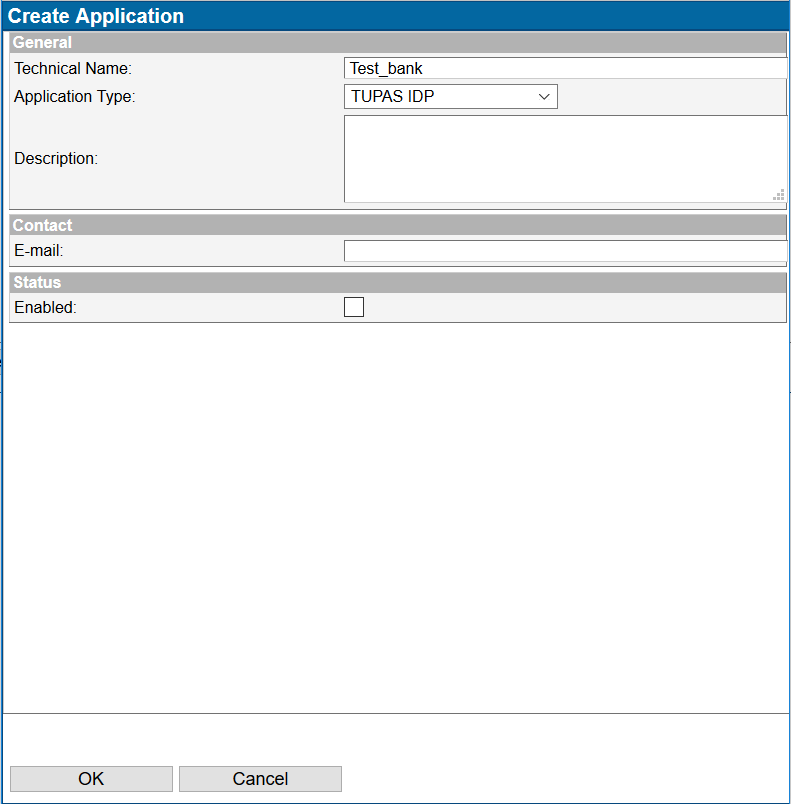
- Create new application of type "TUPAS IDP" for each connected service
- Write a name for the application
Choose application type "TUPAS IDP"
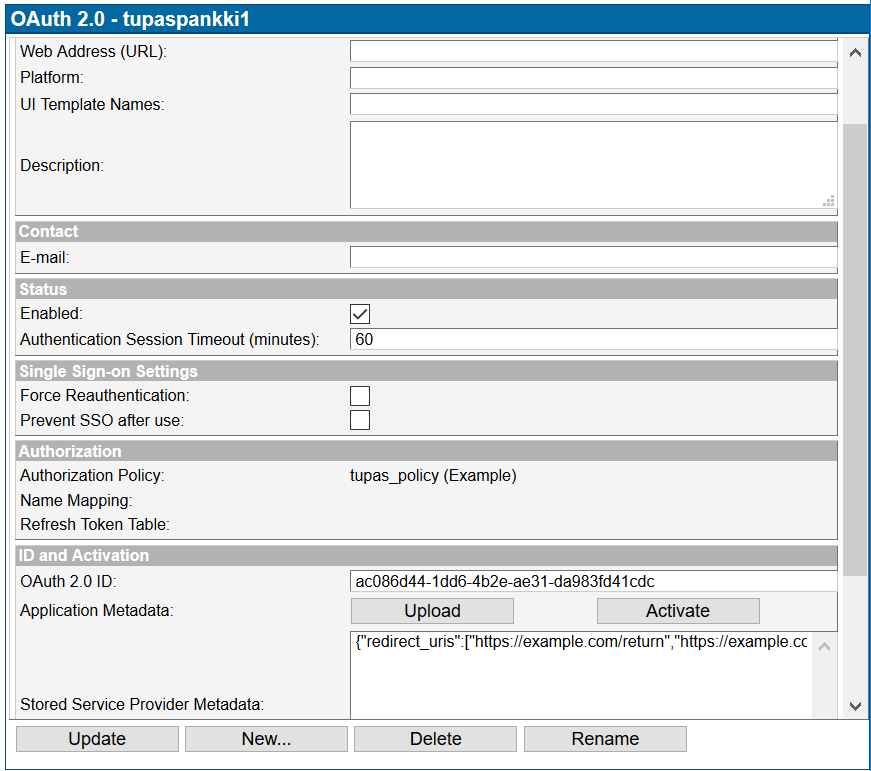
- When the application is created, click "Activate" to activate the application
- SSO creates a client_id and secret for the service (as in OAuth2). You will be prompted to save a JSON file containing the client_id and secret. The client_id and secret should be communicated securely to the connecting service in a secure and encrypted manner. The secret is stored in an encrypted format and cannot be retrieved after this activation step.
- The JSON file contains application metadata containing the value for the TUPAS idp grant_type ("http://globalsign.com/iam/sso/oauth2/grant-type/tupas"), client_id and secret. Remove the client_id and secret from the metadata and add the return URLs t
Grant_type http://globalsign.com/iam/sso/oauth2/grant-type/tupasis mandatory for the application to work.Example Metadata generated:
{"grant_types":["http://globalsign.com/iam/sso/oauth2/grant-type/tupas"],"client_id":"f9f80086-a307-4f28-8b23-ae6c2acf5537","client_secret":"5vBaXCN0QgS4KCo7hPXjzw-fZFl6R6wU"}
Sample generated metadata when activating the application:
- The client_id and secret are needed for the service using this TUPAS identity provider.
- TUPAS authentication request field A01Y_RCVID must contain the client_id
- Service needs to use the "secret" as the authentication key to calculate the MAC code.
- Secret is used by both SSO and the calling application to create the MAC (A01Y_MAC,B02K_MAC) for the request and response, and to verify the integrity of the response as described in the documents/links mentioned above.
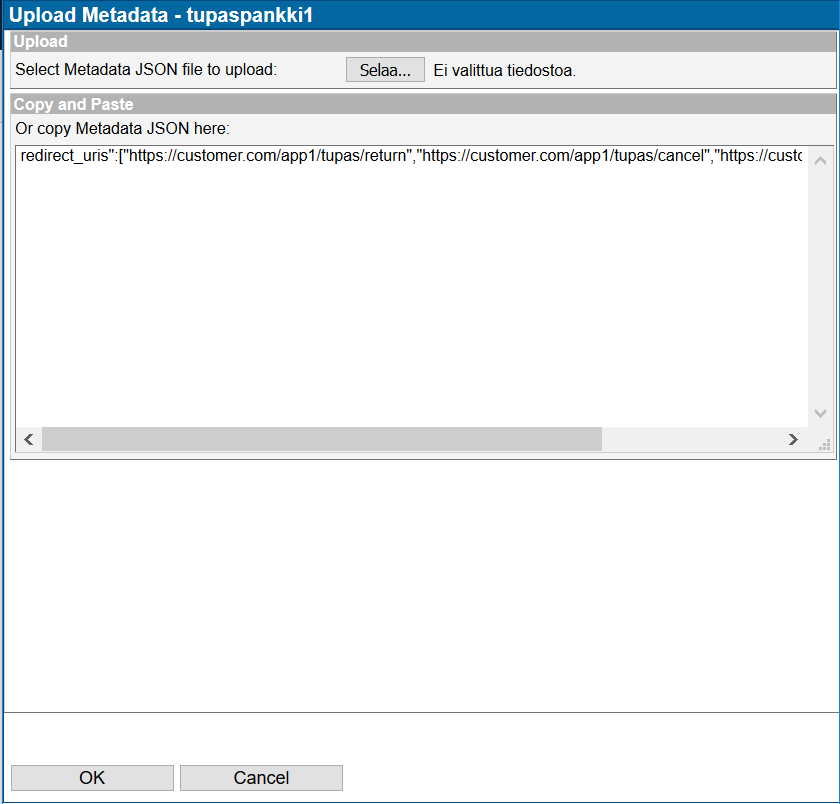
Fill the application metadata by clicking "Upload". You can upload metadata from a file or paste metadata into the text field. The format is similar to an OAuth2 application. An example metadata format looks like this:
{"grant_types":["http://globalsign.com/iam/sso/oauth2/grant-type/tupas"],"redirect_uris":["https://customer.com/app1/tupas/return","https://customer.com/app1/tupas/cancel","https://customer.com/app1/tupas/reject"]}- Notice that redirect_uris must contain the authentication request field A01Y_RETLINK, A01Y_CANLINK and A01Y_REJLINK values. In other words, each of the URLs where the system will forward a succesful request, a canceled event and a rejected event.
- Do not paste the client_id or secret into this this field.
You can use client_name and agent_logo fields to set the application name and logo shown in the SSO login screen.
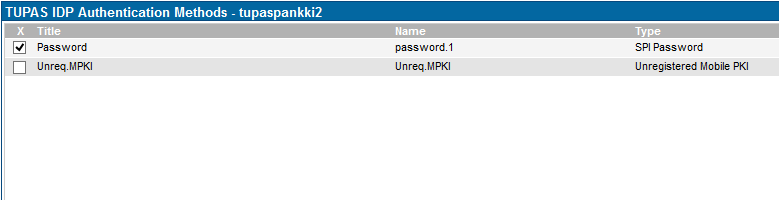
Authentication Methods
Next step is to choose the authentication method for the application. Below we choose to use ubilogin password method for authentication.
|
|---|
Authorization Policy
Please check Management user interface - SSO pages for more detailed information about Authorization policies.
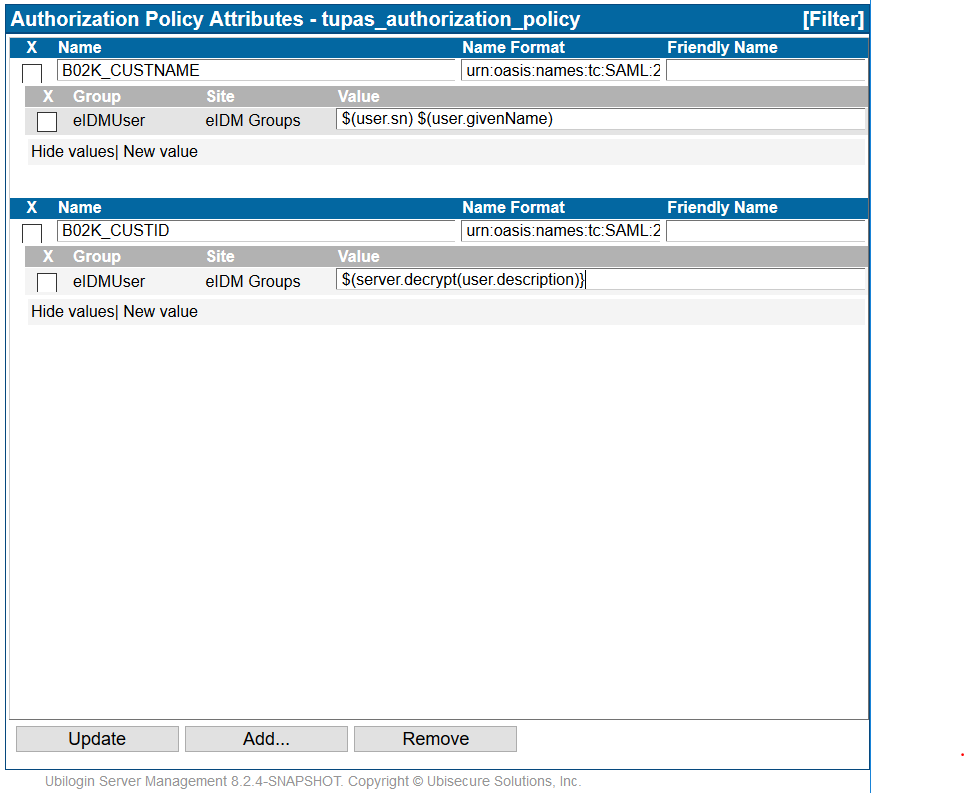
Create authorization policy to fetch customer's name and person id from ldap/database.
- Authorization policy name B02K_CUSTNAME should contain customer's name
- Authorization policy name B02K_CUSTID should contain customer's person id (henkilötunnus)
- Map the authorization policy to the application
- If these are not set. SSO TUPAS IDP will response with code 00 (no requested information was found)
|
|---|
Redirect URI Validation Policy
TUPAS responses are only sent to preregistered return addresses for security reasons.
If the TUPAS client connection requires a dynamically generated return URL, the permitted format of this URL can be specified in the field "Redirect URI validation policy". If this field is blank, an exact match is required. Leave this field blank unless required.
See page Manage Applications of SSO Management documentation for more information on "Redirect URI validation policy".
Notes and Default Values
- Request:
- TUPAS endpoint is UAS_URL + tupas, e,g, login.example.com/uas/tupas
- A01Y_ALG must be "03", SHA-256
- A01Y_IDTYPE must be "12" – Ubisecure SSO supports plain text personal identity code
- Response:
- Bank number parameter as part of TUPAS response field B02K_TIMESTMP is always "999".
- A01Y_KEYVERS is always "002"
- B02K_ALG is always "03"
- B02K_KEYVERS is always "0001"
- B02K_CUSTTYPE is:
- 01 if OK
- 00 if no requested information on the customer was found – SSO will send users ldap-name (B02K_CUSTNAME) and no user person id (B02K_CUSTID)
- If you receive this error, you should first check the authorization policies are configured as described above
- B02K_USERID and B02K_USERNAME are empty as SSO does not handle corporate customers
Example TUPAS IDP Application Metadata:
From the example below you can see the redirect_uris that contain the URLs that are allowed for the TUPAS requests for this agent. Metadata example contains also the human readable agent name and logo url – those are available to be configured as for OAuth2 applications (Please check Ubisecure SSO OAuth 2.0 Configuration Guide) but are not mandatory.
Example 1
Example one sets only the valid return URLs.
{"redirect_uris":["https://example.com/return","https://example.com/return/","https://example.com/cancel"],"grant_types":["http://globalsign.com/iam/sso/oauth2/grant-type/tupas"]}
Example 2
This example sets the name of the service and has a service logo localized in both English and Finnish.
{"redirect_uris":["https://example.com/return","https://example.com/return/","https://example.com/cancel"],"client_name":"Bank
of Finland", "client_name#fi":"Suomen pankki",
"logo_uri":"https://server.fi/
logo.png","logo_uri#fi":"https://server.fi/logo_FI.png","grant_types"
:["http://globalsign.com/iam/sso/oauth2/grant-type/tupas"]}
Key Rollover
Steps for key rollover:
- Create a new application that matches the configuration of the existing application
- Send the new application's client_id and secret to the connected service administrator
- Once the new application configuration is used, disable the old application