SAML IDP Proxy - SSO
- Former user (Deleted)
Introduction
Ubisecure SSO Server is a standards based Identity Provider (IDP). One of the roles of an Identity Provider is to enable federation of user identities from one independent domain to another. Federation is a term used to describe a functionality which transfers a user between two separate IDPs.
Ubisecure SSO provides OpenID Connect, SAML and WS-Federation protocols for identity federation. This page describes how to integrate another domain to a Ubisecure identity domain using SAML 2.0 protocol. This page will describe how to create an IDP Proxy authentication method that will authenticate users from another domain for SPs in the Ubisecure identity domain.
The process of creating a trust relationship from another domain to Ubisecure SSO Server follows the procedure described in the SSO Management documentation, where the other domain is treated as a SAML Service Provider.
| Figure 1. Trust relationships between 2 domains |
Installation
This chapter goes through the necessary steps to make Ubisecure SSO Server trust another SAML Identity Provider and to configure the IDP Proxy authentication method.
Configuring Ubisecure Authentication Server as a Trusting Party
Add the trust relationship to the Ubisecure Directory
The IDP Proxy authentication method is added to the Ubisecure Directory by importing a LDIF file. Replace the dn and cn attributes with the name of the IDP Proxy instance and use the following script to import the LDIF to Ubisecure Directory. Note that for the least, you have to change the last part of the distinguished name from dc=localhost to the distinguished name of your local Ubisecure Directory.
You can find an example LDIF excerpt at the end of ubilogin/ldap/methods.ldif under the title SAML Federation.
#
# SAML Federation
#

dn: cn=saml.idp.1,cn=Server,ou=System,cn=Ubilogin,dc=localhost
changetype: add
cn: saml.idp.1
objectClass: top
objectClass: ubiloginAuthMethod
ubiloginAuthMethodType: SAML
ubiloginClassname: ubilogin.method.provider.saml2.AssertionConsumerMethod
ubiloginEnabled: FALSE
ubiloginTitle: Remote IDP
cd /d "C:\Program Files\Ubisecure\ubilogin-sso\ubilogin\ldap"adam\import.cmd idp-proxy.ldif
cd /usr/local/ubisecure/ubilogin-sso/ubilogin/ldap
openldap/import.sh idp-proxy.ldif
Import the Identity Provider metadata
Log into Ubisecure Server Management with System Administrator privileges. Navigate to the Server Authentication Methods view. Open the settings of the IDP Proxy method you just installed and choose the SAML view. Click Upload SAML Metadata and either upload the Identity Providers metadata file or copy and paste the metadata.
Export the SAML service provider metadata
Click Download SAML Metadata to download the Service Provider metadata and save it for configuring Ubisecure SSO Server as Service Provider for Identity Provider in the other identity domain.
Once you have configured your Identity Provider to accept SAML authentication requests from Ubisecure SSO Server, the IDP Proxy method has been set up.
ExplicitUnspecifiedAuthnContextClassRef
Forces value urn:oasis:names:tc:SAML:1.1:nameid-format:unspecified to AuthnContextClassRef in an outbound SAML2 Authentication Response. This is regardless of what might have been received in an inbound SAML2 Authentication Response. This improves compatibility with third-party applications and third-party identity providers which send different values than expected.
In all cases, negotiation between connected parties for agreed values for AuthnContextClassRef should be the first approach.
Compatibility Flags
There are various compatibility flags that can be used with SAML2 Authentication Methods.
|
|---|
| Figure 2. SAML authentication method with SendAssertionConsumerServiceURL feature enabled |
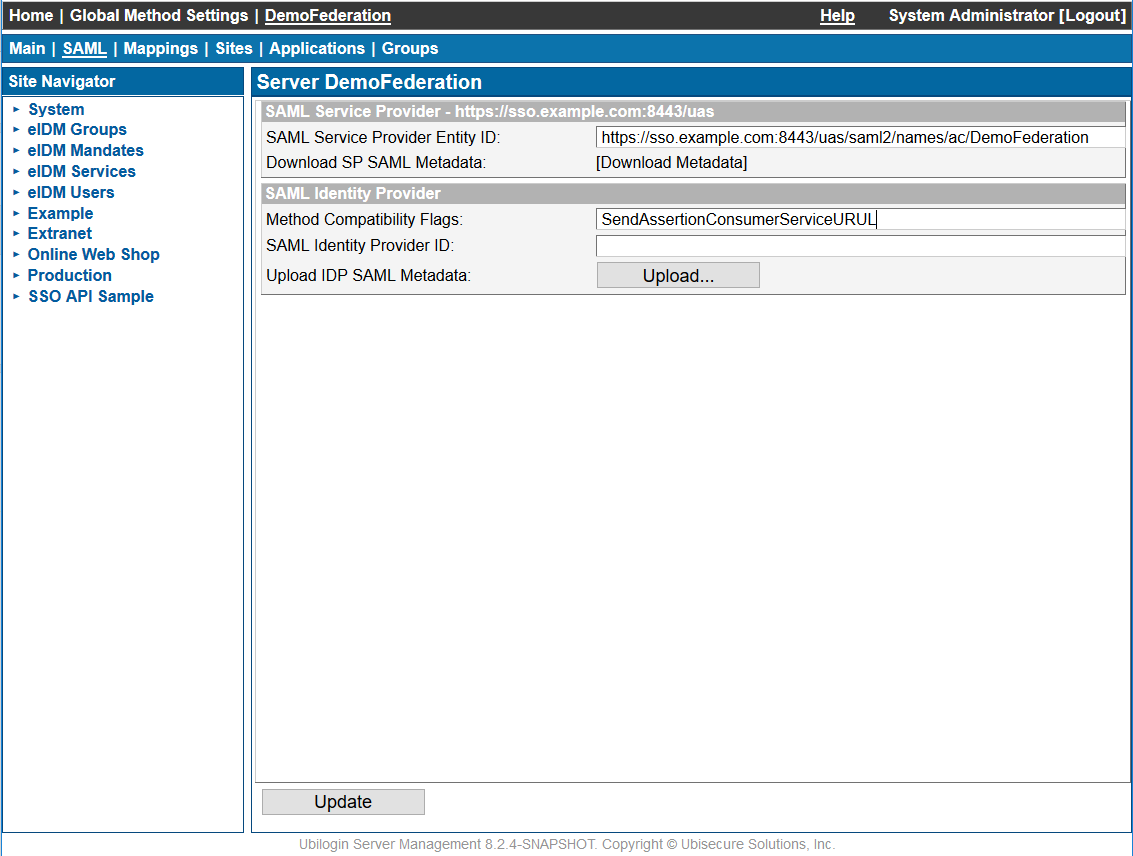
SendAssertionConsumerServiceURL
Forces sending AssertionConsumerServiceURL. Some services require this optional element.
FinnishTrustNetwork
Forces sending the Finnish Trust Network SAML 2.0 Protocol Profile version 1.0 compliant SAML2 Extension ftn.
Note that only the information listed below is included in the element:
- UI locale of the login page
- client name of the application
An example of the included Extensions element is shown below.
<samlp:Extensions>
  <ftn xmlns="http://ftn.ficora.fi/2017/req_ext">
    <lg>fi</lg>
	<spname>client_name</spname>
  </ftn>
</samlp:Extensions>
RequestedAuthnContext configuration
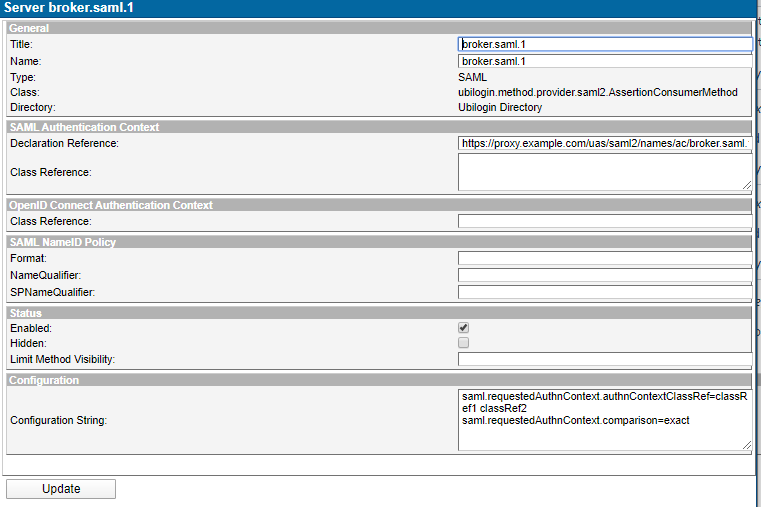
It is possible to configure either AuthnContextClassRef or AuthnContextDeclRef together with Comparison. This is possible by specifying the following configuration
| Configuration key | Description |
|---|---|
saml.requestedAuthnContext.comparison | Value of the Comparison attribute of RequestedAuthnContext. Needs to be one of the following:
This configuration key needs to be configured together either with If this parameter is left empty, then no Comparison attribute is set for RequestedAuthnContext. |
saml.requestedAuthnContext.authnContextClassRef | List of values of AuthnContextClassRef elements added to RequestedAuthnContext. Multiple values are separated by white space. If this parameter is left empty, then no AuthnContextClassRef elements are added to RequestedAuthnContext. |
saml.requestedAuthnContext.authnContextDeclRef | List of values of AuthnContextDeclRef elements added to RequestedAuthnContext. Multiple values are separated by white space. If this parameter is left empty, then no AuthnContextDeclRef elements are added to RequestedAuthnContext. |
NOTE: According to SAML2 protocol schema, it's not allowed to add both AuthnContextClassRef and AuthnContextDeclRef elements in an RequestedAuthnContext.
Configuration can be done via management user interface by opening the authentication method from global method settings view (Home → Global Method Settings). Then configure the setting by entering the values into Configuration String text field.
|
|---|
| Figure 3. SAML RequestedAuthnContext configuration |
Examples
The following configuration in an authentication method :
saml.requestedAuthnContext.comparison = exact
saml.requestedAuthnContext.authnContextClassRef = classRef1 classRef2
Results in the following RequestedAuthnContext in the authentication request:
<samlp:RequestedAuthnContext Comparison="exact">
 <saml:AuthnContextClassRef>classRef1</saml:AuthnContextClassRef>
 <saml:AuthnContextClassRef>classRef2</saml:AuthnContextClassRef>
</samlp:RequestedAuthnContext>