Configure OpenID Connect Freja eID login
- Former user (Deleted)
The configuration of Freja eID authentication method requires Ubisecure SSO 8.8.x or later
General Information on Freja eID
Registration Levels
Freja eID has three levels of identity assurance:
- LOA1 – Basic. Entry level registration.
- LOA2 – Extended. The user has gone through a verification process with their ID document within the app. Available for Sweden, Norway, Finland, Denmark, and UK.
- LOA3 – Plus. For this level the user must go through an in-person identity check. Only available in Sweden.
Claims
Claims returned by Freja eID depend on the user’s level of identity assurance.
Data | Level of Identity Assurance | Claim | Scope |
|---|---|---|---|
| Basic, Extended, Plus | "email" | "email" | |
Full name, | Basic, Extended, Plus | "name" or "full name", "given_name", "family_name" | "profile" |
| Age | Extended, Plus | "https://frejaeid.com/oidc/claims/age" | "https://frejaeid.com/oidc/scopes/age" |
| Personal identity number, country | Extended, Plus | "https://frejaeid.com/oidc/claims/personalIdentityNumber" "https://frejaeid.com/oidc/claims/country" | "https://frejaeid.com/oidc/scopes/personalIdentityNumber" |
| Organisation ID (Freja Organisation eID) | Extended, Plus | "https://frejaeid.com/oidc/claims/organisationIdIdentifier" | "https://frejaeid.com/oidc/scopes/organisationId" |
Step-by-step guide
Prerequisite
Register with Freja eID to obtain client ID and client secret, and register redirect URI. Information how to register can be found from Freja eID Developer's section. During registration you can specify the minimum registration level of your users, which will determine what user data is available (see table above).
Note: The redirect URI will be constructed by SSO in the format: https://<sso base url>/uas/return/<method name>/redirect
Configuration
The method can be configured either through SSO Management Console or SSO Management API. Here you can find instructions for configuration with SSO Management Console. API instructions can be found from the link at the bottom of the page.
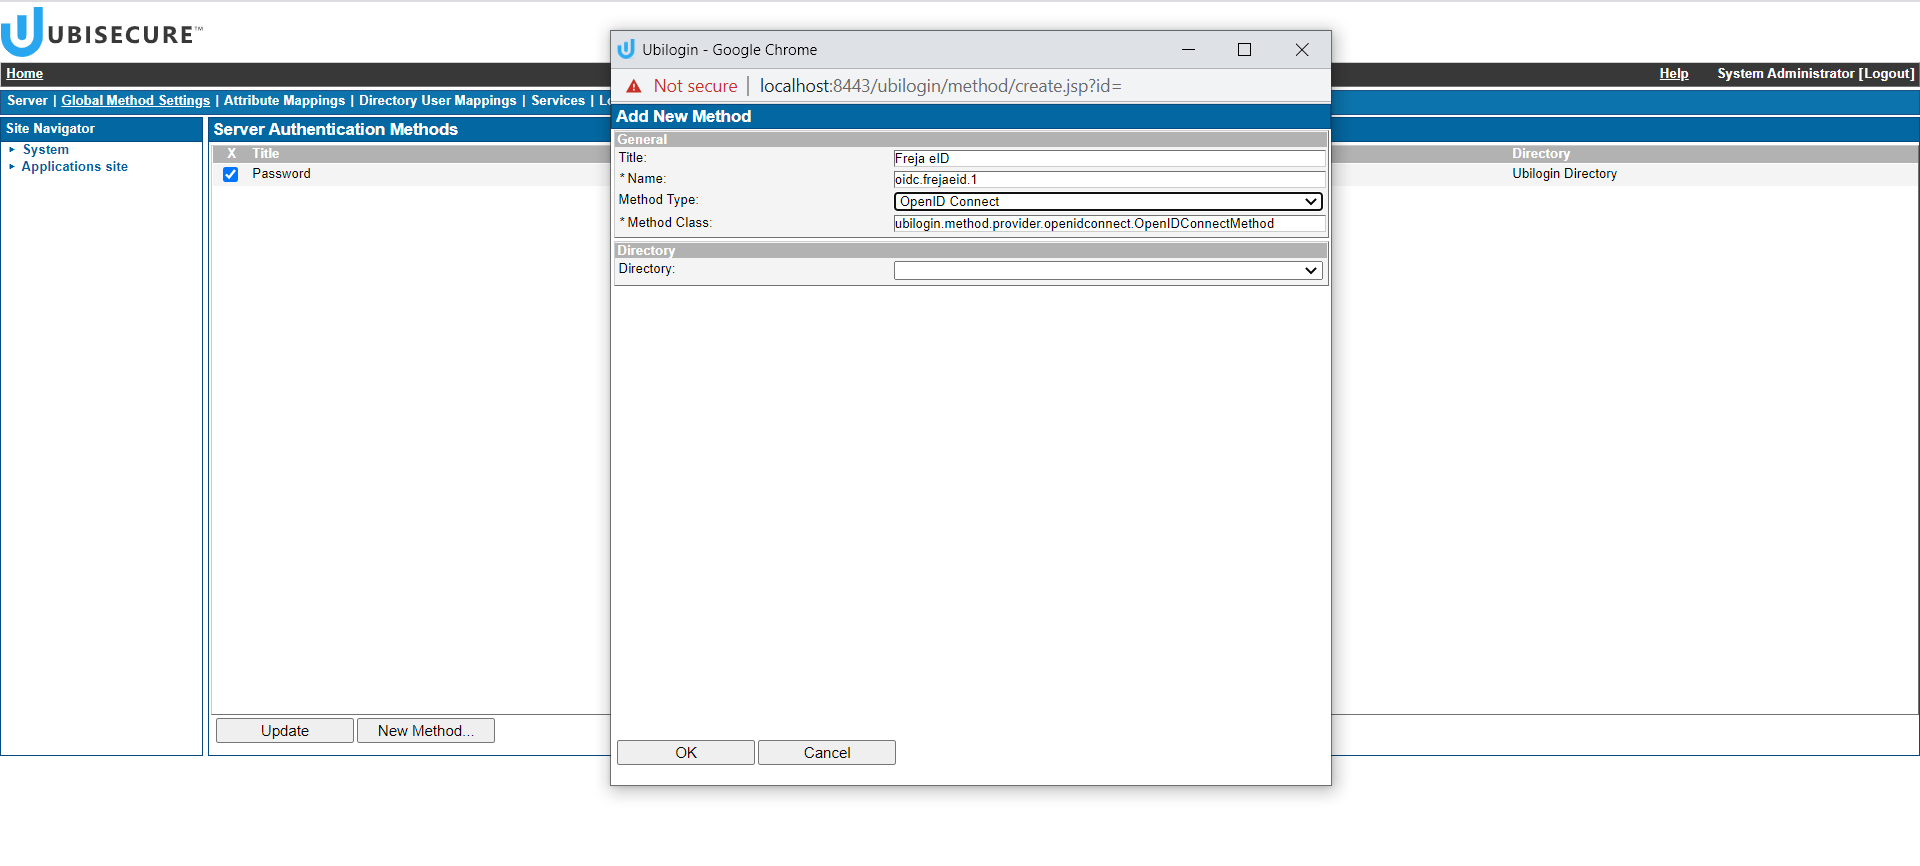
- Login to SSO Management Console. Go to “Global Method Settings” – “New method…” and create the method. Remember to give the right name to the method as it is in the registered redirect URI.
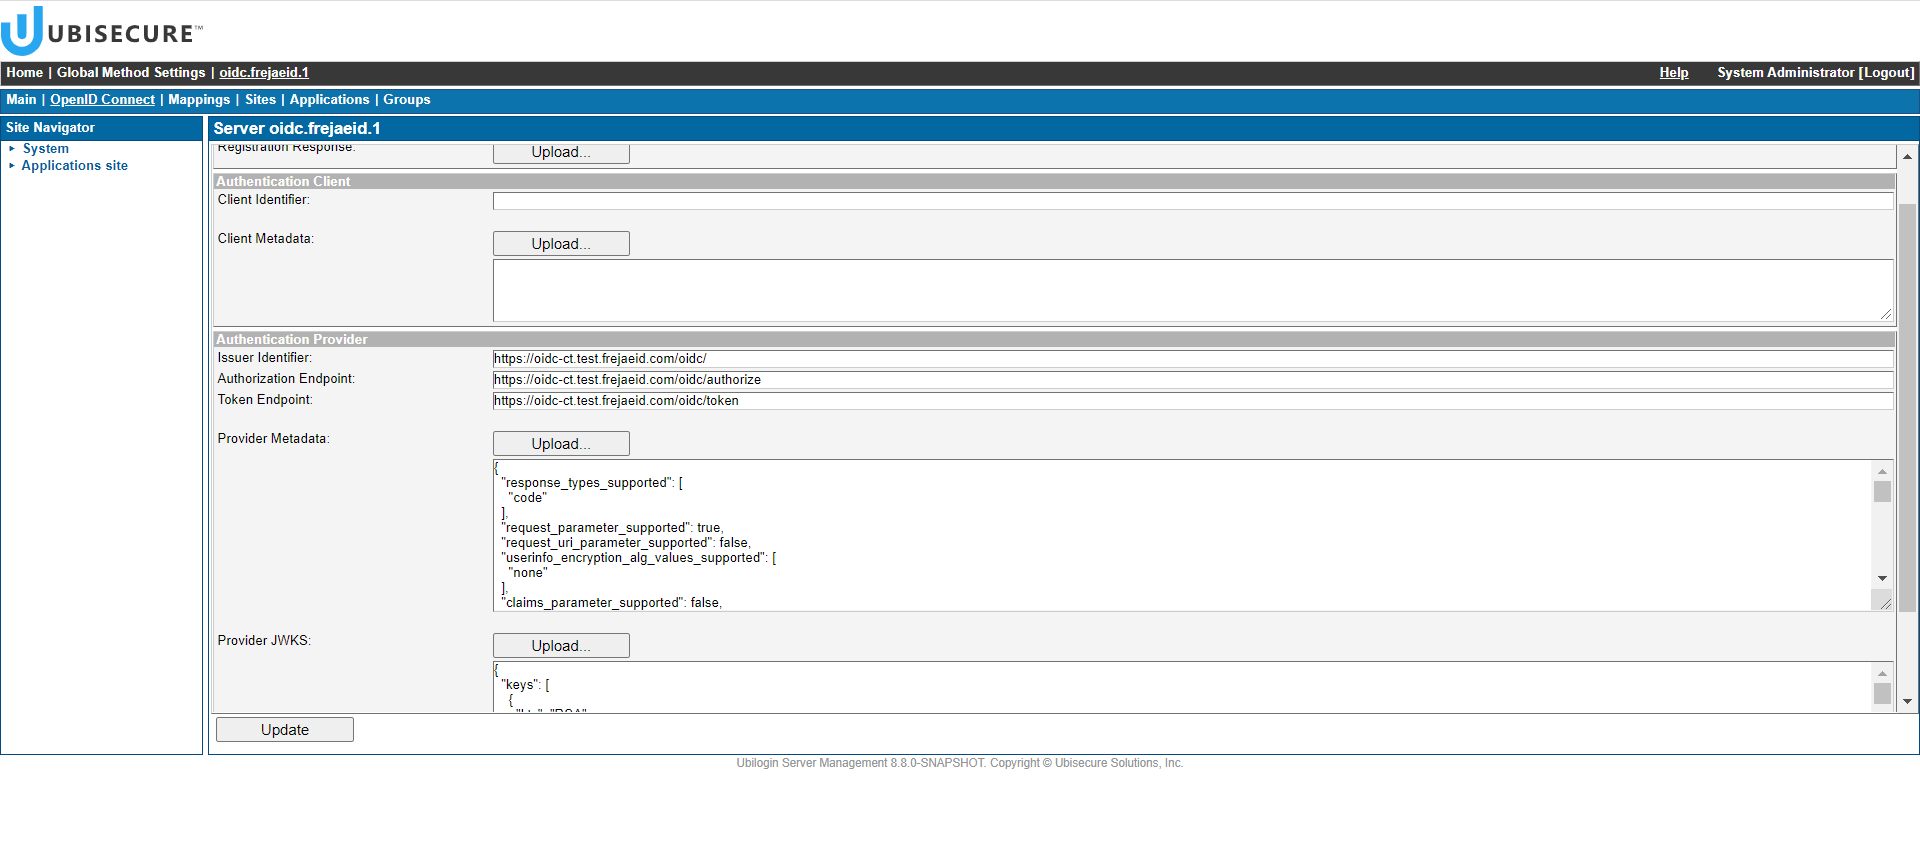
- Go to “Open ID Connect” tab, and upload the Provider Metadata. Freja eID metadata can be found from here:
Production environment: oidc.prod.frejaeid.com/oidc/.well-known/openid-configuration
Customer Test environment: oidc-ct.test.frejaeid.com/oidc/.well-known/openid-configuration
Upload the Provider Keys, which can be found from the "jwks_uri" in the provider metadata.
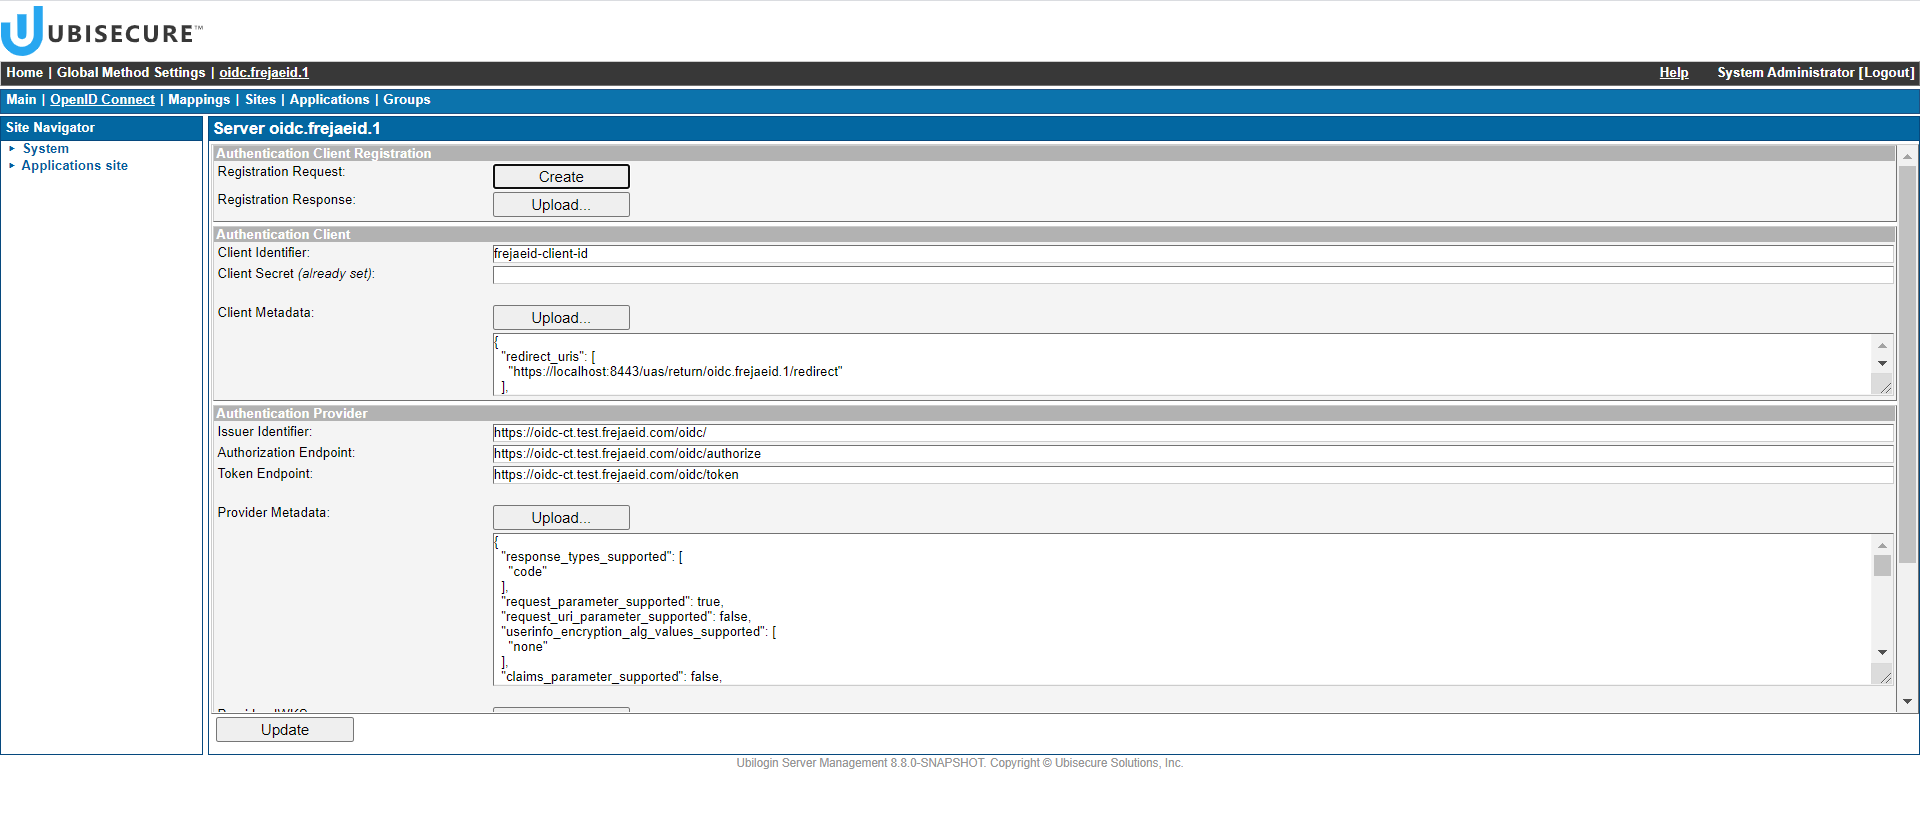
- Upload Client Metadata, where you specify your client ID and secret, and define scope, based on the claims you want to receive from Freja eID.
- If you don’t have client metadata already, you can download a template, which can be modified and uploaded:
Press "Create" next to "Registration Request". This will download a JSON file.
- Modify the file based on your needs. Remember to add at least your client ID and secret.
- Upload the file as Registration Response or Client Metadata.
If you have your client metadata, you can simply upload it by clicking "Upload" next to Client metadata.
- You should see your client ID as "Client Identifier" and a new field "Client secret (already set)".
- If you don’t have client metadata already, you can download a template, which can be modified and uploaded:
- Press "Update".
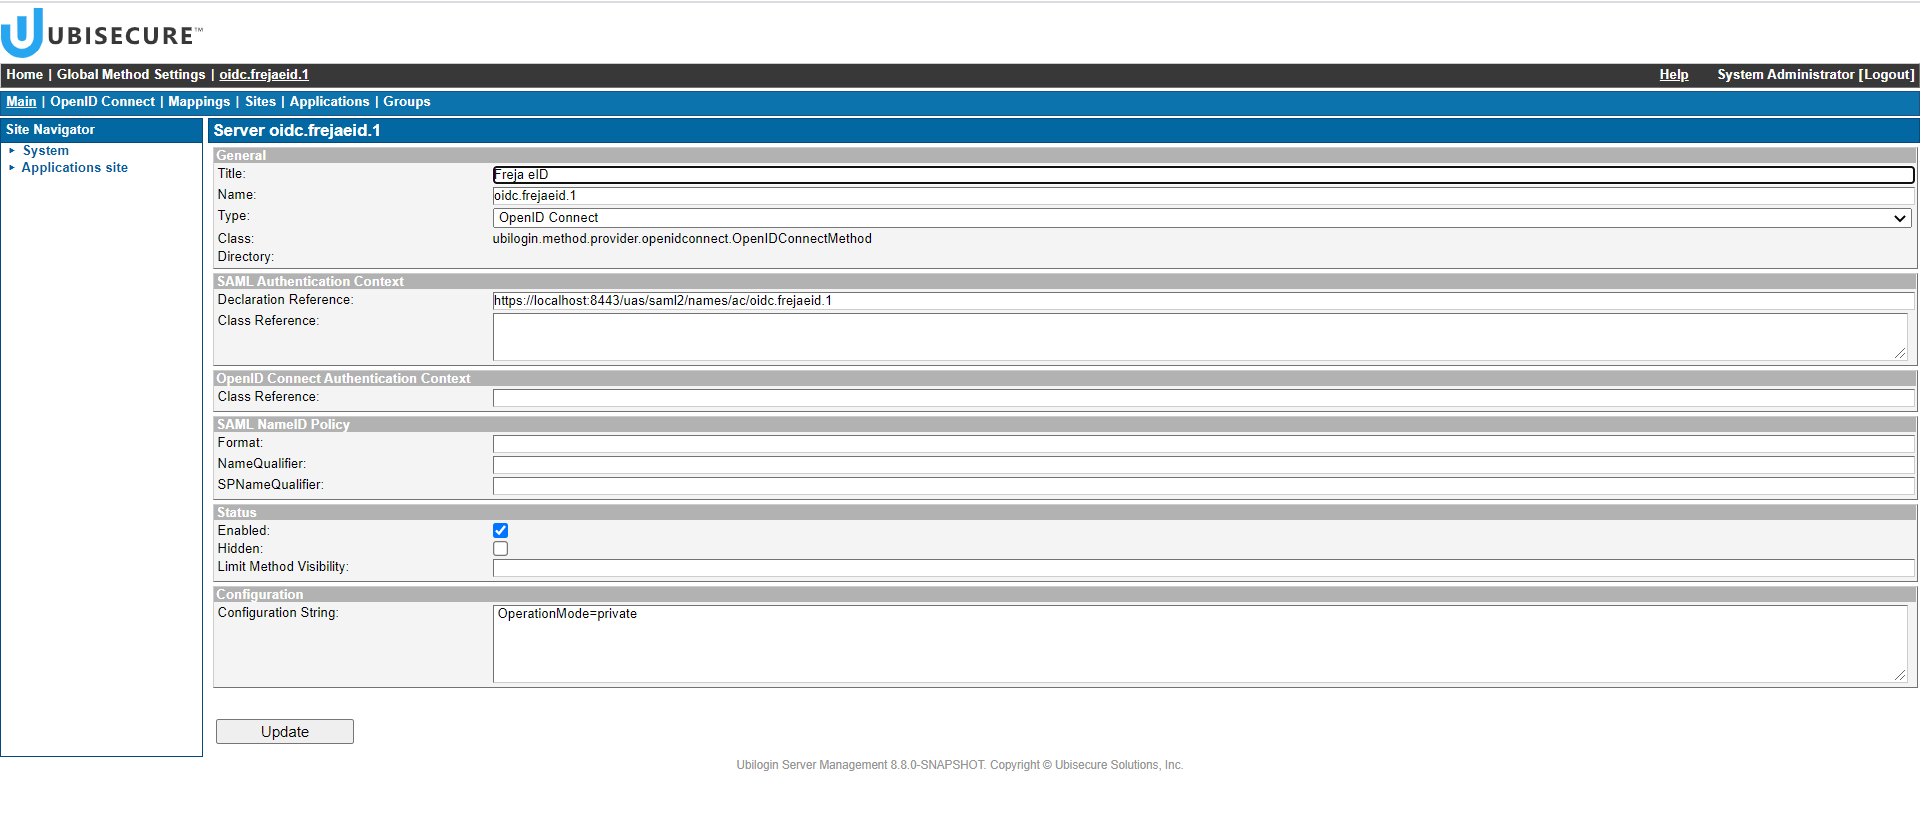
- Go to "Main" tab, select "Enabled" box and add a configuration string: "OperationMode=private" and press “Update”.
- The configuration of the method is now done. Next you need to add it to your application.
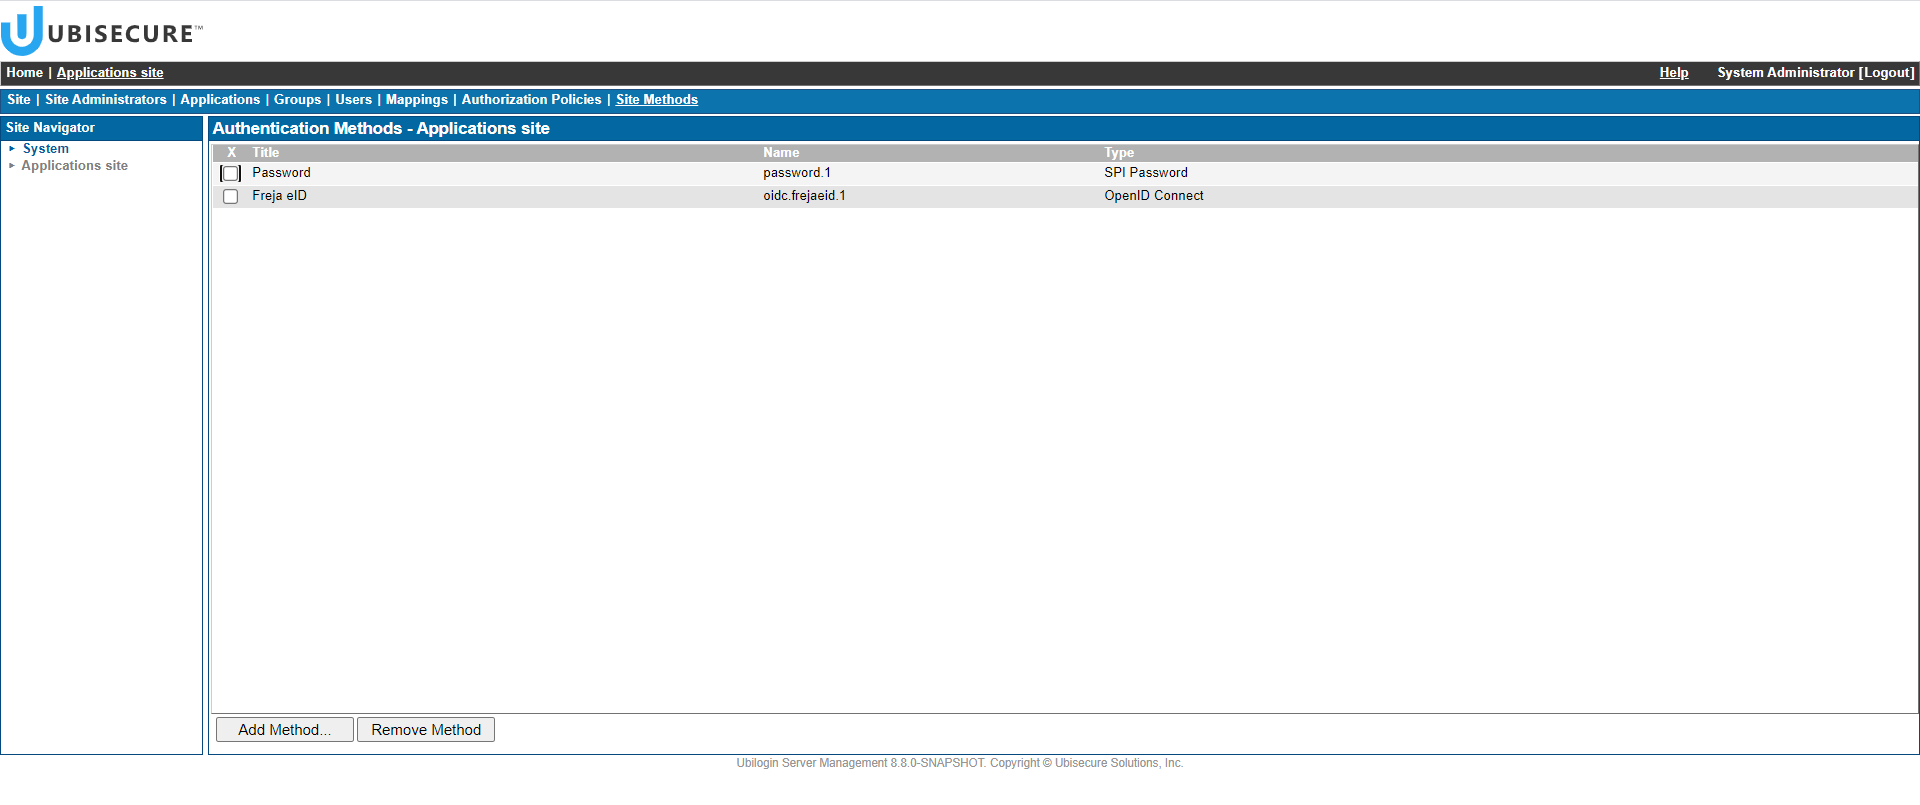
- First, add the method on site level of your application. Go to “Site methods” - “Add method...” and choose “Freja eID” method.
- Create a dynamic group for access control, where membership is based on the authentication method used to log in. In the site view, go to “Groups” – “New Group...”, and create a group, e.g “Freja eID users”. Then, in the group view, go to “Allowed Methods” tab, select the authentication method “Freja eID” and press “Update”.
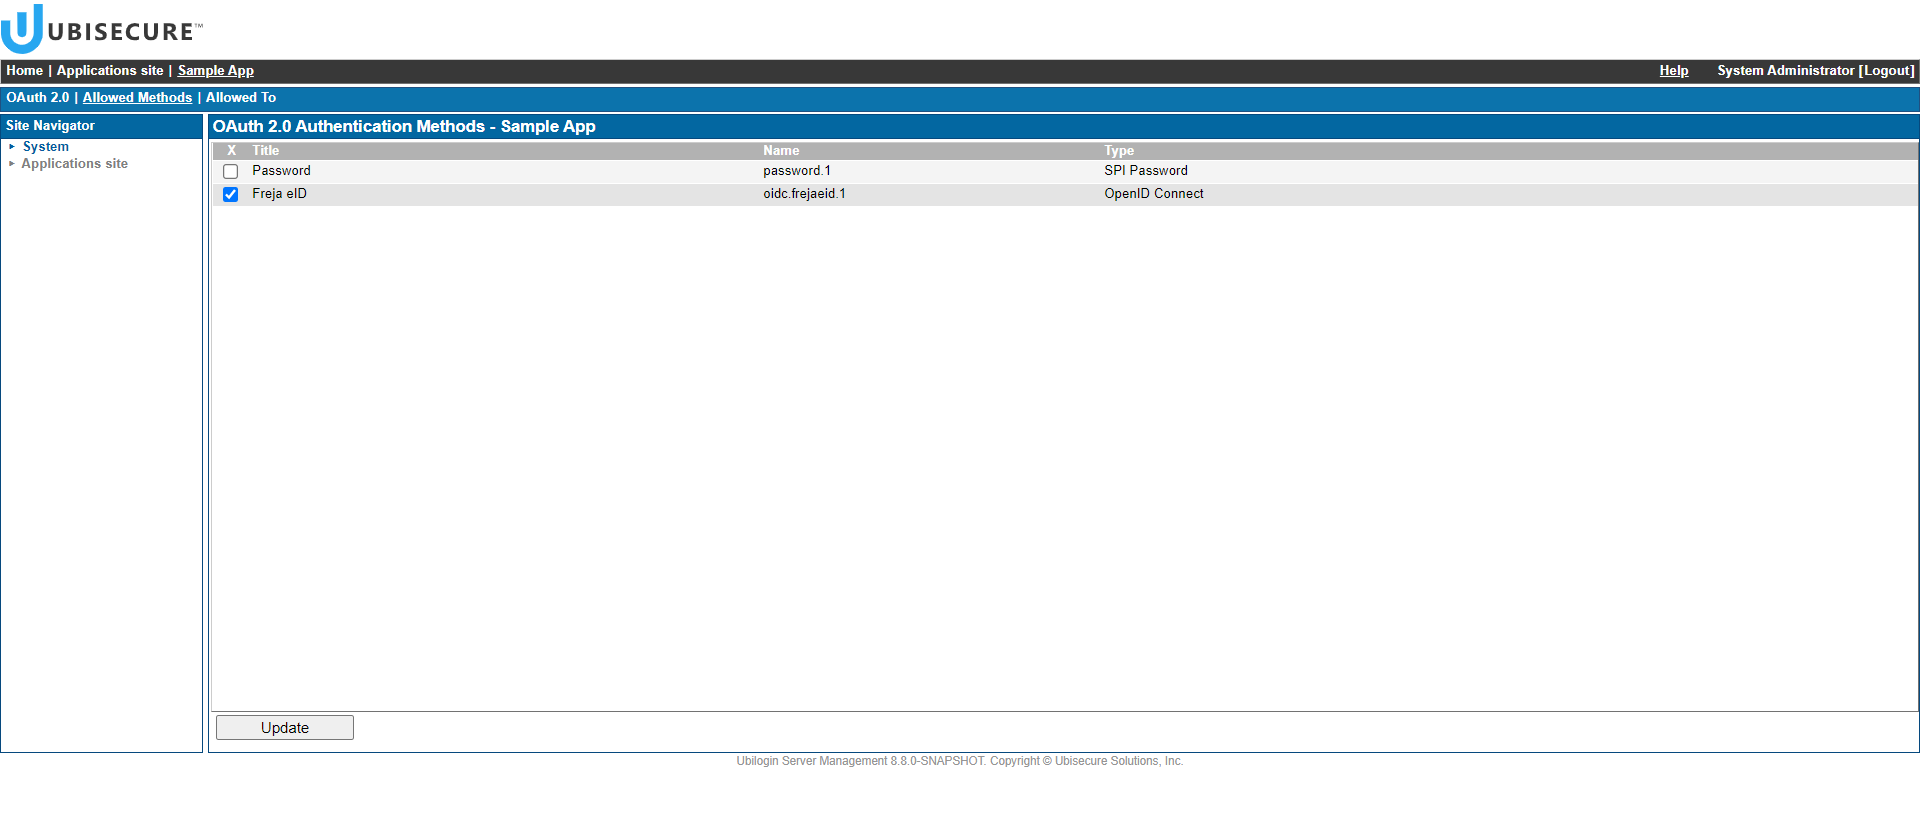
- Go to your application and in “Allowed Methods” tab select “Freja eID” method and press “Update”.
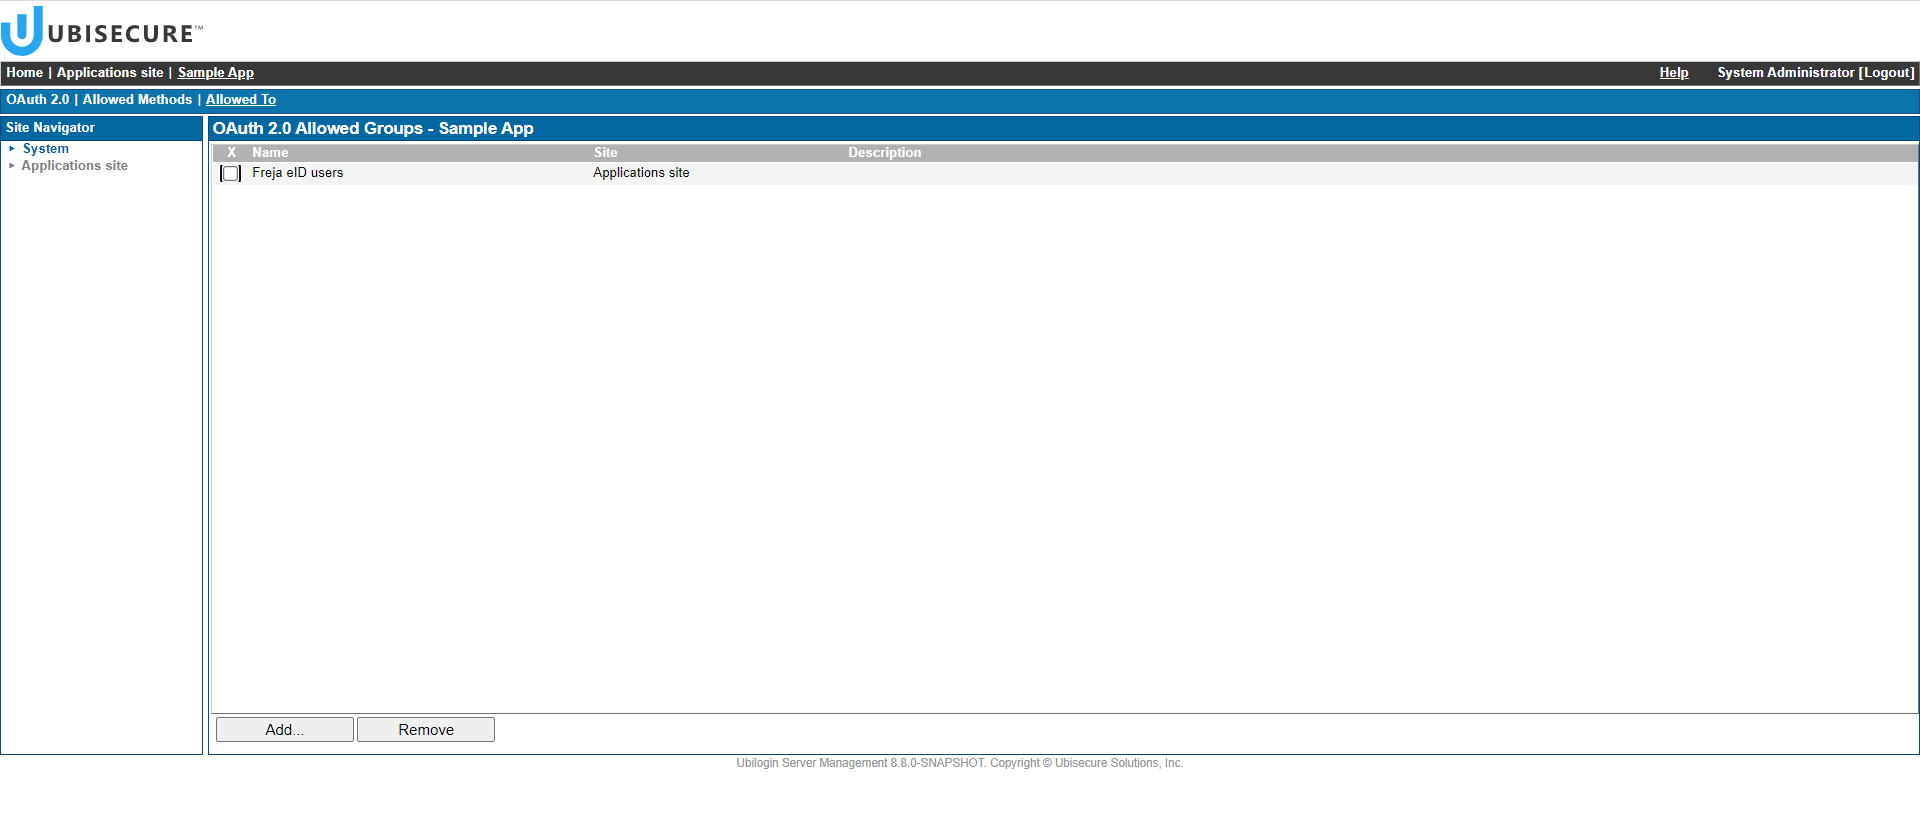
- Go to “Allowed To” tab, press “Add...” and add the group “Freja eID users”.
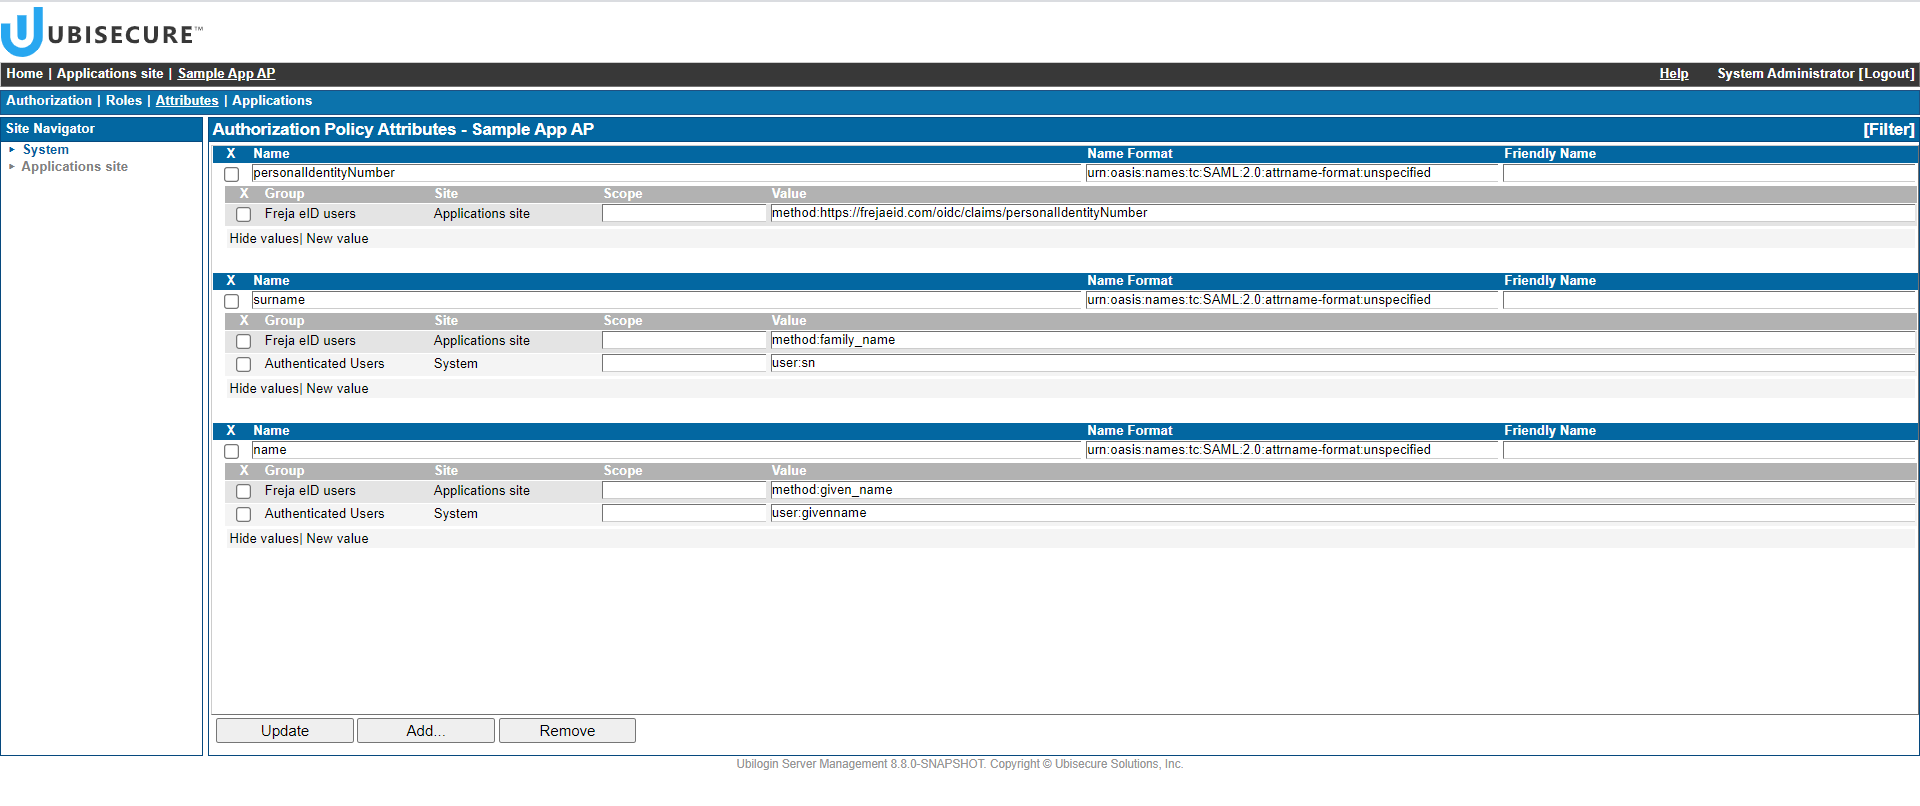
Last step is to configure an Authorization Policy, so that your application can receive the claims from Freja eID correctly.
Note: The values of the Authorization Policy’s attributes should be in the format: method:<claim>
- If your application already has an Authorization Policy, then you can modify it by adding new values to the existing attributes. Press “New value” and choose group “Freja eID Users"
- Otherwise, create a new Authorization Policy. In site view, go to “Authorization Policies” – “New Policy...”. Go to “Attributes”, press “Add...” and choose group “Freja eID Users” and modify the values. Link the policy to the application by going to "Applications" tab - "Add..." and choose your application.
- Now the configuration is done, users should be able to log in using Freja eID and your application should receive the claims you have chosen.
In case of testing environment, you can test your configuration by using the Freja eID mobile app in the test mode.
Note: If the login request to Freja eID fails, it may be due to special configuration of your application. For example, having "Force Reauthentication" on makes a request that Freja eID is not able to process at this moment.
Additional links
SSO Management API OpenID Connect method configuration
Configuring authentication method's logo
Freja eID mobile app testing instructions
Freja eID OpenID Connect integration guide