Installation
- Tomi Pelttari
The installation steps are as follows:
Task | Description | Complete |
|---|---|---|
1 | Review system requirements and upgrade if required |
|
2 | Create account or acquire administrator access to SuccessFactors |
|
3 | Manually create metadata from template and create agent in Ubisecure Management for SuccessFactors |
|
4 | Send certificate and service addresses to SuccessFactors |
|
5 | Configure SuccessFactors error addresses with SuccessFactors support |
|
6 | Test SuccessFactors login and logout |
|
Ubisecure SSO Configuration
Google Apps does not sign the AuthnRequest which is sent to UAS. By default, UAS requires that all AuthnRequest messages are signed. To support Google Apps, unsigned AuthnRequest messages must be enabled.
To enable SSO for SuccessFactors:
- Add the compatibility flag MetadataCertificate to the Ubisecure SSO Server main screen and press Update.
Create a new SAML SP in any appropriate site
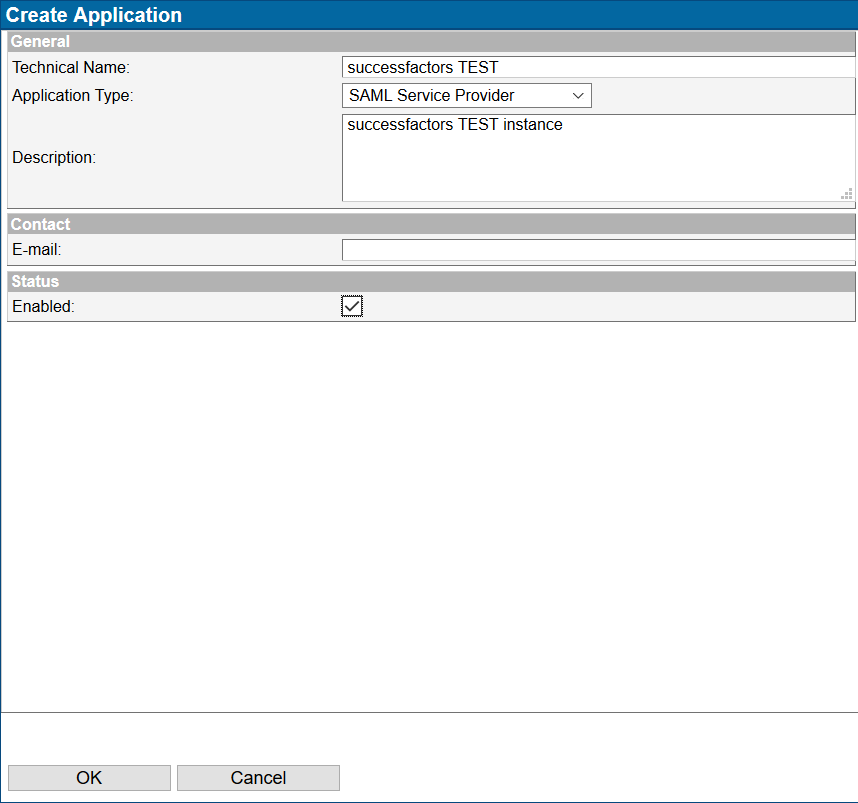
Figure 1. Create SAML Application SuccessFactors do not provide SAML Metadata. Use the model SAML metadata below and update
X509Certificate,HTTP-Redirect Location,HTTP-Redirect ResponseLocationandHTTP-POST Locationif the SuccessFactors test address have changed. Replace XXXX with the ID provided by SuccessFactors. The company ID is case sensitive. Otherwise, copy the text below to the clipboard.
If the SuccessFactors environment changes or certificate expires, replace the certificate with the new certificate provided by SuccessFactors.SAML Metadata template for SuccessFactors:<md:EntityDescriptor xmlns:md="urn:oasis:names:tc:SAML:2.0:metadata" xmlns:saml="urn:oasis:names:tc:SAML:2.0:assertion" ID="_9fd7509105128c5b6d2ad1cc1be0f5c0ce5bd074" entityID="https://www.successfactors.com" xmlns:mdui="urn:oasis:names:tc:SAML:metadata:ui" xmlns:mdattr="urn:oasis:names:tc:SAML:metadata:attribute"> <md:SPSSODescriptor AuthnRequestsSigned="true" WantAssertionsSigned="true" protocolSupportEnumeration="urn:oasis:names:tc:SAML:2.0:protocol"><md:KeyDescriptor><ds:KeyInfo xmlns:ds="http://www.w3.org/2000/09/xmldsig#"> <ds:X509Data> <ds:X509Certificate> MIICDTCCAXagAwIBAgIETAl/KDANBgkqhkiG9w0BAQUFADBLMQswCQYDVQQGEwJVUzEbMBkGA1UE ChMSU3VjY2Vzc2ZhY3RvcnMuY29tMQwwCgYDVQQLEwNPcHMxETAPBgNVBAMTCFNGIEFkbWluMB4X DTEwMDYwNDIyMzMxMloXDTI1MDYwMjIyMzMxMlowSzELMAkGA1UEBhMCVVMxGzAZBgNVBAoTElN1 Y2Nlc3NmYWN0b3JzLmNvbTEMMAoGA1UECxMDT3BzMREwDwYDVQQDEwhTRiBBZG1pbjCBnzANBgkq hkiG9w0BAQEFAAOBjQAwgYkCgYEAkS3xlwL9v/5kHmfnW0fy2JzIDvHKK4TmkZYHN+JHBLRRzNtl Go1f4yUseMjVn4RF1W11uEqnBySokXv5FYoPd1guJ1Xt3u2Xnj52l/lG4S7ichsPwF3ddDk+pWbK F29Ixt0iBN+keknSRyNGdh9jtOekCg6xq4i4YndwKCucABUCAwEAATANBgkqhkiG9w0BAQUFAAOB gQBzhTmtBbnXpT1aTWDa3PRUx8fWTx/oPjL7xP+WeoTJZmeY4N1c6Q3aZ+u+MhxvmhyDTGo43pyy FVBQjiFzrZUEAAPUrLr7M0e4kGULhxE1p2jnBNfzmVYK397+QPHD2kN/BIzVcMBFsrS+fpdDGWnz j1hjuGLNO/XuPO9eSBRkZA== </ds:X509Certificate> </ds:X509Data> </ds:KeyInfo></md:KeyDescriptor> <md:SingleLogoutService Binding="urn:oasis:names:tc:SAML:2.0:bindings:HTTP-Redirect" Location="https://performancemanager4.successfactors.com/saml2/LogoutServiceHTTPRedirectResponse?company=XXXX" ResponseLocation="https://performancemanager4.successfactors.com/saml2/LogoutServiceHTTPRedirectResponse?company=XXXX"></md:SingleLogoutService> <md:AssertionConsumerService Binding="urn:oasis:names:tc:SAML:2.0:bindings:HTTP-POST" Location="https://performancemanager4.successfactors.com/saml2/SAMLAssertionConsumer?company=XXXX" index="0" isDefault="true"></md:AssertionConsumerService></md:SPSSODescriptor> </md:EntityDescriptor>
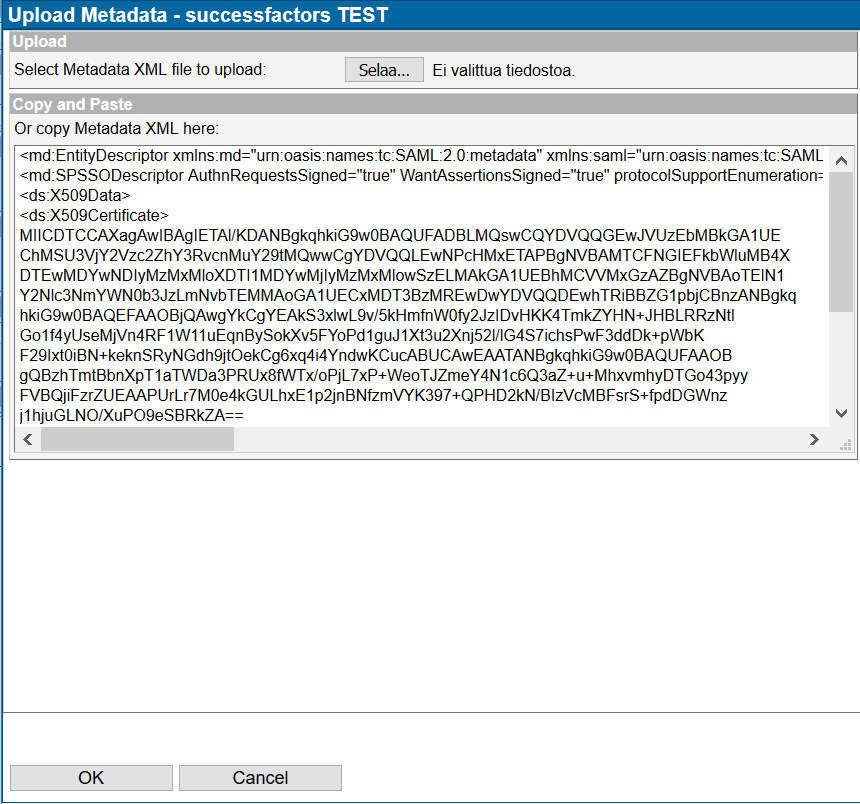
Figure 2. Importing metadata into SAML Application - Press Update
- Add the groups of all allowed users to the "Allowed to" tab of the application.
- Under the Methods tab, select the methods with which the users will log in. As SuccessFactors is an application aimed at internal staff, typically Windows Authentication Provider should be used to permit passwordless SSO to the SuccessFactors application.
Create an Authorization Policy from the Authorization Tab of the same site. Complete the information below
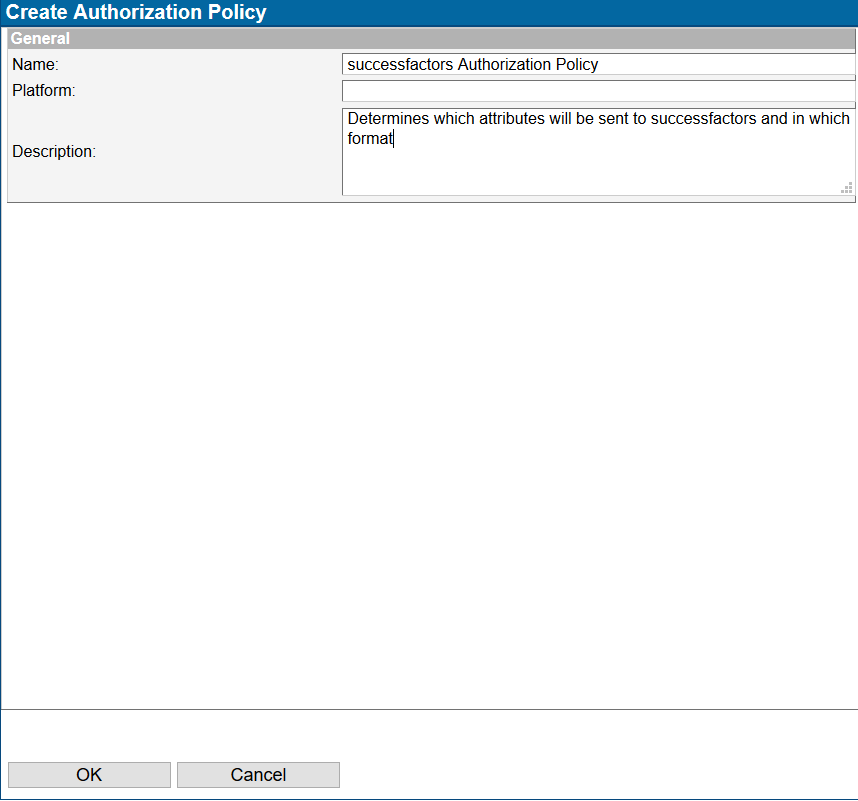
Figure 3. Creating an authorization policy Select the Attributes tab from the Authorization Policy. Complete the information below.
When adding an attribute to the authorization policy, select a group containing all of the SuccessFactors users. If no group exists, this group must be created.
The following statement sets the NameID to the user uid and the NameFormat to unspecified.The example below allows all CustomerID users to login. This CustomerID environment uses email address as the user ID.
The value in the screen shot value field is:${nameID.value(user.uid).format('unspecified')}Adjust this value to match the source of attribute that SuccessFactors uses as the userid. If the user ID is email address, this value would be:
${nameID.value(user.mail).format('unspecified')}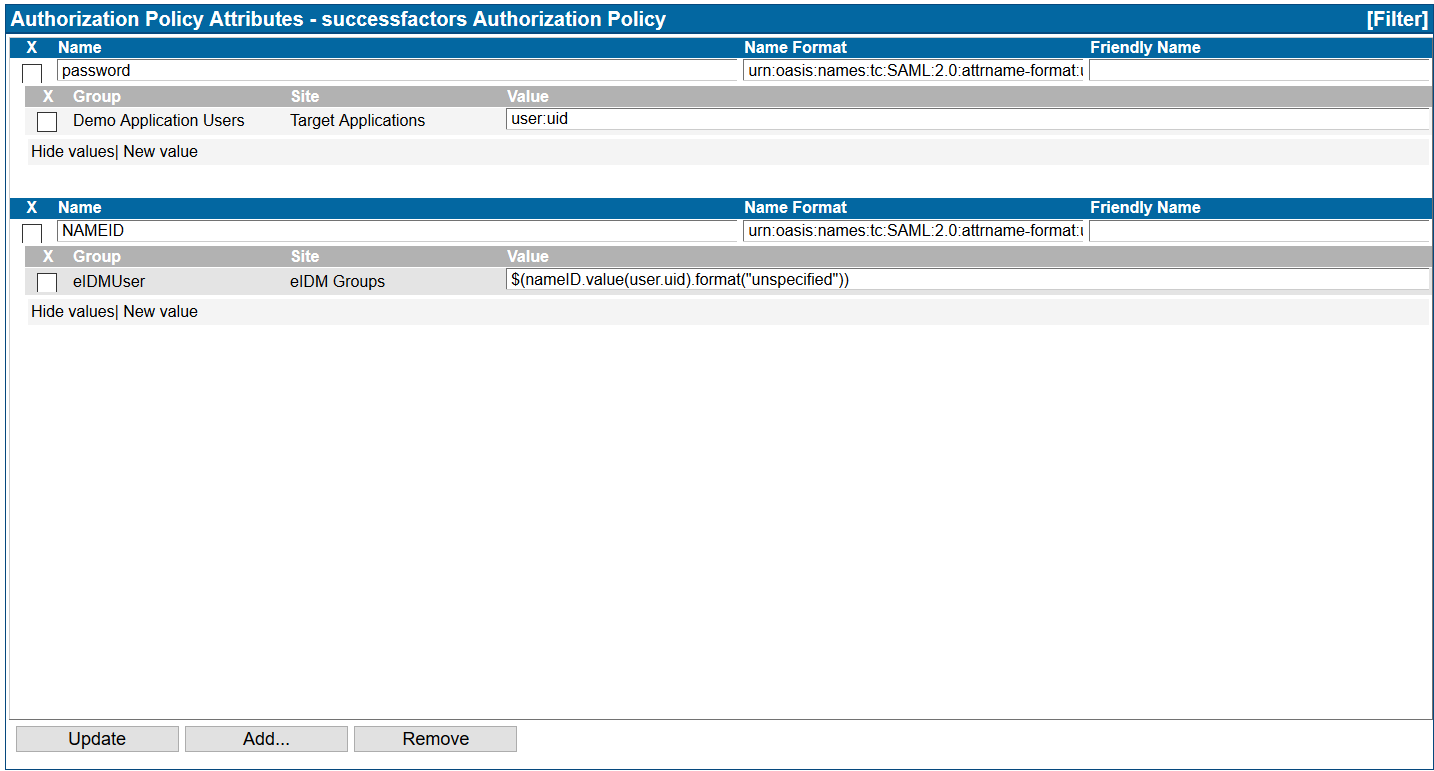
Figure 4. Adding attributes to the Authorization Policy NOTE: The password attribute may or may not be required depending on the configuration of the SuccessFactors environment. In the example above, the userID is sent as the password. It was unclear from SuccessFactors if this is actually required information or not.
Attach the Authorization Policy to the SuccessFactors TEST application from the Applications tab. The Authorization Policy should now be visible on the application configuration screen.
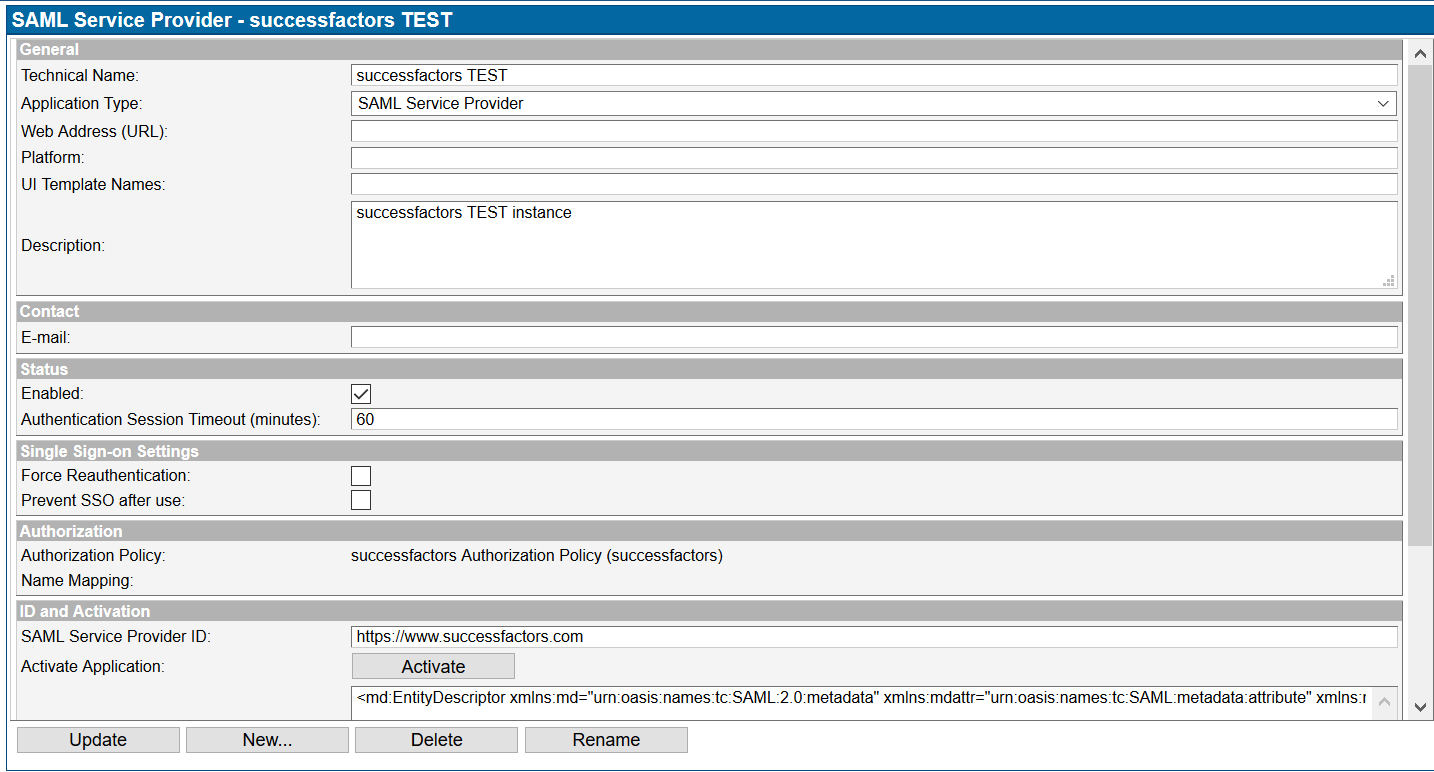
Figure 5. Authorization Policy visible on Application configuration screen
SuccessFactors Account Configuration
SuccessFactors completes all required configuration for SingleSignOn.
Provide the following information to SuccessFactors
- I'd like to receive a PEM formatted X.509 certificate
Either give the address https://UAS_URL/uas/saml2/metadata.xml or copy the first certificate from the same file and add "-----BEGIN CERTIFICATE-----" as the first line and "-----END CERTIFICATE-----" without the quotes. - Are you going to use an Assertion Signature? YES
- Are you going to use a Response Signature? YES
- Are you expecting a Login Request Signature? YES
- What is the SAML Issuer value? This value is found under the word Metadata on the main home screen of Ubilogin Management. It is also the EntityID value in the metadata at https://UAS_URL/uas/saml2/metadata.xml
- Global logout service URL is the UAS logout URL: http://UAS_URL/uas/logout
- SuccessFactors can optionally redirect the users to URLs in the event of errors. The following URLs can be provided to SuccessFactors for use:
- URL when session timeout
- URL for Invalid Login URL redirect
- URL for Missing credential Redirect
- URL for Invalid Manager URL redirect
- URL for Offline URL redirect